Hack A Solar Garden Light Into A Flashlight

solargardenflashlight

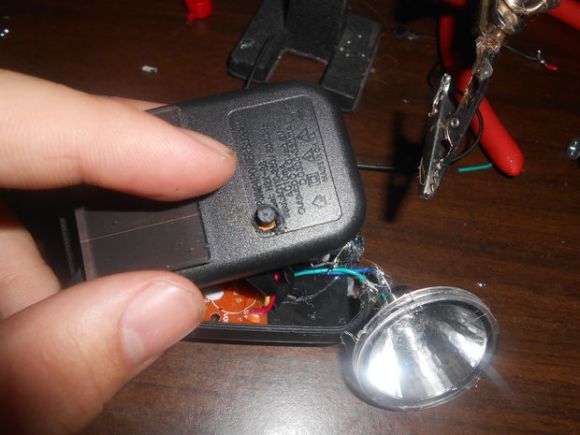
While browsing through his local dollar store, [Taylor] came across a suspicious looking rock that, upon closer inspection, turned out to be a solar garden light. He scooped it up, took it home and cracked it open, modding it to function as a handheld solar flashlight.

Inside was a pathetically small 40mAh rechargeable battery, which he upgraded to a more standard rechargeable AA. The garden rock came pre-built with its own boost converter to kick up the voltage for the LED, but it was fairly dim. We’re guessing [Taylor] didn’t bother reverse engineering the converter and instead simply did some trial and error, but he managed to increase the LED’s brightness by slapping on a different value inductor.

As fun as it may be to have a rock for a flashlight, [Taylor] decided to cobble together a custom case out of a spare USB charger, making a battery holder and adding a pushbutton. The result is a handy solar flashlight that takes around five hours to charge. Check out some other custom lights: a lithium-powered PVC flashlight or one with a snazzier aluminum body and interchangeable heads.

RepRap Wally Can Print Larger Versions Of Itself

SCARA based 3D printers seem to be all the rage these days, and with good reason. This RepRap Wally doesn’t use any linear rods or timing belts — in fact, it can even print larger versions of itself with each iteration! Well, minus the electronics of course.

It was first spotted out in the wild at the NYC Makerfaire, and looks to be a pretty slick design. Using fully 3D printed limbs, the steppers move the arms using a fishing line. To reduce the load on the joints, a bowden extruder is also used. The really cool part of this is the z-axis, it uses a 4-bar linkage to stay level, but because of this, it also moves along an arc in the y-axis as it raises or lowers. This is accounted for in the firmware — otherwise you’d have some rather interesting curved prints!

Stick around after the break to see it in action, it’s a nice change to watch from the standard gantry style printers.

Continue reading “RepRap Wally Can Print Larger Versions Of Itself”

A Simple Forth Development Board

forth

Forth is a very interesting programming language. It’s very flexible and is extremely efficient on low powered hardware, but unfortunately not very popular simply due to the fact that it’s not very popular. There were a few Forth-based microcomputers built in the 1980s, but these were largely unsuccessful.

[Leon] is a Forth aficionado and came up with his own Forth development board in the hopes of Forth making a comeback. It’s a very small and cheap board – only about $12 in parts – but it’s still extremely powerful and a fun platform for investigating Forth.

Compared to other programming languages found in 80s microcomputers, Forth is just weird. It’s a stack-based language, so instead of adding two numbers like 3 + 4, Forth uses postfix notation (or Reverse Polish Notation) so the same statement is expressed as 3 4 +. It’s a much more efficient way for computers to handle data, and some claim it’s more efficient for humans as well.

[Leon] created his own board able to be programmed in Forth, shown above, that uses an ATMega328 microcontroller. He’s using AmForth to put Forth on his system, but also extended the base AmForth install with his own floating point version. making this version of Forth at least as powerful as any 80s microcomputer or ATMega development board is today.

[Leon] put together a great demo of the capabilities of Forth and his dev board. You can check that out below.

Continue reading “A Simple Forth Development Board”

GE Garage And Chicago Ideas Week

IMG_0443

I’ve been on vacation and managed to get a day to play at the GE Garage mobile fab lab currently setup in downtown Chicago. GE has partnered with Chicago Ideas Week to bring the future of fabrication technologies to a space where the community can walk in off the street and work with some amazing hardware like CNC mills, laser cutters and 3D printers. The group is also giving classes at select times on using the equipment and general electrics. Unfortunately I was in town near the end of this event which will be Oct 20th. If you are in the area I do recommend jumping on the excellent transportation you’ll find in Chicago and have some fun at the space. Here are more details on location, classes and times.

I didn’t expect to squeeze any work into my vacation but I did take a guided tour of the fab space with my iPhone 5s.  You can join me after the break to watch the tour, which is a bit rough but still covers a lot of fun topics. Get at look at their line-up or Replicator 2 3D printers. See some fantastic prints from metal made on industrial scale printers. Learn more about the up-scaled CNC seen above that was cutting out skateboard decks. And finish up with an injection molding machine.

Continue reading “GE Garage And Chicago Ideas Week”

European Hackerspace Tour

Eurotrip

Wow! What a response we received on our Calling European Hackerspaces post! First off, thank you for such a warm welcoming to your hackerspaces. It looks like HaD is going to have to be way more active in touring and profiling hackerspaces!

Now unfortunately we’re just not going to have time to visit all of the ones suggested, but we’ve outlined a few of the ones we definitely want to check out!

We created a Google spreadsheet to help do this, so if your hackerspace has been mentioned, OR if it happens to be very close to the others and you really want us to come, please fill out some contact info on the spreadsheet so we can setup a time to visit! If you don’t want to put contact info in a shared document, send an email to the tips line instead with the subject [European Hackerspace Tour]. Because its unlikely our trip will coincide with any open nights, we’d love (need) to have someone to show us the space at potentially odd hours!

I will be writing an individual post for each hackerspace tour with lots of photos and details on all the juicy projects you guys are working on. And if we have time, we might even film the tour!

Once again, thank you for the amazing response and we can’t wait to meet all of you in person!

Build An FPGA Microbee In Three (Not So) Easy Steps

Microbee,_Melbourne_Museum

[Brad Robinson] was feeling a bit nostalgic for his Microbee, so he rebuilt it in an FPGA. Not once, but three times. For the uninitiated, the Applied Technology Microbee was a Z80 based computer 1980’s. Designed in Australia, the Microbee did not see much popularity outside its home continent. Even so, the introduction to home computers many Australians was on a Microbee. [Brad] actually wrote several programs for the Microbee, including some games sold by Applied Technology themselves.

Fast forward to 2012, [Brad] is learning FPGAs, and wants to build a Microbee in VHDL. The FPGAbee was born. The first iteration of the FPGAbee began with the CPU, which came from the T80 open source VHDL Z80 core. Around this core [Brad] added the video controller, keyboard, and sound. When he started adding disk functionality, [Brad] ran into some problems. He wanted to use a FAT formatted SD card for cassette and hard disk emulation.

The relative complexities of the FAT format meant he would have to use some custom software to make this work. [Brad] decided to run this software on a second Z80 core. Both cores would need access to memory, and this is where [Brad] learned what he calls “a hard lesson in cross domain clocks” on FPGAs. Multiple clock nets can cause major propagation delay issues. [Brad] was able to work through the problems, but it caused him to step back and re-evaluate the entire design. This was the start of FPGABee2.

Continue reading “Build An FPGA Microbee In Three (Not So) Easy Steps”

Testing DRAM From A Commodore 64

dram

A few months ago, [Josh] was given an old Commodore 64. He needed to make an AV cable and find a new power supply, and even after testing these new parts out, [Josh] found it still wouldn’t boot. Not one to look a gift horse in the mouth — or perhaps he enjoys the challenge — he set out on restoring a thirty year old circuit board.

He replaced a few chips and the caps, but found he had no way to test the DRAM chips. Compared to SRAM or Static RAM used by other computers of the era, DRAM is a bit harder to interface, requiring a capacitor in each memory cell to be refreshed a few dozen times every second. With a bit of help from his good friend [CNLohr], [Josh] figured out a circuit to read and write to his chips and build a small board based on the ATmega8U2 microcontroller for testing purposes.