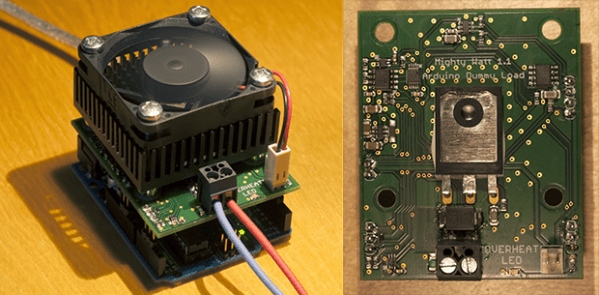
Ghostly Images Captured Only On Camera

is that a logo

A while back our good buddy [Ch00f] built a QR code clock, unreadable to both humans and computers. A human couldn’t read the clock because of the digital nature of a QR code, and because the clock used persistence of vision in driving the LEDs, a digital camera can’t capture all the pixels in the QR code at the same time. It’s a highly useless but impressive art piece. Now, [Ch00f] is turning that build on its head. He created a rudimentary display that is invisible to the human eye, but easily detected with a digital camera.

This build exploits a basic property of CMOS digital cameras – the rolling shutter. Because it takes time to get pixels off a modern digital image sensor, each picture is actual a composite of many different strips, each taken slightly out of sequence. You can see this for yourself by taking a picture of something rotating very fast with your camera phone; a picture of an airplane propeller will make the blades appear curved, or look like [Dr. Seuss] has an aeronautical engineering degree.

To create his display, [Ch00f] found a few inexpensive fiber optic lights. By aligning a few of these into columns and lighting them up in a precise sequence, he can exploit the rolling shutter and make an image appear. To the human eye, it looks like a solid wall of illuminated fiber optics.

As for how practical this build is, [Ch00f] says not much. For cell phone cameras, you’d need to have a very, very short exposure time for this to work. The only way to do that is to make this display unbelievably bright, or just put it out in the sun. We can’t see that being practical for any potential use case, but we’d be more than happy to see a large-scale attempt at displaying images with this technique.

Paper ROM

This low-resolution memory device packs in just a few bytes of data. But it’s enough to spell out [Michael Kohn’s] name. He’s been experimenting with using paper discs for data storage.

His technique becomes immediately clear when you view the demo video below. The disc spins multiple times with the sensor arm reading one track. This gives the system the chance to measure the black band in order to get the data timing figured out. Once the outer track has been read the servo controlling the read head swings it to the next until all of the data is captured.

An Arduino is monitoring the QTR-1RC reflectance sensor which makes up the reading head. It uses the black band width in order to establish the size of an individual byte. Interestingly enough, the white parts of the disc do not contain data. Digital 0 is a black area 1/4 the width of the large black strip, and digital 1 is half as wide.

[Michael’s] set up the generator which makes the discs so that he can easily increase the resolution. The limiting factor is what the reading hardware is able to detect.

Continue reading “Paper ROM”

How Do You Think This Quadcopter Feels?

how-does-this-quadcopter-feel

You don’t speak the language of dogs and yet you can tell when one is angry, excited, or down in the dumps. How does that work, and can it be replicated by a robot? That’s the question which [Megha Sharma] set out to study as part of her graduate research at the University of Manitoba in Winnipeg.

The experiment starts by training the robot in a series of patterns meant to mimic emotion. How, you might ask? Apparently you hire an actor trained in Laban Movement. This is a method of describing and dealing with how the human body moves. It’s no surprise that the technique is included in the arsenal of some actors. The training phase uses stationary cameras (kind of like those acrobatic quadcopter projects) to record the device as it is moved by the actor.

Phase two of the experiment involves playing back the recorded motion with the quadcopter under its own power. A human test subject watches each performance and is asked to describe how the quadcopter feels. The surprising thing is that when asked they end up anthropomorphising the inanimate device even further; making up small stories about what the thing actually wants.

It’s an interesting way to approach the problem of the uncanny valley in robotic projects.

Continue reading “How Do You Think This Quadcopter Feels?”

Building Han Solo’s Blaster

blaster


It’s no secret that [Adam Savage] of Mythbusters fame is a huge fan of replica props, going so far as to make a Maltese Falcon out of Sculpey. This time, though, he’s doing one better for the nerds in the crowd by building the most accurate replica of Han Solo’s blaster ever.

Replica prop gurus already know [Lucas]’ original prop department based Han Solo’s BlasTech DL-44 blaster off an existing gun – the Mauser C96. Along with this gun, there were a few extra bits and bobs tacked onto this gun, including an old German scope, a flash hider from an aircraft machine gun, and even a few bits of metal from a model airplane.

All these extra parts and greeblies are very hard, if not impossible to find. Thankfully, there are a bunch of very skilled replica prop makers reproducing these parts for anyone who wants a very accurate DL-44 Blaster. [Norm] from Tested and [Adam] assembled these parts into an incredibly accurate replica of the ‘hero’ blaster – by far the most identifiable of Solo’s many iterations of blaster seen in Star Wars ep. IV.

Kebab Skewer Quadcopter

kebab-skewer-quadcopter

Quadcopters are the epitome of high-tech hobby electronics. We’re quite used to seeing the frames built out of modern materials (carbon fiber, 3d printed, etc). But it’s pretty hard to beat the strength-to-weight ratio of kebab skewers. You heard us correctly. [Shiny Shez] built his quadcopter frame from kebab skewers.

You might want to get that Boy Scout Handbook out and brush up on your lashing skills. Lashing is a method of using rope (string in this case) to fasten together wooden sticks (bamboo kebab skewers). Once the lashed joints are precisely oriented [Shiny] applies a liberal coat of super glue to cement them in place.

He went the easy route when it comes to control hardware. You can get spare parts for the Husban X4, a commercially available quadcopter. Its main controller is used here. The single board controls the motors, monitors an IMU to keep the aircraft stable while in flight, and includes a wireless transceiver. On the receiving side [Shiny] uses an Arduino with a wireless module. This way he can control the quadcopter from his laptop, or go one step further and use an Android phone.

Your Resume All Cinched Up In LaTeX

latex-resume

Engineers just do things differently, which is why this hack makes a lot of sense to us. Instead of choosing a platform like Open Office to maintain his resume [Campbell Hennessy] renders his employment and references using LaTeX.

We separate content from styling on the web all the time using CSS and content management systems (Hackaday uses WordPress). And with the online component of employment history and job applications becoming progressively more important it makes a lot of sense to prepare your CV accordingly.

LaTeX is a markup language that makes graphically pleasing typesetting effects a snap. We’ve seen it used to label resistor storage tubes and server side hacks to embed the markup in HTML. If you haven’t tried it out yourself just grab your resume (which probably needs updating anyway), a LaTeX rendering tool of your choice, crack those knuckles, and follow along with [Campbell’s] experience.

The Perils Of Cheap MIDI Adapters

MIDI

[Arvydas] recently bought a Rock Band 3 Wii keyboard thinking it would be an excellent and very inexpensive (£9.99) MIDI controller. The keyboard has a proper DIN-5 MIDI out port, so theoretically the only thing needed to plug this into a computer is a USB to MIDI adapter. Unlike the keyboard, the MIDI adapter was a cheap piece of Chinese cruft, but given some ingenuity and a handful of components, he was able to get everything working.

The 30-year-old MIDI specification includes a few schematics on how to properly connect MIDI devices together. The most important part of these schematics is an optoisolater on the MIDI in, a valuable addition considering early MIDI keyboards cost thousands of dollars. It seems [Arvydas]’ MIDI to USB adapter didn’t include this vital component, instead replacing it with a simple resistor. Anything to keep costs down, right?

To get the MIDI adapter working, [Arvydas] headed over to Maplin and bought an optioisolator, With everything wired up on a breadboard, he got it to work and eventually transplanted the circuit to the adapter’s PCB.

It’s a great piece of work to get this MIDI adapter functioning, especially since it’s doubtful the cheap adapter would have worked with any MIDI device.