Hackaday Prize judge, hacker extraordinaire, and generally awesome dude [Sprite_TM] spends a lot of time at his computer, and that means a lot of time typing on his keyboard. He recently picked up a board with the latest fad in the world of keyboards, a board with individually addressable LEDs. He took this board to work and a colleague jokingly said, ‘You’ve had this keyboard for 24 hours now, and it has a bunch of LEDs and some arrow keys. I’m disappointed you haven’t got Snake running on it yet.” Thus began the quest to put the one game found on all Nokia phones on a keyboard.
The keyboard in question is a Coolermaster Quickfire Rapid-I, a board that’s marketed as having an ARM Cortex CPU. Pulling apart the board, [Sprite] found a bunch of MX Browns, some LEDs, and a 72MHz ARM Cortex-M3 with 127k of Flash and 32k of RAM. That’s an incredible amount of processing power for a keyboard, and after finding the SWD port, [Sprite] attempted to dump the Flash. The security bit was set. There was another way, however.
Coolermaster is actively working on the firmware, killing bugs, adding lighting modes, and putting all these updates on their website. The firmware updater is distributed as an executable with US and EU versions; the EU version has another key. Figuring the only difference between these versions would be the firmware itself, [Sprite] got his hands on both versions, did a binary diff, and found only one 16k block of data at the end of the file was different. There’s the firmware. It was XOR encrypted, but that’s obvious if you know what to look for.
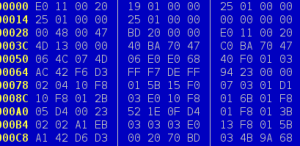 The firmware wasn’t complete, though; there were jumps to places outside the code [Sprite] had and a large block looked corrupted. There’s another thing you can do with an executable file: run it. With USBPcap running in the background while executing the firmware updater, [Sprite] could read exactly what was happening when the keyboard was updating. With a small executable that gets around the weirdness of the updater, [Sprite] had a backup copy of the keyboard’s firmware. Even if he bricked the keyboard, he could always bring it back to a stock state. It was time to program Snake.
The first part of writing new firmware was finding a place that had some Flash and RAM to store the new code. This wasn’t hard; there was 64k of Flash free and 28K of unused RAM. The calls to the Snake routine were modified from the variables the original firmware had. If, for example, the original keyboard had a call to change the PWM, [Sprite] could change that to the Snake routine.
Snake is fun, but with a huge, powerful ARM in a device that people will just plug into their keyboard, there’s a lot more you can do with a hacked keyboard. Keyloggers and a BadUSB are extremely possible, especially with firmware that can be updated from a computer. To counter that, [Sprite] added the requirement for a physical condition in order to enter Flash mode. Now, the firmware will only update for about 10 seconds after pressing the fn+f key combination.
There’s more to playing Snake on a keyboard; Sprite has also written a new lighting mode, a fluid simulation thingy that will surely annoy anyone who can’t touch type. You can see the videos of that below.
Continue reading “[Sprite_TM]’s Keyboard Plays Snake” →