Clever Chemistry Leads To Much Faster 3D Printing

Resin printing, it can be messy but you get really great resolution thanks to the optical nature of curing the sticky goo with light from a projector. Soon it will have a few more notches in its belt to lord over its deposition cousins: speed and lack of layers. A breakthrough in resin printing makes it much faster than ever before and pretty much eliminates layering from the printed structure.

The concept uses an oxygen-permeable layer at the bottom of the resin pool. This inhibits curing, and apparently is the source of the breakthrough. The resin is cured right on the border of this layer and allows for what is described as a continuous growth process rather than a layer-based approach. One of the benefits described is no need for resin to flow in as the part is extracted but we’re skeptical on that claim (the resin still needs to flow from somewhere). Still, for us the need to work with resin which is expensive, possibly messy, and has an expiry (at least when compared to plastic filament) has kept deposition as a contender. The speed increase and claims of strength benefits over layer-based techniques just might be that killer feature.

The technology is coming from a company called Carbon3D. They are branding it CLIP, or Continuous Liquid Interface Production. After the break you can see a video illustration of the concept (which is a bit too simple for our tastes) as well as a TED talk which the company’s CEO, [Joseph Desimone] gave this month. Of course there is also the obligatory time-lapse print demo.

So what do you think: game changer or not, and why do you feel that way? Let us know in the comments.

Continue reading “Clever Chemistry Leads To Much Faster 3D Printing”

Ugly Upgrade Keeps The Tunes Playing Longer

[Sam] picked up a Sansa Clip audio player to listen to some tunes while working on projects. He liked the fact that he could run the Rockbox alternative firmware on the device, but thought the 15 hour battery life needed some improving. He swapped out the stock cell with a larger Lithium cell for a long life of 50-60 hours. It’s an upgrade fom 300 mAh to 1100 mAh, but as you can see, the size of the replacement made for some interesting case modification.

The battery swap required more than just taking one battery out and putting in the other. [Sam] is using a cellphone battery as the replacement and he didn’t want to have issues with the internal circuitry. He took the cell out of its plastic enclosure, removing the circuit board in the process. That PCB is the charging circuit, which he replaced with the one from the stock battery. After insulating the cell with a layer of Kapton tape he soldered it to the MP3 player and did his best to adhere all the parts to each other.

Sure, its ugly, but that makes it right at home on the work bench.

A New Method For Adding Audio Input To A Sansa Clip+

The Sansa Clip+ is a nice little MP3 player and recorder. But it doesn’t offer an input connector, instead relying on the built-in microphone. [Simon Frank] wanted to extend its functionality so he figured out how to add a standard audio jack for analog input.

This is not the first time this has been done, but [Simon] has found a different method of accomplishing the task at hand. The other external input hack we saw cannibalized the internal microphone, rerouting its connections as an external input. But the method seen here keeps that microphone intact. The device includes an FM radio chip which is attached to an ADC on one of the devices other integrated circuits. [Simon] just patched into those signals. Now all he has to do is set up the device to record from the radio and connect his source to the jack which he epoxied to the base of the enclosure.

Build Your Own SOIC Progamming Clip

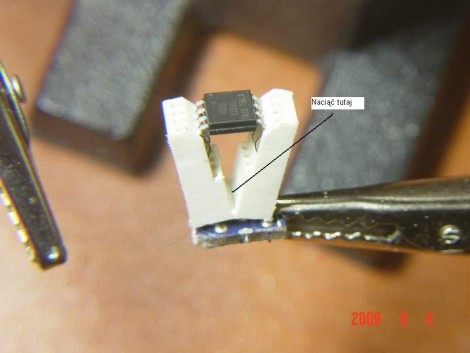
[Pyra] was looking for a way to reprogram some ATtiny13 microcontrollers in a SOIC package. He’s re-engineering some consumer electronics so adding an ISP header to the design isn’t an option. He had been soldering wires to the legs of every chip but this is quite tedious. What he needs is an adapter that can make physical contact with the legs just long enough to program new firmware. After looking around he discovered that a PCI socket can be used as a progamming clip (translated). It shares the same pitch as a standard SOIC package but is not wide enough for the chip. He cut out 4 rows of the socket and the section of motherboard it was soldered to. Then he made a cut down the middle of the plastic and bent the two sections apart. The image above illustrates this, but not shown are the eight wires that he later added to connect to the device.

We wonder if this can be adapted to program SOIC parts without removing them from a circuit board. That would be a handy tool for finishing up the LED lightbulb hack.