Build A Plate Reverb From Ikea

Back before we all pirated FruityLoops, before ProTools, and before VSTs and DAWs, audio recording was much, much cooler. Reverbs were entire rooms. Sometimes they were springs. Sometimes, in the high-end music studios, reverbs were plates. These plate reverbs were simply a gigantic sheet of metal mounted in a box about ten feet long, four feet high, and a foot thick. Inside, you had some transducers, some pickups, and not much else. Send a signal into the plate reverb and it will bounce around on this flexible membrane, and  emerge through the output in a suitably reverberant form.

Of course, very few places have a plate reverb anymore because they’re gigantic and expensive and software effects are small and cheap. That doesn’t mean a plate reverb is made of unobtanium. [Leo] just made his own plate reverb out of Ikea shelves and some simple electronics.

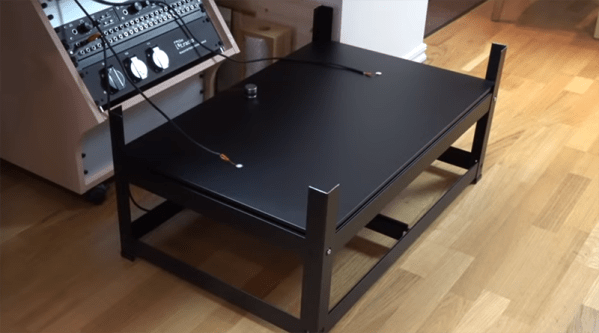
This build used an Ikea Bror shelving unit that cost about $50 sans meatballs. The electronics are a surface transducer and two piezo pickups. Total cost was about $100. That’s all that’s needed to put this plate reverb together, but the real trick is making it work as a reverb.

The plate is driven by the audio output of [Leo]’s computer, through a battery-powered amp, and into a transducer. The transducer is then simply placed on the metal shelf. The two piezo pickups are placed on either end of the shelf, with one going to the right channel of one input, the other going to the left channel of the same input. From there, it’s a simple matter of using this Ikea shelf in an effects loop.

From the video below, the setup absolutely works. [Leo] is playing a few drum loops through the reverb, and the results sound like they should. There’s also a neat trick in using a shelf as a reverb; by placing a rag or a cardboard box on the shelf, the reverb is dampened allowing you to ‘mix’ this reverb in real time.

Continue reading “Build A Plate Reverb From Ikea”

Building A Plate Reverb On The Cheap

For those who don’t spend their free time creating music with experimental audio effects, a plate reverb is essentially a speaker. It just happens to be, by design, a rather poor one. Rather than using a paper cone for a diaphragm like a traditional speaker, the plate reverb uses as you might guess, a metal plate. As the plate vibrates along with the source audio, a set of piezoelectric pickups convert that to an output. The end result is that audio fed into the plate reverb comes out with a nice echo effect.

But despite their relative simplicity, a plate reverb costs thousands of dollars. They’re so expensive that the majority of people just emulate the effect in software. But it doesn’t have to be that way. [Sammartino] and an audio engineer friend recently came up with a detailed guide for building a plate reverb that cost about 10% of commercially available models.

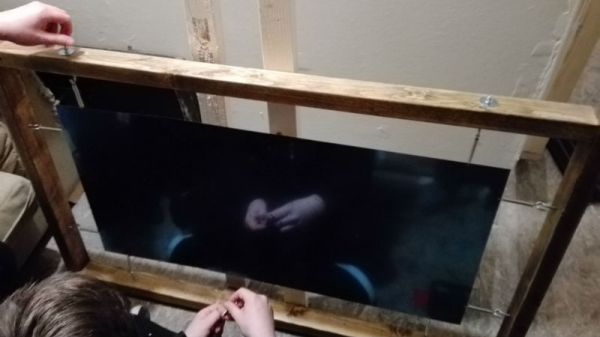
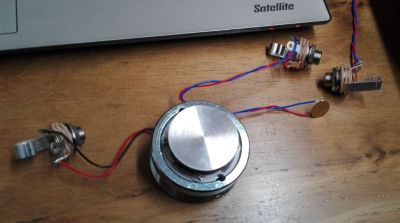
The construction is fairly simple. A wooden frame is built, and eight hooks are installed around the edges. The plate is suspended between these hooks using guitar strings, which holds it tight but with enough give to vibrate along with the tunes. Another board is attached across the center of the frame to support the electronics: a transducer to vibrate the plate, and two piezo pickups to convert that to an audio signal, and a couple jacks and some wiring to tie it all together.

For a different take on the DIY plate reverb, check out this one we covered all the way back in 2013. If you’re in the market for something a bit larger, we’ve got you covered there as well.

Build A DIY Plate Reverb

PlateReverb

[Telegraphy] needed a reverb for his recording studio. There are hundreds of computer-based and standalone digital reverb systems out there, but he decided to build his own plate reverb. Reverb is an effect used in many professional audio and music recordings. Reverb adds thousands of echos to an audio signal. These echos decrease in amplitude over time. When used correctly, the effect is generally very pleasing to the ear.

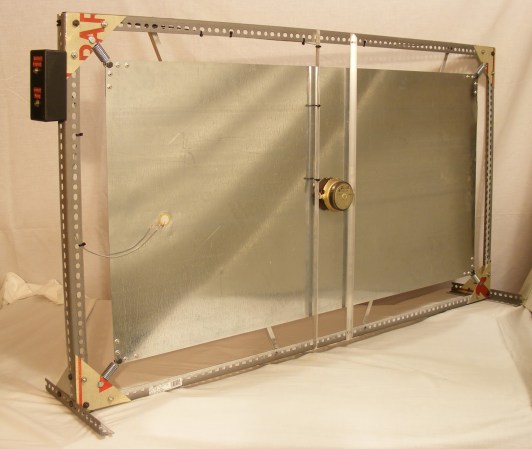
A plate reverb uses a plate of sheet metal to generate the reverb. An audio driver is placed in contact with the metal plate. Audio is fed into the driver, which vibrates the plate. The vibrations travel along the surface of the plate, bouncing off the edges and reflecting back. These reflections are captured by a pickup, which then converts them to a voltage signal. The final reverb effect is actually created in the sound engineer’s mixing board when the “dry” source signal is mixed with the signal returned by the plate.

[Telegraphy’s] plate reverb was built almost entirely from found, Radio Shack, and hardware store parts. The plate and frame are from Lowes. The audio driver is a cut up speaker from an old car stereo. The pickup is a modified piezo transducer from Radio Shack. As [Telegraphy] states several times, there are a lot of differing opinions on exactly how and where to mount the various parts of the reverb. Any placement will generate some reverb. The question is where and how to mount things for the best effect. Much like beauty and the eye of the beholder, the answer to that question is in the ear of the listener.

Jump past the break for a tour of a slightly more involved plate reverb at Gallery Acoustics Studio.

Continue reading “Build A DIY Plate Reverb”

DIY Spring And Plate Reverb

If you’re running your own recording studio, you’re going to need a lot of gear that seems excessively esoteric to the non-musically inclined. A rack full of synth gear looks just like any other cabinet of technology you would find in a server room. Electronic music is, for the most part, very utilitarian looking, but there are a few pieces that add a very nice aesthetic touch to any studio. [Peter] made two great looking pieces of hardware – both reverbs – that significantly add to the decor of his studio. As a bonus, they also sound really good.

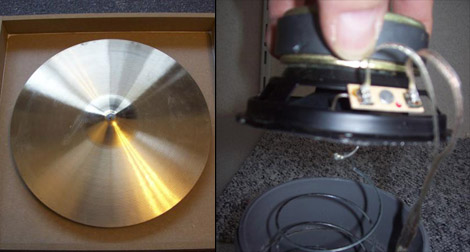
[Peter]’s spring reverb (Dutch, Google translate) works just the same as any other spring reverb; a speaker puts some music into a slightly stretched spring, and this sound is picked up by another transducer at the opposite end. For this build, [Peter] used a Slinky and a piece of PVC pipe left over from a bathroom remodel. Adding a few jacks, pots, and a preamp, [Peter] had a very nice and extremely large spring reverb.

The plate reverb (translation) is also a staple of pro recording studios around the globe. This reverb is somewhat similar to a spring reverb, except the spring is replaced with a tuned metal plate. [Peter] used a cymbal from a drum set for this piece of kit. Two speakers are attached to the back of the cymbal, one feeds a sound into the cymbal, the other speaker picks up those sounds and sends it to the mixing board.

There’s a lot of really cool musical DIY projects over on [Peter]’s site, along with a few audio demos for each of his DIY projects. We’ve included his reverb demos after the break, feel free to give those a listen.

Thanks go to [geekabit] for sending this one in.

Continue reading “DIY Spring And Plate Reverb”