An Englishman And 48 Gameboys Walk Into A Bar…

The original Nintendo Gameboy is perhaps one of the most revered platforms for the music known as chiptune. Primarily, artists will use the console with software like LSDJ or Nanoloop to produce their compositions. Some artists will even use two consoles when performing live. However, that’s all fairly quaint as far as [LOOK MUM NO COMPUTER] is concerned.

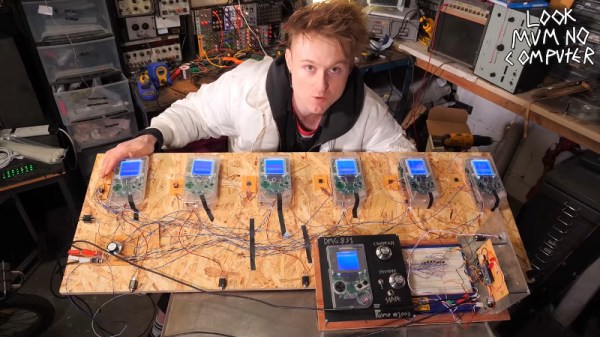
Back in 2016, a rig was constructed with three Gameboys. With each console having 3 oscillators and a noise channel, this gave plenty of scope. There was even a facility to detune the oscillators for a fatter sound.

Yet there remains a universal human philosophy – more is always better. In this vein, the plan is to create a monster machine consisting of 48 Gameboy consoles. This offers a somewhat maddening 144 oscillators and 48 noise channels to play with. The plan is to produce a massive synthesizer capable of producing incredibly thick, dense tones with up to six note polyphony.

The hardware side of things is at once simple and ingenious. Buttons on the consoles are connected together for remote control using ribbon cables and transistors. System clocks for the consoles are provided by a LTC1799 oscillator chip, which allows the clock to be modulated for audio effects. Initial tests with up to six Gameboys running from a single clock source have been remarkably successful.

Any mad scientist could see the genius involved in this project, and we can’t wait to see the full rig in operation. If you’re just getting started with Gameboy music, check out this primer on modding your Gameboy for hi-fi sound. Video after the break.

Continue reading “An Englishman And 48 Gameboys Walk Into A Bar…”

MIPI CSI-2 Implementation In FPGAs

[Adam Taylor] always has interesting FPGA posts and his latest is no exception. He wanted to use a Zynq for image processing. Makes sense. You can do the high-speed parallel parts in the FPGA fabric and do higher-level processing on the built-in CPU. The problem is, of course, you need to get the video data into the system. [Adam] elected to use the Mobile Industry Processor Interface (MIPI) Camera Serial Interface Issue 2 (CSI-2).

This high-speed serial interface is optimized for data flowing in one direction. The camera, or the master, sends a number of bits (at least one) serially with one clock. To increase speed, data transfers on both rising and falling clock edges. The slave also has a pretty standard I2C master to send commands to the camera which, for the purposes of I2C, is the slave.

Continue reading “MIPI CSI-2 Implementation In FPGAs”

Adopting An Orphaned Ultralight

Owning and flying your own small airplane offers a nearly unmatched level of freedom and autonomy. Traveling “as the crow flies” without having to deal with traffic on the ground immediately shrinks your world, and makes possible all sorts of trips and adventures. Unfortunately the crippling downsides of plane ownership (storage and maintenance costs, knowledge that you might die in a fiery crash, etc), keeps most of us planted squarely on terra firma.

But not [ITman496]. His dream of owning an ultralight has recently come true, and he’s decided to share his experience with the world. He’s got a long way to go before he slips the surly bonds of Earth, but there’s no better place to start than the beginning. In a recent blog post he documents the process of getting his new toy home, and details some of the work he plans on doing to get it airworthy.

The plane in question is a Mini-MAX that [ITman496] has determined is not only older than he is, but has never flown. It was built by a retired aircraft mechanic who unfortunately had problems with his heart towards the end of assembly. He wisely decided that he should find a safer way to spend his free time than performing solo flights in an experimental aircraft, so he put the plane up for sale.

After a considerable adventure transporting the plane back home, [ITman496] found it was stored in such good condition that the engine started right up. But that doesn’t mean it’s ready for takeoff by any stretch of the imagination. For his own safety, he’s planning on tearing down the entire plane to make sure everything is in good shape and assembled correctly; so at least he’ll only have himself to blame if anything happens when he’s in the air.

One the plane’s structure is sound, he’ll move on to some much needed engine modifications including a way to adjust the air-fuel mixture from inside the cockpit, improvements to the cooling system, and installation of a exhaust system that’s actually intended for the two-stroke engine he has. When that’s done, [ITman496] is going to move onto the real fun stuff: creating his own “glass cockpit”.

For Hackaday readers who don’t spend their time playing make believe in flight simulators, a “glass cockpit” is a general term for using digital displays rather than analog gauges in a vehicle. [ITman496] has already bought two daylight-readable 10.1″ IPS displays which he plans on driving over HDMI with the Raspberry Pi. No word on what his software setup and sensor array will look like, but we’re eager to hear more as the project progresses.

If you’re not lucky enough to find a mostly-complete kit plane nearby on Craigslist, you could always just make your own airplane out of sheets of foam.

Build A Plate Reverb From Ikea

Back before we all pirated FruityLoops, before ProTools, and before VSTs and DAWs, audio recording was much, much cooler. Reverbs were entire rooms. Sometimes they were springs. Sometimes, in the high-end music studios, reverbs were plates. These plate reverbs were simply a gigantic sheet of metal mounted in a box about ten feet long, four feet high, and a foot thick. Inside, you had some transducers, some pickups, and not much else. Send a signal into the plate reverb and it will bounce around on this flexible membrane, and  emerge through the output in a suitably reverberant form.

Of course, very few places have a plate reverb anymore because they’re gigantic and expensive and software effects are small and cheap. That doesn’t mean a plate reverb is made of unobtanium. [Leo] just made his own plate reverb out of Ikea shelves and some simple electronics.

This build used an Ikea Bror shelving unit that cost about $50 sans meatballs. The electronics are a surface transducer and two piezo pickups. Total cost was about $100. That’s all that’s needed to put this plate reverb together, but the real trick is making it work as a reverb.

The plate is driven by the audio output of [Leo]’s computer, through a battery-powered amp, and into a transducer. The transducer is then simply placed on the metal shelf. The two piezo pickups are placed on either end of the shelf, with one going to the right channel of one input, the other going to the left channel of the same input. From there, it’s a simple matter of using this Ikea shelf in an effects loop.

From the video below, the setup absolutely works. [Leo] is playing a few drum loops through the reverb, and the results sound like they should. There’s also a neat trick in using a shelf as a reverb; by placing a rag or a cardboard box on the shelf, the reverb is dampened allowing you to ‘mix’ this reverb in real time.

Continue reading “Build A Plate Reverb From Ikea”

SDR Is At The Heart Of This Soup-Can Doppler Radar Set

Want to explore the world of radar but feel daunted by the mysteries of radio frequency electronics? Be daunted no more and abstract the RF complexities away with this tutorial on software-defined radar by [Luigi Cruz].

Taking inspiration from our own [Gregory L. Charvat], whose many radar projects have graced our pages before, this plunge into radar is spare on the budgetary side but rich in learning opportunities. The front end of the radar set is almost entirely contained in a LimeSDR Mini, a software-defined radio that can both transmit and receive. The only additional components are a pair of soup can antennas and a cheap LNA for the receive side. The rest of the system runs on GNU Radio Companion running on a Raspberry Pi; the whole thing is powered by a USB battery pack and lives in a plastic tote. [Luigi] has the radar set up for the 2.4-GHz ISM band, and the video below shows it being calibrated with vehicles passing by at known speeds.

True, the LimeSDR isn’t exactly cheap, but it does a lot for the price and lowers a major barrier to getting into the radar field. And [Luigi] did a great job of documenting his work and making his code available, which will help too. Continue reading “SDR Is At The Heart Of This Soup-Can Doppler Radar Set”

Katrina Nguyen Automates Her Mice

When embarking on a career in the life sciences, it seems like the choice of which model organism to study has more than a little to do with how it fits into the researcher’s life. I once had a professor who studied lobsters, ostensibly because they are a great model for many questions in cell biology; in actuality, he just really liked to eat lobster. Another colleague I worked with studied salt transport in shark rectal glands, not because he particularly liked harvesting said glands — makes the sharks a tad grumpy — but because he really liked spending each summer on the beach.

Not everyone gets to pick a fun or delicious model organism, though, and most biologists have had to deal with the rats and mice at some point. It’s hard to believe how needy these creatures can be in terms of care and feeding, and doubly so when feeding is part of the data you’re trying to collect from them. Graduate student Katrina Nguyen learned this the hard way, but rather than let her life be controlled by a bunch of rodents, she hacked a solution that not only improved her life, but also improved her science. She kindly dropped by the Hackaday Superconference to tell us all about how she automated her research.

Continue reading “Katrina Nguyen Automates Her Mice”

Wonderful Sculptural Circuits Hide Interactive Synthesizers

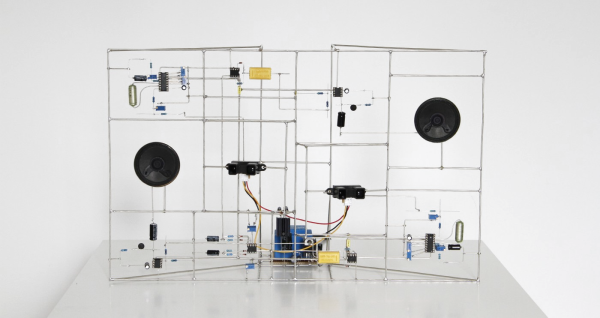
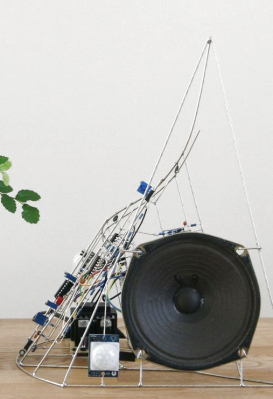
When it rains, it pours (wonderful electronic sculpture!). The last time we posted about freeform circuit sculptures there were a few eye-catching comments mentioning other fine examples of the craft. One such artist is [Eirik Brandal], who has a large selection of electronic sculptures. Frankly, we’re in love.

A common theme of [Eirik]’s work is that each piece is a functional synthesizer or a component piece of a larger one. For instance, when installed the ihscale series uses PIR sensors to react together to motion in different quadrants of a room. And the es #17 – #19 pieces use ESP8266’s to feed the output of their individual signal generators into each other to generate one connected sound.

Even when a single sculpture is part of a series there is still striking variety in [Eirik]’s work. Some pieces are neat and rectilinear and obviously functional, while others almost looks like a jumble of components. Whatever the style we’ve really enjoyed pouring through the pages of [Eirik]’s portfolio. Most pieces have demo videos, so give them a listen!

If you missed the last set of sculptural circuits we covered this month, head on over and take a look at the flywire circuits of Mohit Bhoite.

Thanks [james] for the tip!