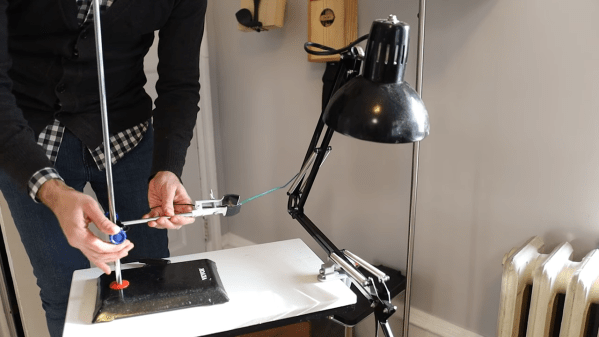
Ray's panels on the wall - circles of different sizes (from 60 to 15cm in diameter) covered by fabric of different shades, their arrangement vaguely resembling a cloud.

DIY Acoustic Panels Or Modern Artwork? Can’t Tell

The acoustic properties of a room have a surprising impact when you want to use a microphone. [RayP24]’s son was trying to make his bedroom into a better recording studio, and for [Ray], that turned into an artfully-executed wall panel project. Fortunately, the process is documented so we all can learn from it. When it comes to acoustics, you can often get a whole lot of improvement from surprisingly few changes. And, as this project demonstrates, you can make it look like a decorative piece to boot.

When arranged and placed on the wall, these panels look like an art piece, a decoration you could get from a somewhat fancy store. If you show them to someone, they might not believe that they also serve as a functioning home acoustics improvement, dampening the sound quite well for audio recording needs. The panels are built out of individual circles, cut out in a way that uses as much of a 3/16″ (5mm) plywood sheet as possible, with hollow circles serving as frames to attach foam-backed fabric. In the Instructables post, [Ray] talks quite a bit about how you can assemble your own and what liberties you can take. There’s also a short video accompanying this project, which you can see after the break. This project is begging to be recreated.

There’s a sizeable amount of hacking-meets-home improvement-meets-home acoustics projects out there, especially lately, when so many people are stuck at home for one reason or another. Just a few months ago, we covered another marvelous “art piece turned reverb killer” project operating by a slightly different principle, and also going a bit more into the theory. Perhaps in a few years, we will no longer have to build panels or structures for our soundproofing needs, as purpose-grown mycelium shapes will do that for us. And once it becomes a question of where to hang your newly-built acoustic panels, this simple guide is a good place to start.

Continue reading “DIY Acoustic Panels Or Modern Artwork? Can’t Tell”

Zac shows off his sound diffusion panels

Taking The Bark Out Of Reverb With Wood Scraps

For the past few years, many have become used to having virtual meetings in their homes. Spaces like kitchen tables, couches, spare bedrooms, and hammocks in the yard have all become “offices”. As you can imagine, many of these spaces aren’t well known for their acoustic qualities. [Zac] built a sound diffusion art piece out of scrap pieces of wood to help his office sound better when recording.

Reverb is caused by sound bouncing off hard, flat surfaces like drywall. These reflections are picked up by the microphone and lead to a noticeable drop in perceived sound quality. There are generally two ways to kill reverb in a space: diffusion and absorption. Diffusion is the technique that [Zac] is going for, with thousands of faces at different angles and locations, it breaks up the harsh reflections into millions of tiny reflections. Absorption is usually accomplished with foam and other typically soft substances.

[Zac] happened to have a large pile of offcuts and extra material from past projects of various wood species, making it easy to make a visually interesting piece. He used a table saw to rip them to a consistent width and a drum sander reduced them all to the same depth. Next, the long sticks were cut with a miter saw into 5 different lengths, leaving him with thousands of little pieces of wood. The hard part began when he had to glue several thousand pieces to a plywood backer board with CA glue. Sanding, finishing with poly, and a french cleat made the three pieces ready to hang on the wall.

Overall, the effect is stunning. While we’d love more hard data on the improvement, it certainly does sound better anecdotally. If you’re interested in more woodworking, take a look into making an inlay without a CNC. Video after the break.

Continue reading “Taking The Bark Out Of Reverb With Wood Scraps”

Dub Siren, a 555-powered synthesizer

Classic Chip Line-Up Powers This Fun Dub Siren Synth

There’s a certain elite set of chips that fall into the “cold, dead hands” category, and they tend to be parts that have proven their worth over decades, not years. Chief among these is the ubiquitous 555 timer chip, which nearly 50 years after its release still finds its way into the strangest places. Add in other silicon stalwarts like the 741 op-amp and the LM386 audio amp, and you’ve got a Hall of Fame lineup for almost any project.

That’s exactly the complement of chips that powers this fun little dub siren. As [lonesoulsurfer] explains, dub sirens started out as actual sirens from police cars and the like that were used as part of musical performances. The ear-splitting versions were eventually replaced with sampled or synthesized siren effects for recording studio and DJ use, which leads us to the current project. The video below starts with a demo, and it’s hard to believe that the diversity of sounds this box produces comes from just a pair of 555s coupled by a 741 buffer. Five pots on the main PCB control the effects, while a second commercial reverb module — modified to support echo effects too — adds depth and presence. I built-in speaker and a nice-looking wood enclosure complete the build, which honestly sounds better than any 555-based synth has a right to.

Interested in more about the chips behind this build? We’ve talked about the 555 and how it came to be, taken a look inside the 741, and gotten a lesson in LM386 loyalty.

Continue reading “Classic Chip Line-Up Powers This Fun Dub Siren Synth”

The Sixtyforgan Proves That Church Organs Are Definitely Chiptune

Church organs may be mechanically complicated and super old-school, but they share something in common with the earliest computer sound chips. In theory, and largely in practice, they produce very simple waveforms. The primary reason that church organs seem so full and rich compared to your old Commodore 64 is that they have the benefit of a whole church’s worth of reverb to fatten out the sound. [Linus] demonstrates this with the Sixtyforgan.

The Sixtyforgan is a Commodore 64 hooked up to a spring reverb tank. By running the relatively basic waveforms from the Commodore’s SID chip through this reverb, it’s possible to generate sounds that are eerily similar to those you might hear at your local Sunday service. While we won’t expect chiptune luminaries like [chipzel] to start busting out songs of praise at events like Square Sounds, it’s kind of awesome to think of the composers of antiquity rocking out to some mad Game Boy jams way back when.

It’s a great demonstration of the Commodore’s musical abilities, and we particularly like the application of the chromatic button layout borrowed from the accordion. We’d love to see this setup combined with an orchestra of the retro computers, like this demonstration playing The Sugar Plum Fairy. Alternatively, Billy Corgan on the Sixtyforgan playing Tiberius would be pretty great, too. Pretty sounding video after the break.

Continue reading “The Sixtyforgan Proves That Church Organs Are Definitely Chiptune”

Racing Game Crashes Into Its Next Life As A Sound Bender

They say the best things in life are free, but we would loudly argue that a dollar can go a long way, too. It all depends on what you do with it. When [lonesoulsurfer] saw this busted-up handheld racing game at the junk store, he fell in love with the lines of the case and gladly forked over a buck in order to give it a new life as a wicked little sound-bending machine with dancing LEDs.

Here’s how it works: [lonesoulsurfer] records a few seconds of whatever into the mic with the looping function switched off, then turns it back on to start the fun. He can vary the pitch with the speed controller pot, or add in some echo and reverb. Once the sound is dialed in, he works the pause button on the left to make melodies by stopping and restarting the loop, or just pausing it momentarily depending on the switch setting.

The electronics are a mashup of modules mixed with a custom PCB that combines the recording module with an LM386 amplifier and holds the coolest part of this build — those LEDs that dance to the music behind the toy’s original lenticular screen. Like most of [lonesoulsurfer]’s builds, it’s powered by an old cell phone battery that’s buck-boosted to 5 V. Check out the build and bleep-bloop video after the break.

Lenticular lenses are all kinds of fun. Get one that’s big enough, and you can use it to disappear for a while.

Continue reading “Racing Game Crashes Into Its Next Life As A Sound Bender”

Echo And Reverb In A Pretty Little Box

These days, if there’s a chip worth using, there will be a cheap pre-built module on eBay to make using it even easier. It’s a great time saver, and projects that used to take a couple of weekends can now be completed in a rainy afternoon. [lonesoulsurfer] knows how it is, and took advantage of this very approach to build this tidy echo & reverb effects box.

The build starts with a PT2399 echo/delay line module sourced of eBay, a part that we’ve learned much about thanks to the hard work of others. A resistor is cut off the board, enabling echo as well as reverb functionality. It’s laced up in a box with a couple of pots and a switch to control the effect, and hooked up with 6.5mm audio jacks to enable it to be easily used with guitars, synths, or karaoke machines.

It’s a fun build, and one that could serve as as a useful component in a larger setup. Adding a 3PDT switch could make it more useful as a guitar pedal, or it could be integrated into a Eurorack module, too. We’d particularly love to see the results possible from stuffing five of the modules in a single box and routing them into each other in new and exciting ways. If you pull that off, drop us a line.

C++ Reverbs From A Matlab Design

The guitar ‘Toing’ sound from the ’70s was epic, and for the first time listener it was enough to get a bunch of people hooked to the likes of Aerosmith. Reverb units were all the rage back then, and for his DSP class project, [nebk] creates a reverb filter using Matlab and ports it to C++.

Digital reverb was introduced around the 1960s by Manfred Schroeder and Ben Logan. The system consists of essentially all pass filters that simply add a delay element to the input signal and by clubbing a bunch together and then feeding them to a mixer. The output is then that echoing ‘toing’ that made the ’80s love the guitar so much. [Nebk]’s take on it enlists the help of the Raspberry Pi and C++ to implement the very same thing.

In his writeup, [nebk] goes through the explaining the essentials of a filter implementation in the digital domain and how the cascaded delay units accumulate the delay to become a better sounding system. He also goes on to add an FIR low pass filter to cut off the ringing which was consequent of adding a feedback loop. [nebk] uses Matlab’s filter generation tool for the LP filter which he includes the code for. After testing the design in Simulink, he moves to writing the whole thing in C++ complete with the filter classes that allows reading of audio files and then spitting out ‘reverbed’ audio files out.

The best thing about this project is the fact that [nebk] creates filter class templates for others to play with. It allows those who are playing/working with Matlab to transition to the C++ side with a learning curve that is not as steep as the Himalayas. The project has a lot to learn from and is great for beginners to get their feet wet. The code is available on [GitHub] for those who want to give it a shot and if you are just interested in audio effects on the cheap, be sure to check out the Ikea Reverb Plate that is big and looks awesome.