For those who have suffered a stroke, recovery is a long and slow process that requires rehabilitation to start as early as possible. Quite often, secondary stroke attacks complicate matters. Spasticity — muscle contraction and paresis — muscular weakness, are two of the many common after-effects of stroke. Recovery involves doing repeated exercises to strengthen the muscles and bring back muscle memory. Benchmarking progress becomes difficult when caregivers are only able to use qualitative means such as squeezing tennis balls to monitor improvement. To help provide quantitative measurements in such cases, [Sergei V. Bogdanov] is building a Dynamometer for Post-Stroke Rehabilitation. It is an Open Source, 4-channel differential force gauge for measuring and logging the progress of the patient. The device measures, graphs, and logs the force exerted by the four fingers when they push down on the four force gauges.
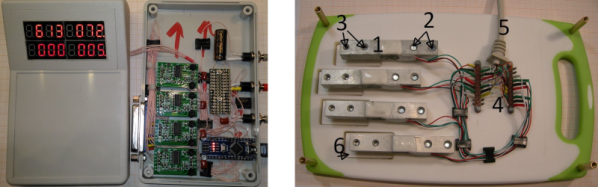
The device consists of four strain gauges obtained from cheap kitchen scales. The analog outputs from these are fed to HX-711 24-bit ADC boards. An Arduino Nano processes the data and displays it on two banks of eight-digit LED modules. [Sergei] also experimented with a 20×4 character LCD in place of the LED display. In the standalone mode, the device can only indicate the measured forces on the LED (or LCD) display which is calibrated to display either numerical values or a logarithmic scale. When connected to a serial port and using the (Windows only) program, it is possible to not only view the same information but also save it at regular, set intervals. The data can also be viewed in graphical form.
The project page provides links to their Arduino code, Windows monitor program as well as build instructions. Check out the related assistive technology project that [Sergei] is working on — A Post Stroke Spasticity Rehab Helper.
Continue reading “Hackaday Prize Entry: Dynamometer For Post Stroke Rehabilitation”
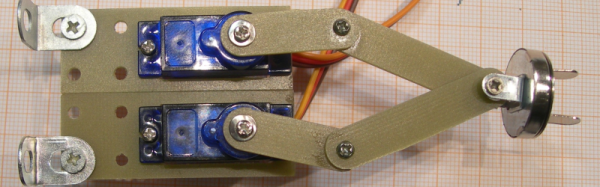
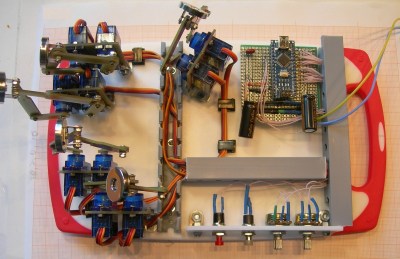 He’s using ten hobby micro servos connected to an Arduino Nano, all mounted on a kitchen chopping board, with a few other bits thrown in to round out the build. There’s one pair of servos for each finger. A five bar linkage converts the servo rotations to two-dimensional motion. The end of the linkage has a swiveling metallic disk. Patient fingers are attached to these discs via magnetic metal pads that are attached to the end of the fingers using adhesive plaster tape. Two push buttons cycle through a large number of exercise modes and two potentiometer’s help adjust the speed and smoothness (the number of points calculated for the desired motion). Two 7-segment LED display modules connected to the Arduino provides a visual interface showing program modes, speed, number of cycles and other relevant information. Replicating the project ought to be very straightforward since the device uses off-the-shelf parts which are easy to put together using the detailed build instructions, photos and code posted on [Sergei]’s project page. Check out the videos below to see the rehab helper in action.


