Spice Up Your Shop With A VW Pickup Wall Decoration

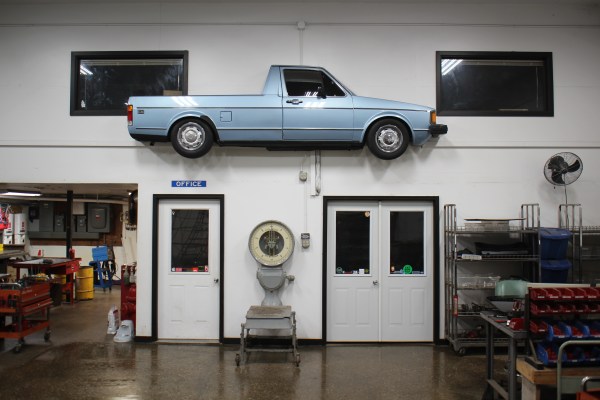
Seeing a half car is always a disconcerting experience. Especially when that half car is about 14 feet up in the air. [PanasonicModelRC6015] — We’ll call him [RC6015] for short — has gone and mounted 1/2 (actually more like 1/4) of a VW Rabbit Caddy pickup MK1 up on his shop wall.

The caddy started life as a regular 1983 VW pickup. Unfortunately, the years had not been kind to it. The body panels were in good shape, but there were serious rust problems in the floors, strut towers, rockers, and control arm mounts. According to [RC6015], this is beyond “weld on few replacement panels”, though he’s been heavily questioned on it in his Reddit thread.

Cutting the truck down was easy – a reciprocating saw did most of the work. The VW has a unibody design, so there was still some frame there to hold things together. A 2×12 board then was then bolted from the front of the truck to the rear. This made everything stable and provided a solid mounting point. A second 2×12 was lag bolted to several studs on the wall. Then it was just a matter of lifting the truck into position and bolting the two boards together. We’re guessing the [RC6015]’s wall has solid wood studs. Don’t try hanging a 500 lb truck from the wall if you’ve only got thin metal studs behind your sheetrock.

Just in case you’re wondering, the Panasonic Model RC-6015 is a vintage flip display alarm clock, the same one Marty used in Back to the Future.

If a truck on the wall is a bit much for your shop, check out this wall mounted weather display.

DIY Hydroponic System Grows Herbs On The Wall

Wall-Mounted Hydroponic Garden

Everyone knows that you should eat healthy, but it’s not always easy. Fresh and healthy foods are often more expensive than processed foods. When money is tight, sometimes it’s best to just grow your own produce. What if you don’t have room for a garden, though?

When [Matthew] returned home from the 2014 San Mateo Maker Faire, he found himself in a similar situation to many other faire attendees. He saw something awesome and was inspired to build it himself. In this case, it was a wall-mounted hydroponic garden. [Matthew] started out with some basic requirements for his project. He knew which wall he wanted to cover with plants, so that gave him the maximum possible dimensions. He also knew that they may have to remove the garden temporarily to perform maintenance on the wall in the future. And as for what to grow, [Matthew] loves lots of flavor in his foods. He chose to grow herbs and spices.

[Matthew] purchased most of the main components from Amazon and had them shipped to his doorstep. Everything else was found at the local hardware store. The base of the build is an off-the-shelf planter box. The drainage hole in the bottom was plugged up to prevent water from leaking out. A different hole was drilled in the side of the box to allow a garden hose to be mounted to the box. The hose is connected through a float valve, keeping the water level inside the box just right.

[Matthew] then built a frame out of dimensional lumber. The frame ended up being about 4.33 feet wide by 8 feet tall. The boards were fastened together with metal braces and mounting plates. A full sheet of plywood was then nailed to the front of the frame. Thick plastic sheet was then wrapped around the frame and stapled in place.

[Matthew] purchased giant planter pockets to actually hold the plants. He tried stapling them to the front of the frame, but discovered that staples were not strong enough to hold the weight of the plants, soil, and water. He instead used screws and washers.

Next, a submersible pump was mounted inside the bottom planter box. This pump is used to circulate the water and nutrients up to the plants above. Two hoses were connected to the pump and run up the sides of the upper frame. These hoses evenly distribute the water to the plants.

The final step was to mount the unit in place against the wall. [Matthew] didn’t want to screw into the wall and cause any damage. Instead, he placed a couple of bricks inside of the planter box and rested the bottom of the frame on top of those. The top of the frame is essentially hung from a railing up above with some thin steel wire.

The whole unit looks very slick and takes up little space. With some more ingenuity, one could likely build something similar with even more DIY components to save some more money.