Splash Droplet Photos

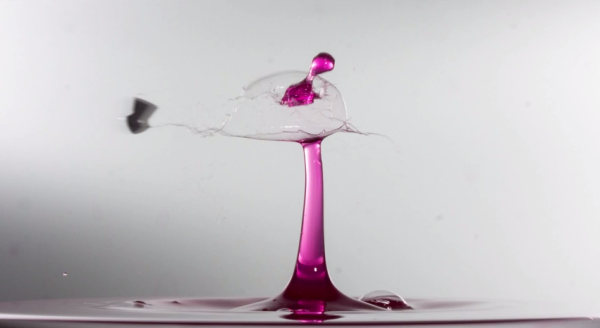
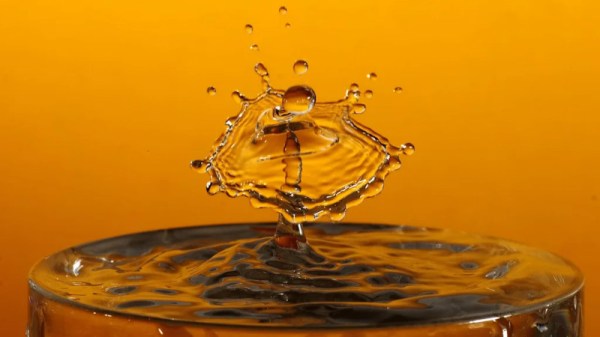
Water droplets are beautiful things, though photographing them can prove difficult without a little help. Precise timing is key, and that’s what led [Alex Pikkert] to build a timing controller to help nail the perfect shot.

It’s a job that’s ideally suited for the average microcontroller. In this case, [Alex] chose the venerable Arduino Uno. Paired with a bunch of buttons and a 16 x 2 character LCD, it has a simple-to-navigate interface for dialling in a shot. The trick to splash and droplet photography is to first open a valve to release a droplet, and then fire a flash a set time after to capture the droplet in flight, after it’s hit the surface of the liquid. [Alex]’s design uses a MOSFET to trigger the water valve, and optoisolators to safely trigger the flash and camera.

[Alex] has gotten some impressive results with the rig, and it would serve as a great starting point for anyone looking to get into the field. We’ve seen similar builds before, too. If you’ve got your own fancy photography rig for those otherwise-impossible shots, be sure to drop us a line!

Photography Rig Captures Holy Grail Shots

You’ve seen amazing shots of water spouts and milk crowns. You’ve seen shots of bullets piercing glass ornaments, playing cards, and poor, defenseless pieces of fruit. Maybe you’ve even seen that holy grail of shots—a bullet piercing a water spout. But how is it done? How do photographers capture this two-headed mythical beast of high-speed photography? [Maurice] has cracked the code and shared it for all to see.

He uses a Camera Axe to trigger the camera, a device he came up with years ago that’s on its fifth version. His setup uses a 100mm macro lens, a key flash, and two fill flashes that sit behind a diffusing wall of whiteness. All three flashes are connected to a multi-flash board which feeds into Camera Axe. [Maurice] explains how he gets nice, tall water spouts by thickening it with xanthan gum. He adds Jet Dry to reduce the surface tension and some food coloring to keep things interesting.

[Maurice] also runs through his pellet shooting rig, which he made with some polyethylene tubing and an air compressor. He ended up shooting the pellets at 20psi, which sends them traveling at 75 feet per second. They move slowly enough that he can use his own stomach to stop them in the demonstration. Dialing in just the right settings to get the pellet to intersect the spout at the right time took some finagling, and that will hold true for anyone who attempts to recreate this setup. He gives a link to his code files in the video description to get you started. Video is after the break.

Continue reading “Photography Rig Captures Holy Grail Shots”

Stop Motion Water Droplets

logo

The folks at Physalia studio were asked by a company called IdN to produce a little bit of video with a logo. After tossing a few ideas around, they hit upon the concept of projecting the IdN logo inside a falling water droplet. CGI would never get this idea right, so the finished product is the result of stop-motion animation created inside several thousand falling drops of water.

Taking a picture of a falling water droplet was relatively easy; a small drip, a laser pointer and photodiode, and a flash trigger were all that was needed to freeze a drop of water in time. The impressive part of the build is a motion control system for the camera. This system moves the camera along the vertical axis very slowly, capturing one water droplet at a time.

Behind the droplet is a an animation that’s seemingly inspired by a Rorschach test, ending on the IdN logo. The frames for these animations were printed out and placed inside the test chamber/studio upside down to account for the optical effects of a sphere of water.

The end result is a product of over 20,000 pictures taken, all edited down into a single 30-second shot. An amazing amount of work for such a short video but as you can see in the videos below, it’s well worth the effort.

Continue reading “Stop Motion Water Droplets”