Measure The Speed Of A Speeding Bullet

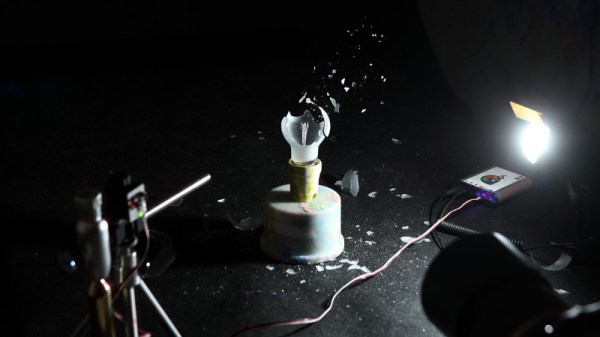
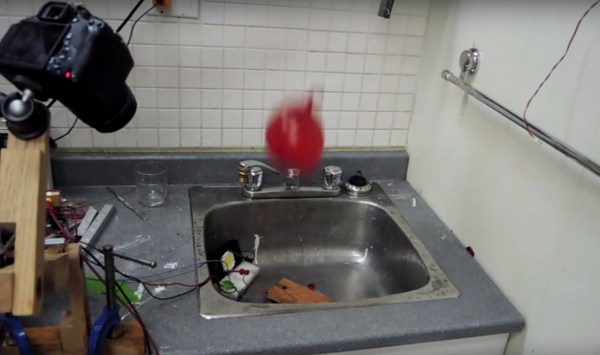
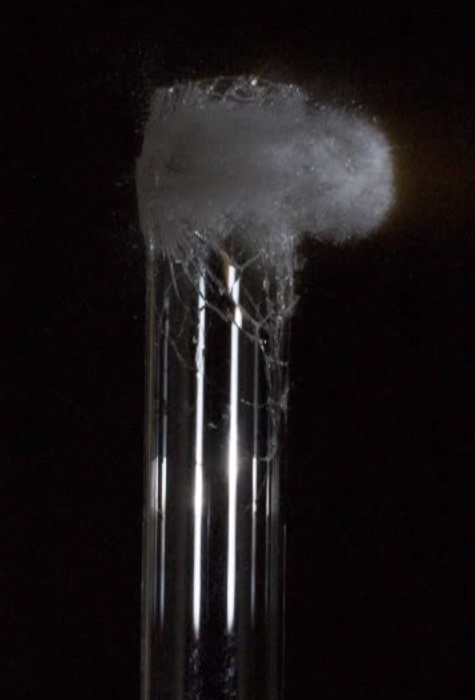
In the study of ballistics, you can do very little without knowing the velocity of a projectile. Whether you need to hit a target at over a mile, check if a paintball gun is safe for opposing players, or photograph high-velocity objects, you need a way to measure that velocity. [td0g] enjoys the challenge of photographing bullets impacts, and has created an open-source ballistic chronograph to help achieve this.

A rifle bullet punching through a wine glass, captured with the help of the chronograph

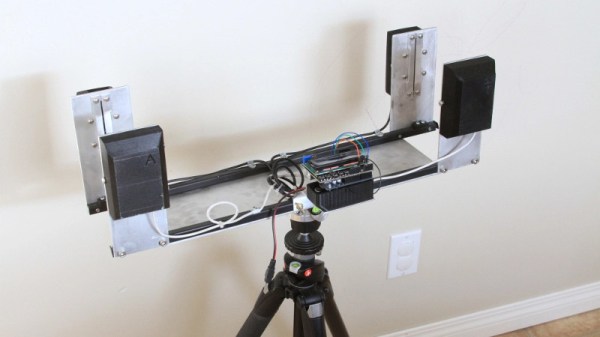
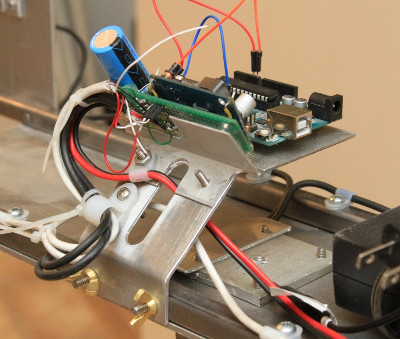
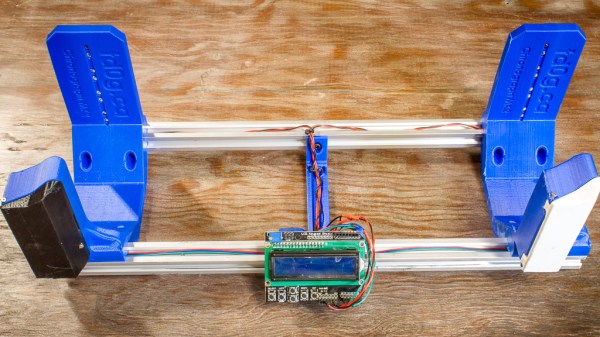
[td0g]’s design makes use of two light gates spaced some distance apart, and the time that an object takes to travel between the two is measured and used to calculate velocity. Most commercial ballistic chronographs also work in this way. [td0g] created the light gates using pairs of infrared photodiodes and LEDs. When there is a sudden dip in the amount of light received by the photodiode, the Arduino control circuit knows that an object has passed between the photodiode and LEDs and triggers the timer. An LCD shield on the Arduino is used to control the software and display velocity. As you probably guessed, clock accuracy is very important for such time measurements, and [td0g] demonstrates a simple technique using a smartphone metronome app to manually calibrate the clock to acceptable accuracy for his purposes. Continue reading “Measure The Speed Of A Speeding Bullet”

Take Control Of Your DSLR With PiXPi

If you’ve ever tried to take a picture of a fast moving object, you know how important timing is. You might only have one chance, and if you hit the shutter a bit too early or too late, the shot could be ruined. Past a certain point, no human camera operator can react quickly enough. Which is exactly why [Krzysztof Krześlak] created PiXPi.

In the past we’ve seen high-speed flashes designed to “freeze time” by illuminating the scene at the precise moment, and while PiXPi can technically do that, it also offers a few alternate methods of capturing that perfect moment. The idea here is to give the photographer the best chance of getting the shot they’re after by offering them as many tools as possible.

Essentially, PiXPi is a microcontroller that allows you to orchestrate your DSLR’s trigger, external flashes, and various other sensors and devices using an easy to use graphical programming interface from your smartphone. So for example, you could program the PiXPi to trigger your camera when it detected a loud enough noise.

But the device also allows you to be a bit more proactive. Rather than sitting back and waiting for a signal to fire off the camera, the PiXPi can directly take control of the action. As an example, [Krzysztof] has created an electronically triggered valve which can release a drop of liquid on command. Using PiXPi, the photographer can quickly put together a routine that triggers a drop, waits the few milliseconds it takes for it to hit the target, and then snaps a picture.

The goal of the 2019 Hackaday Prize is to develop a product fit for production, and naturally a huge part of that is having a well thought-out design. But if you’re ultimately looking to sell said product, it’s also very important to keep the needs of the end user in mind. To that end, we think [Krzysztof] has done a great job by not only making the system very flexible, but keeping it easy to use.

Continue reading “Take Control Of Your DSLR With PiXPi”

An Impeccably Designed High-Speed LED Flash

If you want to take a picture of something fast, and we mean really fast, you need to have a suitably rapid flash to illuminate it. A standard camera flash might be good enough to help capture kids running around the back yard at night, but it’s not going to do you much good if you’re trying to get a picture of a bullet shattering a piece of glass. For that you’ll need something that can produce microsecond flashes, allowing you to essentially “freeze” motion.

You can buy a flash that fast, but they aren’t common, and they certainly aren’t cheap. [td0g] thought he could improve on the situation by developing his own microsecond flash, and he was kind enough to not only share it with the world, but create a fantastically detailed write-up that takes us through the entire design and construction process. Even if you aren’t in the market for a hyper-fast flash for your camera, this is a fascinating look at how you can build an extremely specialized piece of gear out of relatively common hardware components.

So what goes into a fast LED flash? Rather unsurprisingly, the build starts with high-quality LEDs. After some research, [td0g] went with an even dozen CREE CXA2530 arrays at just shy of $7 USD each. Not exactly cheap, but luckily the rest of the hardware is pretty garden variety stuff, including a ATMega328P microcontroller, some MOSFETs, and a TC4452 driver. He did pack in some monstrous 400 V 10μf capacitors, but has since realized they were considerably overkill and says he would swap them out if doing it all over again.

To make development easier (and less costly, should anything go wrong), [td0g] designed the flash so that the LEDs are arranged in banks of three which can be easily removed or swapped in the 3D printed case. Each trio of LEDs is in a removable “sled” that also holds the corresponding capacitor and MOSFET. Then it was just a matter of getting the capacitors charged up and safely dumping their energy into the banks of LEDs without frying anything. Simple.

At this point, the astute reader is probably thinking that a high speed flash is worthless without an equally fast way of triggering it. You’d be right, but [td0g] already figured that part. A couple years back we covered his incredible ballistic chronometer which is being used as a sensor to fire off his new flash.

High Speed Chronograph Looks Like Pro Gear

It can be hard enough to take a good photograph of a running kid or pet, and if we’re being honest, sometimes even stationary objects manage to elude our focus. Now imagine trying to take a picture of something moving really fast, like a bullet. Trying to capture the moment a fast moving projectile hits an object is simply not possible with a human behind the shutter button.

Enter the ballistic chronometer: a device that uses a set of sensor gates and a highly accurate timer to determine how fast an object is flying through it. Chronometers that operate up to a couple hundred meters per second are relatively common, but [td0g] had something a little faster in mind. He’s come up with an optical setup that he claims can capture objects moving as fast as Mach 2. With this chronometer tied into a high-speed flash rig, [td0g] is able to capture incredible shots such as the precise instant a bullet shatters a glass of water.

Because he couldn’t find any phototransistors with the sub-microsecond response time necessary to detect a small object moving at 1,000 m/s, [td0g] ended up using LEDs in a photoconductive configuration, where 27 VDC is applied backwards against the diode. Careful monitoring of voltage fluctuations across the diode allows for detection of changes in the received light level. To cut down on interference, [td0g] used IR LEDs as his light sources, reasoning there would be less ambient IR than if he used something in the visual range.

What really impresses with this build is the attention to detail and amount of polish [td0g] put into the design. From the slick angled bracket that holds the Arduino and LCD to the 3D printed covers over the optical gates, the final device looks like a professional piece of equipment with a price tag to rival that of a used car.

For the future, [td0g] plans on upgrading to faster comparators than he LM339’s he has installed currently, and springing for professionally done PCBs instead of protoboard. In its current state this is already a very impressive piece of kit, so we’d love to see what it looks like when it’s “finished”.

If you don’t need something quite this high end but still would like to see how fast something is going, we have covered chronometer builds to fit every budget.

Frozen Time Photography With A 100W LED

High speed photography is fun. Ultra high frame rate video, even more so. But since not many of us have access to $10,000 HFR cameras… we have to make do with long exposure shots a perfectly timed camera flash. You can design a system to trigger the flash at just the right millisecond — but they’re still pretty expensive typically.

[Electronupdate] has a 100W LED module and penchant for Arduino Nanos — so he wondered if he could make an affordable high speed camera rig — and he did.

It’s a pretty slick little setup. He has a limit switch mounted to a nail on a piece of wood — when the water balloon drops on it, it triggers the mechanical switch. The Arduino then triggers the LED flash, which is quite a large load and requires a High Side Switch to operate. A small LCD and series of buttons allow him to dial in the time offset just right in order to get some awesome photos of a water balloon exploding.

Continue reading “Frozen Time Photography With A 100W LED”

Photography Rig Captures Holy Grail Shots

You’ve seen amazing shots of water spouts and milk crowns. You’ve seen shots of bullets piercing glass ornaments, playing cards, and poor, defenseless pieces of fruit. Maybe you’ve even seen that holy grail of shots—a bullet piercing a water spout. But how is it done? How do photographers capture this two-headed mythical beast of high-speed photography? [Maurice] has cracked the code and shared it for all to see.

He uses a Camera Axe to trigger the camera, a device he came up with years ago that’s on its fifth version. His setup uses a 100mm macro lens, a key flash, and two fill flashes that sit behind a diffusing wall of whiteness. All three flashes are connected to a multi-flash board which feeds into Camera Axe. [Maurice] explains how he gets nice, tall water spouts by thickening it with xanthan gum. He adds Jet Dry to reduce the surface tension and some food coloring to keep things interesting.

[Maurice] also runs through his pellet shooting rig, which he made with some polyethylene tubing and an air compressor. He ended up shooting the pellets at 20psi, which sends them traveling at 75 feet per second. They move slowly enough that he can use his own stomach to stop them in the demonstration. Dialing in just the right settings to get the pellet to intersect the spout at the right time took some finagling, and that will hold true for anyone who attempts to recreate this setup. He gives a link to his code files in the video description to get you started. Video is after the break.

Continue reading “Photography Rig Captures Holy Grail Shots”

Making An Airgap Flash

[Maurice] and his team just finished the airgap flash they’ve been working on for a year now. This kind of flash is useful for very high speed photography such as photographing shooting bullets. With a duration of about a millionth of a second it is 30 times faster the normal flashes at their fastest settings. In the video embedded after the break, [Maurice] first explains the differences between his flash and a conventional one which normally uses a xenon flash tube, then shows off different photos he made with his build.

Even though this video is a bit commercially oriented, [Maurice] will make another one detailing the insides. In the mean time, you can checkout the schematics in the user manual (PDF) and also have a look at an other write up he made which we covered in the past. We should also mention that trying to make this kind of flash in home is very dangerous as very high voltages are used (in this case, 16kV).

Continue reading “Making An Airgap Flash”