Abstracting Transistors Into High-level Design

Although it’s not the best way of understanding computers, most people tend to imagine electronic devices as black boxes filled with magic and blue smoke. Even microcontrollers, the most fundamental means of computation, are treated like little black plastic centipedes with metal legs. In a series of blog posts, [Andrew Gibiansky] is tearing down the walls of obfuscation and illuminating the world of transistors, gates, and FPGAs.

The first blog post goes over the idea of electronic circuits as a waterfall; a positive voltage is a reservoir on a mountain top and ground is sea level. This idea is extended to the lowly transistor acting as an electronic switch, able to turn a circuit on and off.

Continuing on to logic gates, [Andrew] covers the NOT, AND, and OR gates before moving on the flip-flops and SRAM. These can, of course, be modeled in Verilog and VHDL – programming languages that abstract the world of transistors and gates into a much more human-readable form.

[Andrew] is far from done with his series of blog posts, but judging from his work so far it seems to be a great resource for untangling the obtuse concepts of gates and memory into the coherent design of a computer.

USB Keyboard Becomes An AVR Programmer

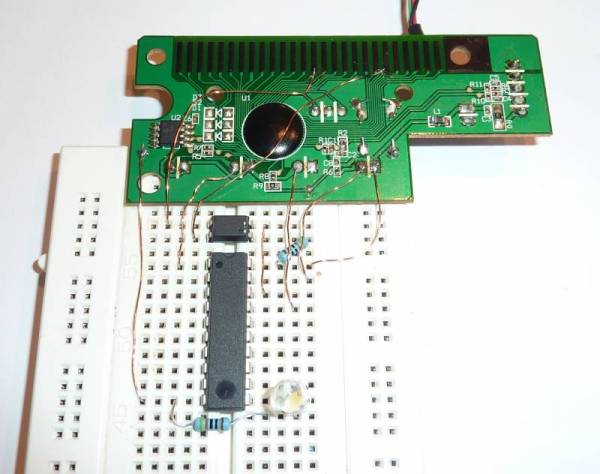
[Steve] created an AVR programmer using an old USB keyboard. We feature a bunch of AVR programmers, but this one is made from parts that many people will have lying around. There are two components: the controller PCB from a USB keyboard, and an optocoupler for emulating key presses.

In order to send data to the AVR, [Steve] used the LED outputs on the keyboard. These LEDs can easily be toggled according to the HID device specification. They provide a 5 volt output with current limiting resistors, which means they can be connected directly to the target AVR.

Reading data is a bit more complex. The optocoupler tricks the keyboard into believing that a single key has been pressed, firing off a data transfer. The MISO pin on the AVR is connected to the row and column of the shift key, which is read by the driver.

On the software side [Steve] created an avrdude interface driver. This allows the programmer to be used with avrdude, just like any other programmer. [Steve] does point out that it isn’t the fastest programmer since the keyboard tries to debounce the MISO input, greatly limiting the speed. However, since it’s made from stuff you might have in your junk bin, it’s a neat hack.

Tiny MAME Cabinet Built From Raspberry Pi

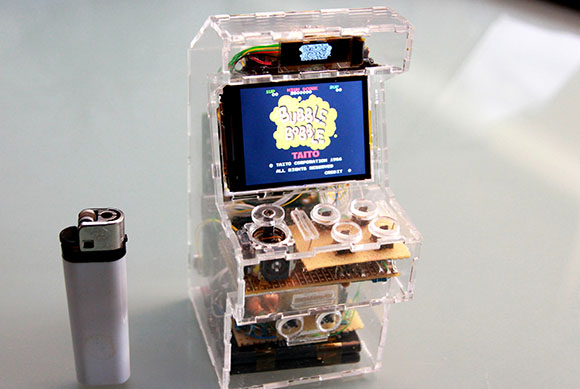
It’s been a while since we’ve seen [Sprite_tm] pull a project from thin air, and we haven’t seen him do anything with a Raspberry Pi yet. All things must pass, and finally [Sprite] has unleashed his tiny, pocket-sized MAME machine to the world.

The build uses a Raspi for all the Linux-ey and MAME goodness, but [Sprite_tm] didn’t want to fiddle around with the HDMI or analog video output. Instead, he chose to use an SPI-controlled TFT display that is only 2.4 inches across. This isn’t a new hack for [Sprite] – he figured out how to connect this display over GPIO pins with a Carambola earlier this year.

To make his cabinet portable, [Sprite] opted for using old cell phone batteries with a cleverly designed charging circuit. When the power supply is connected to +5V, the batteries charge. When this power is removed, an ATtiny85 provides 5V of power to the Raspi and display.

No arcade cabinet is complete without a marquee of some sort, so [Sprite] used an extremely tiny 128×32 white OLED to display the logo of the game currently being played. Everything in the Raspi is set up to be completely seamless when switching between games, automatically configuring the controls and marquee for the currently selected game.

You  can check out [Sprite]’s mini MAME booting straight into Bubble Bobble after the break along with some gameplay footage and finally switching it over to Nemesis. A very awesome build from an exceedingly awesome maker.

Continue reading “Tiny MAME Cabinet Built From Raspberry Pi”