A Lightweight AVR IDE

It’s entirely possible to do your coding in vim or emacs, hammering out hotkeys to drive the interface and bring your code to life. While working in such a way has its charms, it can be confronting to new coders, and that’s before even considering trying to understand command line compiler settings. The greenhorn coder may find themselves more at home in the warm embrace of an IDE, and [morrows_end] has now built one for those working with AVR assembly code.

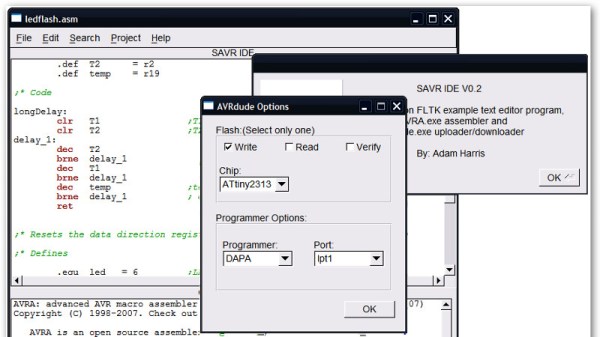
The IDE goes by the name of Simple AVR IDE, or savr_ide for short. Programmed in C++ with the FLTK widget library, [morrows_end] has tested it on Windows XP, but notes that it should successfully compile for Linux, Unix, and even MacOS too.

All the basic features are there – there’s syntax highlighting, as well as integration with the AVRA assembler and AVRDUDE for programming chips. It’s a tool that could make taking the leap into assembly code just that little bit easier.  For another taste of bare metal coding, check out [Ben Jojo]’s discussion of x86 bootloaders.

TinyDriver – ATtiny84 Platform Without Arduino

You don’t need an Arduino for everything! Or do you? This is an argument that plays out here quite often. Whatever the outcome, most folks agree that once you’ve dipped your feet in the shallow end of the pool, the real fun is when you dive into the deep end.

[Mahesh Venkitachalam] designed tinyDriver, an experimental Open Source breakout board for the Atmel ATtiny84 chip. His idea was to create a convenient platform which can be used to understand microcontrollers in-depth, by letting users dive under the hood and make use of the various features of the chip such as timers, PWM, interrupts, ADC, and digital I/O. The ATtiny84 is cheap and simple enough for starters. Add a low-cost AVR programmer, install the free and cross-platform avr-gcc and avrdude tool chain, read up the data sheet, learn some C programming and start experimenting. Rinse and repeat and you’ll be a pro at it soon. He’s got a few starter projects documented on his website to get you going.

The hardware is open source, and the Git repository contains the hardware source and example code. If you’re a hardware noob, he’s thoughtfully added a PTC resettable fuse and reverse polarity protection on the board to make sure you don’t release the magic blue smoke prematurely. All of the I/O’s are broken out on a header, and the motor driver and RGB LED can be disabled when not needed. The board isn’t hand-assembly friendly, but he plans to crowd fund it shortly. If you want to move beyond the Arduino platform, projects like the tinyDriver are the way to go.

The HackadayPrize2016 is Sponsored by:

Flashing Chips With A CNC

[Eberhard] needed to flash several hundred ATMegas for a project he was working on. This was a problem, but the task did have a few things going for it that made automation easy. The boards the ‘Megas were soldered to weren’t depanelized yet, and he had a neat and weird bed of nails programming connector. There was also a CNC machine close by. This sounds like the ideal situation for automation, and it turns out the setup was pretty easy.

The boards in question were for FPV/radio control telemetry adapter and thankfully the assembly house didn’t depanelize the 40 PCBs on each board before shipping them out. A very cool ATMega flashing tool handled the electrical connections between the computer and the microcontroller, but a real, live human being was still required to move this flashing tool from one chip to the next, upload the firmware, and repeat the process all over again.

The solution came by putting a few metal pins in the bed of a CNC mill, 3D print an adapter for the flashing tool, and writing a little code to move the flashing tool from one chip to the next. An extremely simple app takes care of moving the programmer to an unflashed chip, uploading the firmware, and continuing on to the next chip.

There’s still some work to be done that would basically tie together the Gcode and AVRdude commands into a single interface, but even now a complete panel of 40 PCBs can be programmed in a little over 10 minutes. You can check out a video of that below.

Continue reading “Flashing Chips With A CNC”

Automated Programming And Testing Jig Built With Raspberry Pi

[Doug Jackson] makes word clocks, and he must be doing quite a bit of business. We say that because he put together a programming and test bed for the clock circuit boards.

This is a great example to follow if you’re doing any kind of volume assembly. The jig lets the populated PCB snap into place, making all the necessary electrical connections. This was made possible by a package of goods he picked up on eBay which included rubber spacers to separate the board from the acrylic mounting plate, pogo pins to make the electrical connections, and a spring-loaded board clamp seen to the left in this image.

The switch in the lower right connects power to the board and pulls a Raspberry Pi GPIO pin high. The Python script running on the RPi polls that pin, executing a bash script which programs the ATmega169 microcontroller using the GPIO version of AVRdude. We looked through his Python script and didn’t see code for testing the boards. But the image above shows a “Passed” message on the screen that isn’t in his script. We would wager he has another version that takes the hardware through a self test routine.

We first saw one of [Doug’s] word clocks back in 2009 and then again a few months later. The look of the clock is fantastic and it’s nice to see the project is still going strong.

Programming Microcontrollers With A Raspi

rasduino

The advent of the Arduino brought the world of microcontrollers to hobbyists, students, and artist the world over. Right now we’re in the midst of a new expansion in hobbyist electronics with the Raspberry Pi, but we can’t expect everyone to stay in the comfortable, complex, and power-hungry world of Linux forever, can we? Eventually all those tinkerers will want to program a microcontroller, and if they already have a Raspberry Pi, why not use that?

[Kevin] wanted to turn his Raspi into an AVR development workstation, without using any external programmers. He decided to use the Raspi’s SPI port to talk to an AVR microcontroller and was able to make the electrical connections with just a few bits of wire an a handful of resistors.

For the software, [Kevin] added support for SPI to avrdude, available on his git. Theoretically, this should work with any AVR microcontroller with the most popular ATMegas and ATtinys we’ve come to love. It doesn’t support the very weird chips that use TPI programming, but it’s still extremely useful.

Rolling Your Own Minimal USB To Serial Arduino Programmer

usb-to-serial-programmer

[Hans Peter] wanted to move away from using full Arduino boards in his projects. One of the components he rarely used after the development stage is the USB hardware. Once the firmware is flashed to the chip he didn’t need it any longer. So he tried his hand with some really small SMD parts by building this USB to serial Arduino programmer.

The chip he went with isn’t the FTDI part we’re used to. Instead of using an FT232RL, he opted for its smaller cousin the FT230x. This chip doesn’t fully implement the communications protocol of the 232, but it does work with AVRdude and that’s all that really matters. Above you can see [Hans’] creation next to the official Arduino USB-to-serial programmer. He used the same connection scheme, but went with an edge connector for the USB instead of using a mini-B jack.

It’s pretty impressive to see his prototyping work with the 16-pin QFN package. He soldered it dead-bug style to a couple of SIL pin headers in order to test it on a breadboard. The first board he assembled was too loose in the USB port, but he added some tape to the back to make it thicker, and coated the edge connector traces with a bit of solder and that did the trick.

USB Keyboard Becomes An AVR Programmer

[Steve] created an AVR programmer using an old USB keyboard. We feature a bunch of AVR programmers, but this one is made from parts that many people will have lying around. There are two components: the controller PCB from a USB keyboard, and an optocoupler for emulating key presses.

In order to send data to the AVR, [Steve] used the LED outputs on the keyboard. These LEDs can easily be toggled according to the HID device specification. They provide a 5 volt output with current limiting resistors, which means they can be connected directly to the target AVR.

Reading data is a bit more complex. The optocoupler tricks the keyboard into believing that a single key has been pressed, firing off a data transfer. The MISO pin on the AVR is connected to the row and column of the shift key, which is read by the driver.

On the software side [Steve] created an avrdude interface driver. This allows the programmer to be used with avrdude, just like any other programmer. [Steve] does point out that it isn’t the fastest programmer since the keyboard tries to debounce the MISO input, greatly limiting the speed. However, since it’s made from stuff you might have in your junk bin, it’s a neat hack.