I’ll admit it. I can be a little cheap. I also find it hard to pass up a bargain. So when I saw a robot kit at the local store that had been originally $125 marked down to $20, I had to bite. There was only one problem. After I got the thing home, I found they expected you to supply your own radio control transmitter and receiver.
Normally, that wouldn’t be a problem but lately… let’s just say a lot of my stuff is in storage and I didn’t have anything handy. I certainly didn’t want to go buy something that would double the cost of this robot that I really didn’t need to begin with.
However, I did have a few ESP8266 modules handy. Good ones, too, from Adafruit with selected 5 V I/O compatibility and an onboard regulator. I started thinking about writing something for the ESP8266 to pick up data from, say, a UDP packet and converting it into RC servo commands.
 Seemed like a fair amount of work and then I remembered that I wanted to try Blynk. If you haven’t heard of Blynk, it is a user interface for Android and Apple phones that can send commands to an embedded system over the Internet. You usually think of using Blynk with an Arduino, but you can also program the embedded part directly on an ESP8266. I quickly threw together a little prototype joystick.
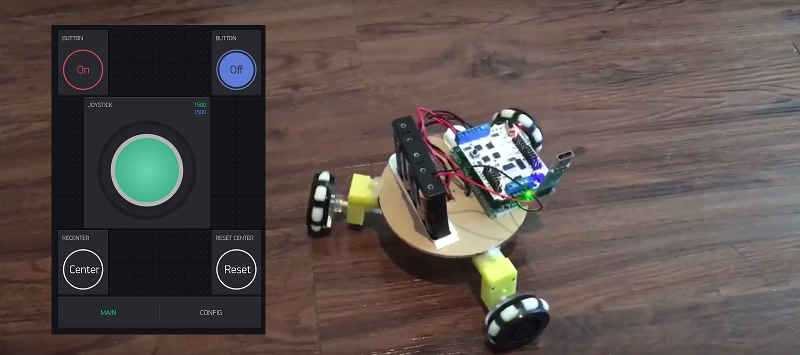
In this and a subsequent post, I’m going to tell you more about how all this went together and what I learned about the strengths and weaknesses of using Blynk on the ESP8266. There’s nothing specific about the code to the particular robot. The finished project looks like a standard two-channel RC controller sending pulses from 1 to 2 ms in length to indicate the joystick position on each axis.
The Plan
There’s not much to the joystick in theory. Forget the phone application and the networking for a minute. If you had two sensors (like, say, potentiometers), the output for the joystick is just a pair of pulses, one for each axis. These pulses typically drive servos. A 1.5 ms pulse means the sensor for that axis is at the center. A 2 ms pulse means it is at one extreme and a 1 ms pulse means it is at the other extreme. Everything else is to scale. So if the X pulse is at 1.2 ms and the Y pulse is at 1.9 ms, then the X axis is a little off center one way, and the Y axis is a lot off center the other way.
In this case, our sensors are the joystick widget on the phone screen. That’s the hard part, but thanks to Blynk, it really isn’t that hard at all.
Inside Blynk
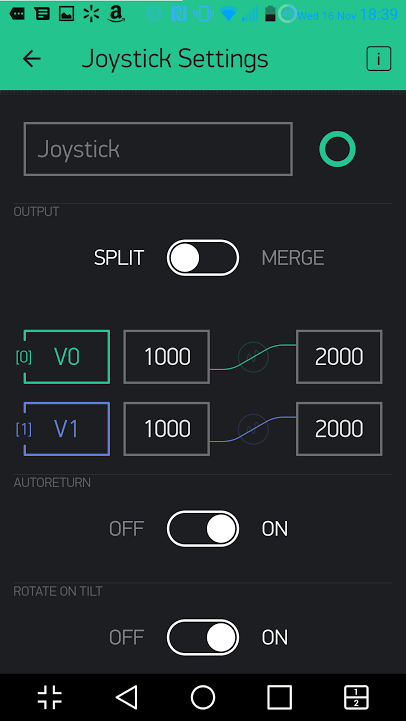
The GUI part of Blynk is really simple. You build a screen, add widgets and tap them to configure them. The joystick has some basic configuration items (see figure, below) and you can set its range (which we’ll set to 1000 to 2000 to match the pulse with in microseconds).
When you create a Blynk app, you generate a long hex number that identifies your application. That number is the key to connecting your microcontroller to the user interface.
The basic steps are easy:
- Open Blynk and create a new project
- Select a project name and the type of hardware you’ll use
- The software will show you an “auth token” (the long hex number)
- You can write the number down or press a button to have it sent to your e-mail (much easier)
- Press the create button and you’re done
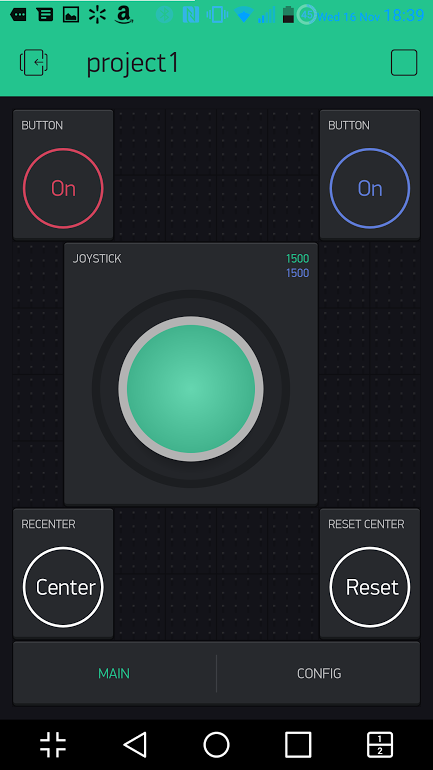
 At the top of the screen you’ll see a + sign. You can use that to add various widgets (switches, LEDs, and–of course–the joystick control). You can build your interface and set different properties on each widget that controls its appearance and behavior.
To get it all to work, you load the Blynk embedded-side code into your processor. You’ll also have to add the ID number and do whatever it takes to get network connectivity (e.g., add your network SSID and password). For a lot of things, that’s all you have to do.
When your program runs, it connects to the Blynk server and since it has that ID, it will connect to the phone GUI (assuming it is open). For simple things, you don’t need anything else. You can connect buttons and LEDs and sliders and similar items from the Blynk widget set directly to physical pins on your device. Connect a button to a pin connected to a physical LED and you can turn the LED on and off. Connect an LED to a input switch on the microcontroller and you can light the virtual LED by pushing the button.
Things like sliders and gauges can use analog output (PWM) and analog inputs. So “pin” doesn’t necessarily mean a single digital bit.
Sometimes connecting widgets to physical I/O is all you need. Some widgets can do things like scale numbers (so 0-255 turns into 0-100, for example) that reduces the need to do anything custom. However, sometimes you need custom code. For these cases, you can use virtual pins that I will describe later.
The app, by the way, is free… sort of. You are given a certain amount of “energy” to spend. When you use a widget, it consumes a certain amount of energy. If you delete a widget, you get the energy back. If you are out of energy, you can’t add any more widgets. Unless, that is, you buy more energy. I know the Internet has conditioned us to think everything should be free, but this is a fair compromise. The joystick left me with no energy, so it didn’t cost me anything to deploy, but unless I delete it, I can’t make anymore Blynk interfaces without paying for more energy.
Next Steps
To complete the joystick project, you’ll need to tackle the following issues:
- Programming the Blynk firmware into the ESP8266
- Communicating with the Blynk user interface from your custom code
Neither of these are especially hard, as I’ll show you next time. For the joystick, there’s no need to send data from the ESP8266 back to the phone, although that’s certainly possible.
We’ve covered Blynk before, but I wanted to do a complete project just for Hackaday (not that we haven’t seen plenty of projects out there). If you want to follow along, grab an ESP8266, download Blynk, and stay tuned for the next installment.


Blynk is great, but for something more than a few buttons you’ll have to do an in app purchase.
What’s so bad about supporting the developers who build good products? :)
I’m using my own Blynk server ran on a pi to control around 60 esp8266s that light up badges that the audience for a kids adventure show wears. Works great.
Rocco – can you drop in a link pointing to more info on how to set up that server? Sounds interesting!
https://github.com/blynkkk/blynk-server
Okay, this sounds awesome as hell. Got any more info or a blog post?
Haven’t done a blog post. I’m using Bertus Kruger’s Wifi Pixels for the led esp combo. Work great. https://github.com/Protoneer/WifiPixels I also put an apache server on the Pi and set it up for wireless updating in case I need to change the code.
I have this silly behind the scenes video I made for promotion. It doesn’t get technical. More for non technical folks who ask how it works. https://youtu.be/5FgSw9XtjyE
Plenty technical to understand the system, what a great application! I bet the kids love it!
Very neat – I found BLYNK great for environmental monitoring.
Nodemcu, temp/humidity sensor and the blynk app will display graphs over a user selectable range. And you can see your data wherever you are – I was monitring my wife’s greenhouse over winter.
I’m indebted to Blynk. My ancient craftsman garage door opener would never pair to a remote again. Fresh batteries, new remotes, nothing would make it work. Re-soldered the board, new antenna wires. Just wouldn’t work, having seen a million articles on using micro controllers to operate a garage door via wifi. Finally had a viable excuse and the junk around to give it go. Took me a day as I am very green to all this still but Blynk was the easiest part of the job.
I’ll admit that I’d much prefer to have a normal remote control for the garage door however, riding a motorcycle in the Winter with heavy gloves and multiple layers makes reaching and operating the phone a hassle. But am thankful I can delay repairing it properly at a later date when it’s warmer.
Anyone know a solution to operate Blynk buttons from a smart watch?
Hi Eric,
What kind of smartwatch do you own?
Asus Zen Watch 2 and Pebble Time.
What is the hardware (robot kit)?
I’m not familiar with this one.
Modified wicked devices omnibot. I will cover the mods in December or January.
This awesome project, can i request link that introduce coding and wiring, I will make it too
It’s awesome project. Can I want coding and wiring. I will make it too
Part 2 will cover the code. If you can’t wait, you can find it on https://github.com/wd5gnr/ESP8266Joy
Will, thanks for sharing this amazing project. Really glad that you liked Blynk.
I’d recommend removing your Auth Token from github ;) Unless you want every Blynker be able to control your robot.
Nice article. I also made a very detailed article with Blynk and the ESP12 model which you can read it here:
http://www.geekstips.com/arduino-blynk-esp8266-iot-for-non-programmers/