Simple Solution Makes Rocket Fin Alignment A Breeze

If you’re building model rockets you want to make sure they fly straight, and most of that is dependent on the stabilizer fins. It has long been a problem come assembly time. How can you make sure that they’re being aligned without any variation? [Rrix] mentioned that one technique is to use a square to position them perfectly perpendicular to the bench on which the rocket is being assembled. But this is still prone to error. His method uses a couple of precision jigs made out of cardboard.

He designed this pair of jigs in Inkscape, then used the files to fabricate them out on a laser cutter. It worked like a charm, but led him to another issue that can be solved in a similar way. Model rockets have rail guides that travel along a rod attached to the launch pad as the craft accelerates to a point where the fins have enough effect to keep it going in a straight line. If those guides aren’t straight, your fin alignment will be all for naught. His second version of the jigs includes a cut out for these guides.

Building A Homebrew Diesel ECU

arduino-diesel-ecu

Over the years automobile engines have become increasingly complex, and with this added complexity comes an increased reliance on intricate computer systems to run them. These control systems are typically the fruit of many hours of research and development, carefully protected by the auto makers who create them. Instead of relying on a closed system to power his car, a Finnish hacker that goes by the name [synkooppi] has decided to do away with his diesel engine’s ECU altogether and build one of his own with little more than an Arduino.

As you can see from his web site, [synkooppi] has created his DIY ECU using an Arduino Mega, which is capable of controlling diesel engines that employ a Bosch VP37 or other inline diesel pump. So far he has all of the basic workings in place, which allow him to run and control an Audi diesel motor.

While many details about his homebrew ECU are hard to come by, he does have a series of development videos posted on YouTube which should help satiate inquisitive minds. For those of you with a spare diesel motor laying around, [synkooppi] has made the first release of his code available to try out.

Stick around to see a video of the ECU in action.

[Thanks, perhof]

Continue reading “Building A Homebrew Diesel ECU”

Tearing Down Disney’s Glow With The Show Props

disneys-glow-with-the-show-teardown

[Andy’s] boss recently returned from a trip to Disneyland with a set of light-up [Mickey Mouse] ears in tow. He said that during the event, every set of “Glow with the Show” ears in the crowd changed colors in sync with the performance. After he and some co-workers speculated on how this was pulled off, [Andy’s] boss gave him a new assignment – to find out how the darned things work!

[Andy] carefully disassembled the ears, sharing his findings and speculations with us. Inside, he found a small flexible circuit board powered by three AAA batteries. At the center of the device resides a TI MSP430G2553 which is tasked with controlling the RGB LEDs embedded in the ears.

In one ear, he spotted what he believes to be a Vishay TSMP6000 IR receiver. Vishay-branded or not, he verified that it does indeed pick up IR signals using his oscilloscope and a TV remote. In the other ear, he found a pair of small IR diodes, which he speculates are used to repeat the IR timing/sync signal received in the opposite side of the device.

The synchronization methods seem completely different than those found in the Xylobands we covered a while back, so we’re really intrigued to find out more about technology behind them.

Stick around to see a video of the light show in action, and since [Andy] says he’s willing to entertain any thoughts on how Disney makes their magic happen, be sure to sound off in the comments.

Continue reading “Tearing Down Disney’s Glow With The Show Props”

Custom Starcraft Controller

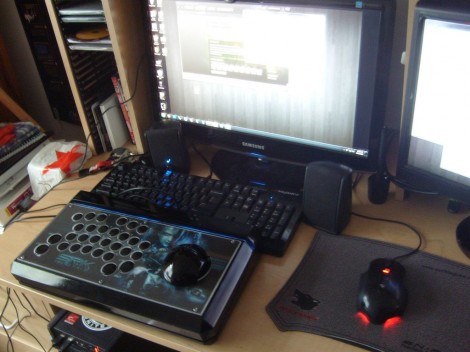
This Starcraft controller was designed as a contest entry. The goal of the contest was to provide a custom controller for the Starcraft Real-Time-Strategy game that shared some of the features seen in First Person Shooter controllers.

The design started as rough sketches. From the there button layout was prototyped before actually building a virtual model of the entire controller. A rendering of the model was submitted as a contest entry, and we’re glad it was also seen through to a physical device. This involved sending the design files off for 3D printing. What came back was painted and assembled to achieve the beautiful look seen above.

On the right is a stick that acts as the mouse controller. The buttons on the left are just the most necessary of Starcraft control keys. They all map to the appropriate keyboard keys and the device enumerates as an HID keyboard so no button mapping is necessary. That being said, a player does have the option of remapping if the layout doesn’t suit.

[Via Reddit with more info at Shoryuken]

16-bit HCMOS Computer Is A Wire Wrapping Wonderland

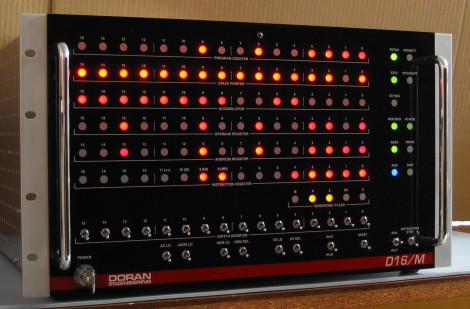
The D16/M is a 16-bit computer built using HCMOS logic chips. It’s a thing of beauty from every angle thanks to the work [John Doran] put into the hobby project. But he didn’t just take pictures of the build and slap them on a webpage. He took the time to publish a remarkable volume of documents for the computer too!

The processor can execute a total of 73 instructions and offers a 100-pin bus for accessing main memory and peripherals. So far he has documented three different peripheral boards, each of which is pluggable thanks to an edge connector that accepts the board. The expansion boards are for system memory, serial communication port, and a clever four-position SD card interface for persistent storage.

Got a question about the system? He wrote a FAQ. Want to learn from his obvious mastery of wire-wrapping? He wrote a wire wrapping tips guide. Like we said, there’s a mountain of documentation and the links to it all are included in his main project page.

[Thanks Allen]