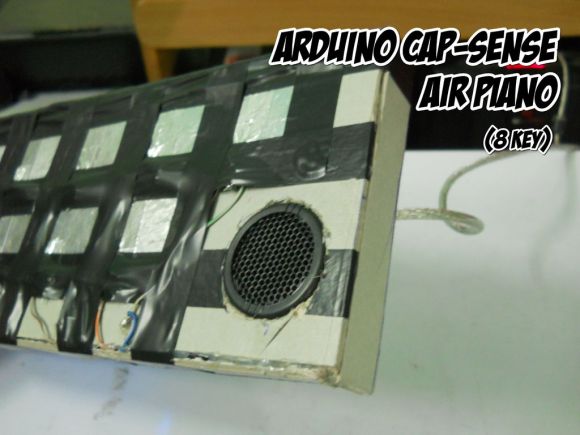
You don’t have to have high-quality parts to play around with electronics and here’s a great example. [Vishal] used junk to play around with CapSense, the touch sensitive Arduino library. What he ended up with is this touch-based piano keyboard.
We’ve featured the CapSense library in the past, but even that example uses a very meticulously crafted test rig of foil tape, protoboard, and some resistors. If you still haven’t given it a try follow this example of using aluminum foil, electrical tape, and a cardboard box.
[Vishal] just sandwiched the end of jumper wire between two pieces of foil to make each ‘key’. We believe the other end of the wire is soldered to the bias resistors where they connect to a couple of pin headers. The headers were hot-glued in place through holes in the bottom of the box, making the entire rig simple to plug into the Arduino board driving it. After adding in a small speaker and flashing the code he’s finished. It certainly makes for a short afternoon project which you won’t feel bad about taking apart later since you didn’t sink a ton of time or resources into the build.


This library we renamed to “CapacitiveSensor”. It might be a good idea to edit this article with the new name, since the old name is a registered trademark for similar technology.
Given the fact that I, as an end user, will never be able to actually meet you Paul I wanted to say thank you here for all your hard work and effort. Thanks to you, a n00b of the worst kind has gotten the chance to get to know and enjoy electronics. I use the teensy 3.0 and just love it. Reading this article and seeing you were involved in the CapacitiveSensor library just drove home all the more how much you have given to the community. I’m sure I speak for many; thank you!!!!!!
Neat! Although I think there could be some additional follow-up hacks such as
a) Using conductive ink instead of tape. ;)
b) modding a laser keyboard display to paint which keys to play
c) Extend the card board box so that virtual dials/knobs can be added
as demonstrated at http://golancourses.net/2012spring/05/13/billy-keyes-final-project-sketchsynth/
d) Do an midi2asci hack in order to use above keyboard to “type” like a regular
keyboard — just using musical notes instead.
Expensive addition, but does allow for a starwars pun,
add https://github.com/heaversm/leap-osc-to-midi so one can do chords.
e.g. Add ‘midi-cord-ins” to one’s device to be able to make use of the music force!
Don’t get how can this work if there is only one wire going to the aluminum pieces?
So the aluminum piece is neither in series nor in parallel.
Or are tiny wires in the wire doing the job?
Here’s how it works:
1.- The microcontroller (arduino in this case) sets that pin as an output and drives it high (wire now puts out +5V).
2.- The aluminum foil acts as a capacitor and stores some charge.
3.- The microcontroller sets the pin as an input (wire is now a sink to ground) and starts keeping track of the time.
4.- Since there is still some charge in the aluminum foil, the pin will stay high until most of the charge sinks to ground. If that happens, the input will change from high to low. The body acts as a ground here, so If the user is touching (or very close to) the foil, most of the charge will go to the user’s body, draining it faster.
5.- The microcontroller senses the change on the input and stops counting time.
6.- Now the microcontroller knows wether the foil was discharged or not, and if it was, how long it took to do so. From there it can deduce if the user was touching it or not.
7.- Go back to step 1 and repeat. The microcontroller can do all this on several pins at once, and so fast that the response feels instantaneous.
Please feel free to correct me if I’m wrong.
so actually the wire going to the aluminum foil acts like two wires, right?
the one part touches the foil1 and the other the foil2 of ONE tab/key which gonna be “pressed”. So it in series to the resistor. Is this correct?
Not sure what you mean, but in this case, there is only 1 wire attached to each aluminum tab. Those wires are connected to arduino pins 4-11, and there is a resistor from each wire to arduino pin 3.