Touch-Typing On Fingertips? Prototype Says It Could Work

The fingertips are covered in touch sensors, each intended to be tapped by the thumbtip of the same hand.

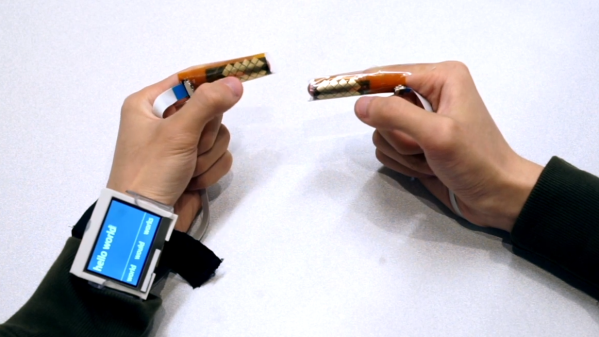
Touch-typing with thumbs on a mobile phone keyboard is a pretty familiar way to input text, and that is part of what led to BiTipText, a method of allowing bimanual text input using fingertips. The idea is to treat the first segments of the index fingers as halves of a tiny keyboard, whose small imaginary keys are tapped with the thumbs. The prototype shown here was created to see how well the concept could work.

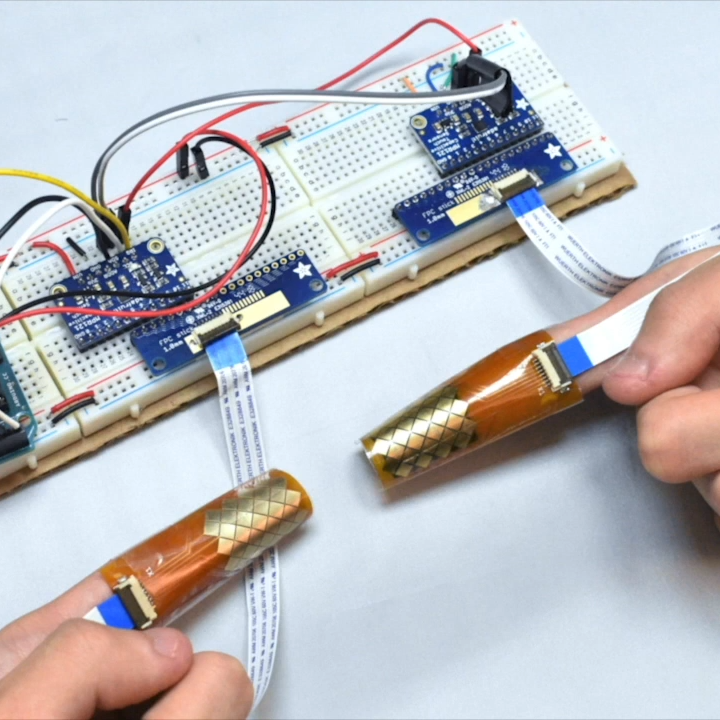
The prototype hardware uses touch sensors that can detect tap position with a high degree of accuracy, but the software side is where the real magic happens. Instead of hardcoding a QWERTY layout and training people to use it, the team instead ran tests to understand users’ natural expectations of which keys should be on which finger, and how exactly they should be laid out. This data led to an optimized layout, and when combined with predictive features, test participants could achieve an average text entry speed of 23.4 words per minute.

Judging by the prototype hardware, it’s understandable if one thinks the idea of fingertip keyboards may be a bit ahead of its time. But considering the increasingly “always on, always with you” nature of personal technology, the goal of the project was more about investigating ways for users to provide input in fast and subtle ways. It seems that the idea has some merit in principle. The project’s paper can be viewed online, and the video demonstration is embedded below.

Continue reading “Touch-Typing On Fingertips? Prototype Says It Could Work”

Freeform Wire Frame Tulip Blooms To The Touch

Holidays are always good for setting a deadline for finishing fun projects, and every Valentine’s Day we see projects delivering special one-of-a-kind gifts. Why buy a perishable bulk-grown biological commodity shipped with a large carbon footprint when we can build something special of our own? [Jiří Praus] certainly seemed to think so, his wife will receive a circuit sculpture tulip that blooms when she touches it.

via @jipraus

This project drew from [Jiří]’s experience with aesthetic LED projects. His Arduino-powered snowflake, with LEDs mounted on a custom PCB, is a product available on Tindie. For our recent circuit sculpture contest, his entry is a wire frame variant on his snowflake. This tulip has 7 Adafruit NeoPixel in the center and 30 white SMD LEDs in the petals, which look great. But with the addition of mechanical articulation, this project has raised the bar for all that follow.

We hope [Jiří] will add more details for this project to his Hackaday.io profile. In the meantime, look over his recent Tweets for more details on how this mechanical tulip works. We could see pictures and short videos of details like the wire-and-tube mechanism that allowed all the petals to be actuated by a single servo, and the components that are tidily packaged inside that wooden base.

Need more digital expressions of love? We have no shortage of hearts. Animated LED hearts, illuminated acrylic hearts, and talking hearts. We’re a little short on flower projects, but we do have X-ray of a rose among others to accompany [Jiří]’s tulip.

Continue reading “Freeform Wire Frame Tulip Blooms To The Touch”

Pumpkin Piano Promises A Gourd Time

Fall – it’s that time of year that brings falling leaves, Hallowe’en, and a pumpkin version of everything that you hold dear. In this case, it’s not a latte – it’s [Robert Vorthman]’s Pumpkin Piano.

[Robert] took a straightforward approach to the build, pressing a Raspberry Pi into service as the backbone of the operation. This is combined with an Adafruit breakout board for the MPR121, which is a chip that provides 12 capacitive touch-sensitive inputs. These are connected to the bountiful produce which make up the piano keys in this fun holiday hack. [Robert] uses some Python code that talks to fluidsynth, a software synthesizer that uses Soundfont files to create different sounds. It’s all wrapped up with some Neopixels that flash when each vegetable is triggered.

The build would make a great party piece for just about any fall gathering, and [Robert] has done a great job of rolling up all the hardware and software required in the write-up. For another take on a vegetable-based orchestra, check out last year’s Harpsi-gourd.

Touch Sensitive Cement With Just A Dash Of Neon

For quite some time now we’ve seen people casting their own countertops and other surfaces out of cement. It’s a combination of mold-making and surface finishing that produces a smooth and durable surface at quite a low cost, if you don’t factor in damage done to your back when lifting the thing for installation.

This offering is a little bit different. [Elliott Spelman] built his own touch sensitive cement table top. When you place your grubby hands on the polished surface, a loop of neon lighting is switched on. This is thanks to a 4:1 mix of quick setting cement and iron oxide powder. Bare copper wire was laid around the edges of the surface to be encased by the cement for making connections later.

There were some sad moments when [Elliott] was removing the cast surface from the mold. He ended up cracking it and suggests others be liberal with their use of both wax on the mold before casting, and patience in removing the cement afterward. We might also suggest a strengthening agent like fiber reinforcement. The edges and surface can be sanded to the finish desired and in this case, attaching table legs was easy since the wooden underside of the mold remains on the bottom of the cement.

The neon lighting adds a retro touch to this build. It’s sad to see this technology dying away, so a resurgence of artisanal neon is great in our book. [Elliott] found a Bay Area arts collective called the Crucible which does a lot of art glass education to help him make two hoops of glass tube and fill them with the appropriate gasses. A capacitive touch sensor (once Atmel, now Microchip part) AT42QT2120 (datasheet) monitors the wire coming from the slab and switches the power supply for the tubes using a combination of relay board and Arduino Uno.

We find the prospect of positional sensing in doped cement fascinating. Anyone have ideas for adapting this technique so that a more long and narrow slab could have positional awareness within, say, a few inches? Let us know in the comments.

Continue reading “Touch Sensitive Cement With Just A Dash Of Neon”

Quick And Dirty Touch-sensitive Keyboard Project

quick-dirty-touch-sensitive-keyboard

You don’t have to have high-quality parts to play around with electronics and here’s a great example. [Vishal] used junk to play around with CapSense, the touch sensitive Arduino library. What he ended up with is this touch-based piano keyboard.

We’ve featured the CapSense library in the past, but even that example uses a very meticulously crafted test rig of foil tape, protoboard, and some resistors. If you still haven’t given it a try follow this example of using aluminum foil, electrical tape, and a cardboard box.

[Vishal] just sandwiched the end of jumper wire between two pieces of foil to make each ‘key’. We believe the other end of the wire is soldered to the bias resistors where they connect to a couple of pin headers. The headers were hot-glued in place through holes in the bottom of the box, making the entire rig simple to plug into the Arduino board driving it. After adding in a small speaker and flashing the code he’s finished. It certainly makes for a short afternoon project which you won’t feel bad about taking apart later since you didn’t sink a ton of time or resources into the build.

Electronic Bag Pipes Need No Bag And Use Only 1 Pipe

A lot of people might turn their noses up at an electronic version of bagpipes. But we see a definite need for them. After all, it’s pretty hard to take your bagpipes on a road trip, but this eChanter will have no trouble entertaining your fellow travelers.

The musical instrument is Arduino-based and the builder can decide between a headphone jack (use it with that FM transmitter when in the car!) or a speaker. The version seen above uses headphones with a piece of PVC pipe as the body, screw heads as touch sensors, and a project box to hold the electronics. But there are a lot of alternatives suggested, such as using automatic sprinkler parts. It sounds like a riser, connector, and pop-up sprinkler head body will do just as well hosting all of the components.

Want to hear what it sounds like? There’s an mp3 clip under the final steps section.

[audio http://www.echanter.com/marine-corps-hymn.mp3]

Making The Bulbdial Clock Touch Sensitive

We never thought about it before, but having the controls on the bottom of a clock is a bit of an inconvenience. [Alex Whittemore] mutes the LEDs on his clock each night and after a while, decided he should make the mute button into a touch strip on the case. You’ll remember that the Bulbdial clock uses colored LEDs to create the effect of a sun-dial, casting colored shadows for each hand of the clock. It makes sense that this would put off a pretty good amount of light at night. [Alex’s] original thought was to use a capacitive touch sensor but complexity and cost were in his way. What he ended up with is a resistive touch switch based off of two metal strips. He used metal repair tape but suggests copper foil as he was unable to solder to tape. When your finger touches the two strips it completes the circuit for the base of a transistor, which in turn grounds the mute button on the clock. Cheap, simple, and illustrated in the video after the break.

Continue reading “Making The Bulbdial Clock Touch Sensitive”