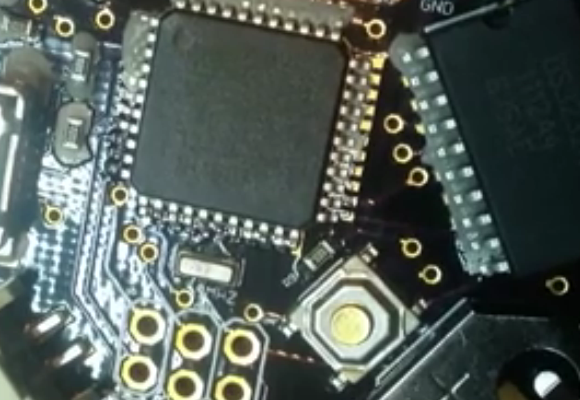
It’s no secret that we’re bizarrely drawn to macro videos showing solder paste during the reflow process. This electric skillet reflow guide provides the fix we’ve been jonesin’ for while including some helpful tips for first-timers and veterans alike. Not sure what we’re talking about? Look at the grey paste at the top of this image. As it heats up it’s drawn under each component as seen in the lower half of the image.
This particular guide is aimed at one-off assembly so a solder paste stencil is not used (we learned a lot about those earlier in the month). It instead uses the painstaking toothpick application technique. It takes time but the upside is that once you get the hang of it you’ll apply the perfect amount of solder each time. After placing all of the components [Count Spicy] carefully transfers the board to an electric skillet, covers it with the glass lid (so he can see what’s going on), and sets the temperature just above the solder’s specified melting point.
Since the skillet is cheap and easy to find you really just have to order the solder paste to get into this type of assembly. Our only gripe is that you can’t really follow a temperature profile with this rig. For that you need to move up to some PID controlled hardware.


Sure, and who can blame you for that!? It is very similar to “watching the paint dry” but is much more dynamic and therefore more entertaining. I can sit and watch those videos for hours.
My only question is: how do they bring lens so closely to the fuming solder paste without the fear of ruining the optics’ coatings? I wonder if any of the cameramen behind those videos can comment on how safe that was for the camera…
Just use a “UV Filter” (otherwise know as a flat plate of ordinary glass in a threaded aluminum mounting ring). Same for soldering under a microscope. Discard as needed. About $2 from any Chinese camera store on e-bay or Amazon. For old B&L stereo microscopes you will also need a 38 mm to 52 mm adapter (no need to discard adapter). 38 mm UV filters apparently do not exit. Or get the official B&L 38.1 mm lens protector (about $25 on e-bay).
Do not use your skillet (or oven) for food after you have used it for reflow. There are a lot of nasty fumes that stick to the walls and do not come off again.
Also, use good ventilation. The fumes are not all toxic, but neither are they healthy.
While it is an interesting video, drag soldering would be less time consuming and produce much better results.
It’s nearly impossible to dispense solder paste in the correct amounts (and correct areas) without the use of a solder stencil.
This is how I do it. Toothpick and dedicated frypan. I don’t put a cover over it, but maybe I should. I’ve been trying to “etch a stencil out of soda can,” but haven’t got it right yet. It dissolves through in some areas while other areas still have the holes plugged. If you’re having trouble getting the paste on with a toothpick, remember, “roll the toothpick to apply paste, wipe it to remove.” It really goes pretty quickly for me now, especially since I used an aquarium pump and some small brass tube to make “a tool that sucks.”
Can’t get my camera to focus very close, but it has LOTS of pixels, so I can make a still by holding it back a little ways and cropping the image.
Careful with the TQFP type pack to get it less than 1 pin out of alignment. Sometimes I’ve had the solder pull the pins to the wrong pads. Not hard to fix, just heat it up again and pick the part off with a tweezer.