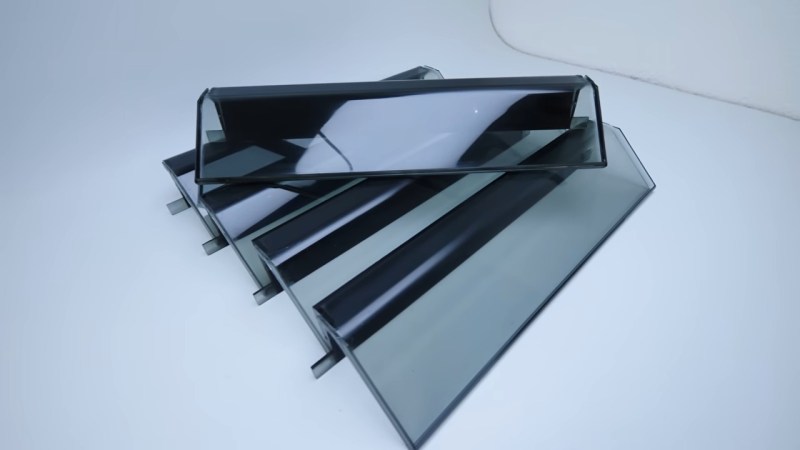
IBM Selectric typewriters have a lot of unique parts that can be tricky to source, but one we didn’t think of was the clear acrylic(?) dust covers, that are apparently very hard to find in good shape. [Eric Strebel] has a few Selectrics that all have issues with these parts. While you could come close to recreating this piece with acrylic sheeting carefully bent to match the original shape, [Eric] has a different hammer to try in a new video: replicating it with a resin casting.
He uses de-gassed tin-cure silicone to create a mold for the original, with a bit of 3D printed PLA and foam board to hold the silicone to create the mold. That’s done in two steps to create a two-part mold, which is separated and cleaned before the resin goes in. The original part is actually a smoky plastic, rather than fully clear, but [Eric] is able to match it perfectly using a colourant in his clear ̶e̶p̶o̶x̶y̶ polyurethane resin. The resin is put into the mold with a simple gravity pour, though he does have a vibrator on it to help it flow. Curing is done under heat and pressure– 60 PSI. The results are amazing; once he adds a touch of paint to match the black finish on one face of the original, it’s very difficult to tell [Eric]’s casting from his master piece, except that the cast replicas are in better shape.
This particular part works very well for casting and not much else. While you could match the large curve by heat-bending a piece of smoky acrylic, there are lips along the edges of the part that would be tricky to reproduce. [Eric] also needed several, for his multiple typewriters, and this method is very efficient at producing multiple units since the mold is reusable.
While you might not have an IBM Selectric that needs a dust cover, this technique is equally applicable to all sorts of clear shapes. If you’re new to resin casting, we have a handy guide to replicating plastic parts to get you started in this kind of work. It’s not just large parts that can be replicated: you can even copy phonograph records, such is the fidelity of resin casting.


three things i am very happy i do not collect: CRTs, typewriters, and physical music/movie media. i like that most of the things i want to amass are affected by Moore’s Law in a way that makes it easy to hoard.
I am pleased that you choose not to collect typewriters. More for me!
the thing i really don’t get is the collecting of VHS cassettes. transfer to hard drive and throw the damn thing away!
The hard drive doesn’t work in the VCR’s tape slot
You are not trying hard enough
Why Epoxy though? If the original part was acrylic, cast acrylic. Lighter weight, greater impact resistance, more UV durable, less embrittlement over time and faster curing and less exothermic (both factors result in less chemical damage to the silicone prolonging tool life).
The only thing epoxy has over acrylic is its easier to find a supplier of pourable epoxy than a pourable acrylic system.
It is polyurethane, not epoxy.
“but [Eric] is able to match it perfectly using a colourant in his clear epoxy resin. ”
just went with what was written.
Tyler hallucinated it. And also didn’t read the very first line of the video description.
Clankers hallucinate; humans goof up. I dun goofed.
Also, I’m not sure if you meant this to come off as an offensive troll, but by using a word associated with LLMs you dehumanize the writer and come off as very rude.
Sorry Tyler. Meant to be funny, given the recent trends. I see that doesn’t translate to the written word very well. Apologies for the slight.
Thanks for clearing that up; I can see how it would be funny with better context. Apology accepted.
ive been experimenting with acrylic bending techniques. when i find a method that doesnt bubble the surface il let you know.
next thing i try will probibly be running hot air through a pipe and doing gravity bends. first attempt used a heat gun using a rounded countertop edge as a guide. keeping things square is hard so bend it oversize and trim it if you need to. precision bending probibly requires an oven and a precision mold. i can see why resin casting might be an acceptable alternative.
Make sure youre buying cast acrylic sheets not extruded for better results.
im using crap salvaged from unfixable dead monitors.
The other thing you might be encountering, especially if it’s salvaged plastic, it may be polycarbonate. It’s more prone to surface boiling and water ingress. So you have to run it at a low temperature for a long time to dry it before kicking up the temp to bend it. Even if it is acrylic, you might just be going too fast and hot. Running long enough that it lifts away from the heater, then drops down will ensure you’ve got a good heat soak through the whole thickness of the material.
Try shelding either side of the bend with something like plywood or MDF, spaced about twice the acrylic sheet thickness apart. I found if you gently let the heat build up just along the bend line with the hot air gun it’ll eventually start to yeild exactly where you wanted it. Because neither the wood or the acrylic is a particularly good thermal conductor the heat doesn’t creep too much keeping it from warping.
Also watch the wood as you go, it will give you much better early warning signs than the acrylic. If it starts charring or discolouring then your heatgun is too hot, too close or you’re not moving fast enough and risk bubbling the surface.
That said I’m no expert so there may be much better methods, but for the couple of times I have it worked well for me after what sounds like similar first results to yours.
i had a big roll of 6″ kapton tape i was using to keep the wood from charring. for a test jig i have a section of particle board. i clamped a hollow tube (i think it was a roller shaft from a printer, has a nice finish too) to the top surface with some metal brackets to keep the curve flush with the top surface. running a line of silicone caulk along the inside edge and cutting it flush would help keep it flat and protect the wood. or use a round router bit the same diameter as the tube, since i have neither of these things il have to use tension to keep it from dimpling. clamping some weights to the overhanging end should help with that
i need to drill the end out to fit the nozzel for the heat gun, its close but not quite there, i may also want to clean out the inside somewhat, seems to either be rusted or unfinished or full of oil, none of which would be good. chuck up a bottle brush in my drill or something. i also kind of ran out of flat acrylic using my last piece for a case for a joystick project. everything else i seem to have is 3/8ths or greater, idk even how to cut that with the tools i have and i doubt it will bend well without a large oven. as usual my budget is zero. i can probibly do some tests with the surviving scraps from my last project, the ones i didnt use to test drilling techniques.
Charring?! You’re waaay too hot. Slow and gentle is the way to bend plastics.
so noted, will lower the heat. im using my smd soldering station as a heat source so i can dial the temperatures pretty accurately.
Sometimes the bubbling is the result of absorbed moisture, and preheating the sheet for a few hours in an oven at lower temperature can help.
good tip, will try that. i live in a rainforest so all my stock is probibly waterlogged.
Might be a good one to remember if I ever get around to restoring my dad’s old turntable!