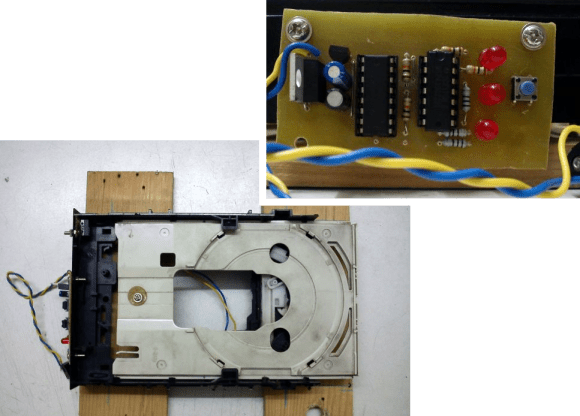
Etching PCBs goes a lot better if you agitate the solution in order to carry away the dissolved copper and get fresh etchant to the area. With that in mind [Rohit Gupta] designed a mechanism in Sketch Up before realizing he was going about it the hard way. He ended up basing his agitator on a broken CD-ROM drive instead of starting from scratch.
He uses the CD sled from the drive, ditching the lens and its support structure. To get direct access to the motor that drives the tray he uses an L293D H-bridge chip. This is controlled by an MSP430G2231 microcontroller. The driver board seen in the upper right includes a voltage regulator, three status LEDs, and one user input switch. Once triggered, the sled will move back and forth, contacting an old mouse microswitch which acts as the limiting switch. We find it entertaining that [Rohit] prototyped the circuit on a breadboard, then used that success to etch the final circuit board (shown in the video below).
If you’ve been following the hacker creed and never getting rid of any junk you’ll have no problem finding a donor drive to make one of your own. But just in case you can’t get a hold of this hardware a similar agitator can be built using a hobby servo.


Very interesting this solutions using old computer parts, i’m building a CNC from 2 cdroms and this will be my next project, both, to do PCBs
Please please please share the process if you manage to do it, I´ve been tryng to do the same thing for a while now
Hi, i’m following what this guy did: http://hackaday.com/2010/11/08/cnc-machine-from-pc-parts/
yeah because it’s o fc#ing difficult to buy 2 or 3 stepstick drivers and programme a microcontroller…. sure buying ready made stuff isn’t awesome achievement but if it’s cheaper than components themselves then what can I do??
Glad you liked it.. Incidentally even i am thinking of building a small desktop sized CNC using the remains of the CD-ROM.
You can surely see this :
http://www.instructables.com/id/Pocket-laser-engraver/
Its an awesome instructable and pretty well detailed!
I feel so honored to be the first comment. All of my hard work and dedication has paid off. Getting the top comment has been a dream of mine for many years, and i would like to thank those who have helped me along the way. First and foremost i would like to thank god for giving me this opportunity. Next i would like to thank my parents. I want to thank my friend Josh Arcaro, for being really skinny and always there for me. I would also like to thank my pet tadpole for surviving against all odds for over a week. Next i would like to thank the squirrel that lives in my backyard for climbing trees because that gives me inspiration that i need to get through the day. This is a special moment in my life and i would like to thank any of my unmentioned friends and family that have helped me along the way. This moment will be a moment that i will never forget. I just remembered a few other people i would like to thank; facebook, the fish i caught in the third grade, my light in my room bc i wouldn’t be able to see the keyboard without it, the internet for letting me go on facebook, my house because without it i would be homeless, and last but not least i would like to thank all the people out there that actually took time out of their day to read this. I cannot stress how much of a big deal to me this is. I have been trying to be the first comment on a post for years, but that has not been possible until this amazing day. Hopefully my good luck will continue, but this is undoubtedly a rare occasion. If you asked me how i did this, i would say, you can achieve anything u set your mind on. To all the kids out there reading this, i would like to tell them to follow their dreams. Being the top comment is amazing, thank you everyone.
Don’t give up!
Ironic
To be fair, in a binary system your comment is #10 which, when you think about it, is a 1… just one that’s followed by some other meaningless number. So it’s kind of like being comment #1. Don’t give up kid, someday you’ll be rich beyond the dreams of avarice.
oh! sorry for destroy your dream…
I’m not really sure if this is brilliant or sad…
I think you took a little too long crafting your speech. I made the same mistake on youtube with Gangnam Style.
>Using an expensive microcontroller board where basic 7400 logic would do the job.
Outsourcing anything but t-shirts to India never ends well.
The controller is for free and so are other parts! Anybody with an address can get it from TI. I agree that it could have been implemented from logic ICs as well but i had the parts lying around.
I although find the last line a bit derogatory!
Thanks for the comment!
We go over this every single time at hackaday, using a µC is often cheaper than logic in small volume, plus you can configure away any errors in software instead of going to get the iron again.
Even in very large volume, using a µC can be cheaper than logic, a small controller isn’t that different from a logic chip in large volume pricing (millions of units) when mounting and everything is included.
No need for 7400 logic also. The tray mechanism has already a limit switch with two positions. A little modification to adjust the travel distance, two pull dow resistors, and feed directly the L293 intputs.
logic free. many moons ago, in need of a qk fix i ripped apart a knackered scanner and with an old wormscrew lego motor and the largest cog hooked it up to a sledge that ran over the slide bars . a little bit of light oil for lube and an egg timer and done. the cam action only gave 10mm ish of linear motion but it was more than sufficient given it was such a shallow developer tray!
You don’t really even need any logic at all, or the CD drive for that matter. Just an on/off switch and a motor with a stick attached with a pivot (like old locomotive wheels) attached to a sliding platform would shake back and forth enough. You could probably make something up with one of those under-mount drawer slides and a drill.
So what you’re saying is, this guy has an old CD drive he wants to use for an agitator, he should throw it away and go buy a drill and some drawer slides?
Cruised through the build log but didn’t see an explanation why he went with a switch to reverse motor direction vs just reversing after x (milli ?)seconds. Seems mechanically simpler. Maybe v1.1 could make use of a continually rotating motor and cam to slosh everything back and forth. No controller required.
Hi,
First of all its not a Stepper motor that handles the cradle its a simple DC Brushed motor. So if you change the voltage or load the time it takes to come back will change significantly. Hence a switch was required to detect the cradle`s position.
Here is the final build video:
http://www.youtube.com/watch?v=0nLpa1uPF_E
Even the CAM arrangement is cool but i wanted to use old parts than to make an entirely new arrangement!
Thanks!
Thanks for the reply. I didn’t realize brushed motors were so imprecise. I figured you skipped the cam option since this was a recycling project as much as anything else. Keep up the good work.
Yep, same thought here. A simple DC motor with a crank arrangement would have done the same thing, and completely foolproof to boot.
hm. i was considering just attaching a vibration motor from an old phone or playstation controller either to the tank, or to the pcb clamp, to get that jewelry cleaning effect. as long as it doesnt do anything to the resist, it seems like itd be a very simple improvement over a standard tank setup.
The jewelry cleaners are ultrasonic transducers. Unbalanced motors will certainly swirl liquids but it won’t give the same action of the sonicators you mentioned.
indeed, and those transducers are available as well. i just suspected that reproducing the cleaning effect properly would strip the resist off fairly quick, and if agitation is the end result that im lookin for, a vibration motor seemed both quick and easy.
I tried attaching the PCB to the end of an electric toothbrush – one of the cheap AA battery ones. I’m still getting started with etching and fiddling with a lot of different things, so couldn’t be sure if it made much of a difference. It was a handy board holder if nothing else.
Posted the comment on his site, but I’ll post it here as well. Great build. To minimize the wear on the end stop, could you have the tray first go to a home position (run it backwards till it hits the switch), move a predefined number of steps away from the switch, then begin the oscillation. The oscillation should now occur independent of the switch. Thanks for posting this. This is a hack in the truest sense.
“he realised he was going about it the hard way”
the hard way like using a micro controller to reverse a motor when it hits a switch?
That is what I was thinking, just wire 2 micro switches to the place on the pcb where the original switch was then place one so the sled depresses the switch when open and the other so the sled presses it when closed. easier and cheaper.
Hi,
The ‘Hard way’ was building stuff i made on SketchUp and not this! :P
I don’t get it why people would use ferric chloride for etching PCBs anymore? Don’t you folks in the USA, India and other countries know about sodium persulfate? It minimizes over-etch, is safer, doesn’t stain everything (although it bleaches textiles), its solution is clear so you can see the copper being etched away.
The reason I use it is because someone gave me a 5 gallon bucked of ferric chloride, that is enough for most of my life…
Ferric Chloride…
Because it’s really good at staining things, over-etching and generally being a pain in the process. Why go for a better etchant when you can have all that fun!
You know, you could always learn how to do it too…
I’m curious… wouldn’t shaking the solution worsen over-etching? It seems like more etchant would make it underneath the photoresist if it’s flowing transversely.
It seems to me that the longer the board stays in the solution the more etchant creeps under the resist, if you etch fast there is very little creepage under the resist.
Commercial etching machines use moderate to high pressure sprayers with etchant and etch boards in as little as 30s.
Air entrancing (air pumping) you can get an etch in 2 minutes. So far that is my personal best using FeCl. High pressure spraying corrosive materials isn’t for the faint of heart either. So I’ll settle for the extra minute and a half I’m taking over what the pros are doing.
Not saying you should, i’m just making the point that you won’t etch under the resist by shaking the tub of etchant, using a worst case scenario that is known to work.
Use air. Once you’ve used air in a tank you never go back to shaking. Get one of those cheap ass 12V tire inflation air compressors and stuff an aerosol spray cap on the end of its hose, into the tank, and you’re golden. Anything else is total Tomfoolery. Oh, and heat your tank until it just starts to fume, around 110F. You’ll enjoy etches in under 5 minutes with air, and a heated tank.
Or an aquarium pump and a air stone like people used to use.
Or send the boards out to OSHPark (My favorite)
Or just go buy an Arduino and the appropriate shield!
Or what the hell, everything has pretty much been made already, just buy the finished product from somewhere.
(i felt a distinct lack of Arduino in this post so i had to mention it)
Exactly… This is engineering overkill. Take a simple little task and turn it into something way more complex than it needs to be and then wonder why it never quite works right… Air stone, aquarium air pump and some tubing… Simple. Just make sure to keep the pump above the level of the etching solution – a shoe box or something will work, no need to build a freaking suspension bridge or anything to hang the pump from.
I’ve heard the aquarium pumps work well too. But I’ve never kept fish, so I never had one just kicking around to use. My point is pumping air into an etch tank is the best way for a hobbyist to enhance their etching setup. Sure pressure spraying is the very best method known to man but I submit that is not worth getting involved with due to the range of complications it presents. Pumping air into an etch tank is about as easy as dumping a hose in, and going. The results speak for themselves too.
I’ve personally etched boards in 2 minutes air pumping, and using a heated etch tank. Boards that I might add came out perfect. No undercutting, and no under etched sections. What else are people looking for?
I’ve done the same with one 555, one BJT and nothing else…
Next time use a flyback diode too as motors are inductive loads. I mean splurge! :)
Splunge!
For what is’s worth. The earliest one I’ve seen.
http://www.instructables.com/id/PCB-agitator-from-an-old-CR-ROM/
LOL… I made mine years ago just using one old drive with micro switch (just changed a bit original micro switch of drive), a pair of relays (one DPDT can do the trick), linear regulator and a power supply…