Everyone reading this post has had a cheap pencil-style soldering irons that plug straight into the wall at some point in their lives. Even if you’ve upgraded to a professional soldering station, you probably have one of these cheapy irons kicking around that are slow to heat up to an unknown temperature. [Pantelis] thought he could fix the latter problem with his Homemade Soldering Station for those basic soldering irons.
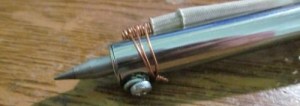
Since the intent of the soldering station was to control the temperature of the iron [Pantelis] had to figure out a way to sense the temperature. He did this by strapping a thermocouple to the iron near the tip. The wires were run back through the handle and then along the power cord.
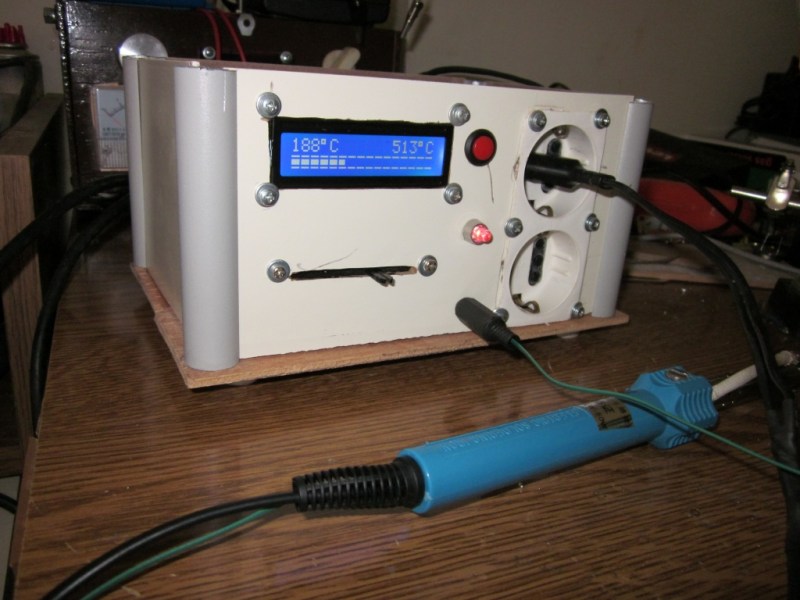
Both the stock iron plug and the thermocouple leads plug into a box put together specifically for this project. In the photo you’ll notice the LCD screen that displays both the target and actual temperatures. The linear potentiometer below the LCD screen is used to set the target temperature. The LED to the right alerts the operator that the iron is heating up and when it is at temperature and read to go.
Although there isn’t a lot of schematic or part list information, [Pantelis] did do a good job photo documenting his build. Check it out, it’s worth a gander.


Thumbs up for the reuse of the low voltage supply. It look like it is out of an old boom box. Also thumbs up for the use of opt-isolation.
I’d like to know how he set up a reference for the thermocouple. I tried to read up on thermocouples and reference junctions and it mad my head hurt lol so I went with NTC thermistors.
He probably either used an IC that does cold junction compensation or he just didn’t worry about it. As long as the junctions stay at roughly the same temperature, then I think it’s just a calibration offset.. and probably only a few degrees anyway.
The mounting and arrangement of the power supply makes me cringe. Is that not a fire hazard?
Modern transformers have an internal thermal fuse to prevent fire from overheating.
Me reading your comment: “Wait, they have a fuse to prevent the fire from overheating? How the hay does a fire not overhe- oh.”
Not that it would overheat anyway. It looks like it is good for1 to 2 AMPs and the MCU etc will only be draining milliamps.
Wood has an ignition temperature of around 200degC. If you have that kind of temperature chances are something’s already on fire.
Nice proyect, can anybody explain how it work? or add a schematic? seem it read a k-type termocuple to put in a PDI loop to control (pwm output?) what?
Nice idea but seems a total waste of time, having the thermocouple that far (thermally) from the tip is probably just going to make the response time of the controller completely useless.
A crappy iron with a controller is still a crappy iron – what a total waste of time. Just throw it away and get a proper iron.
You’re probably right. There is more to a quality soldering iron than just temperature control. The silicone handpiece cord on my Weller is so supple. Nice irons are exactly that, they’re nice.
I agree. It’s the small details that makes the solder iron stand out. The cable on my Weller WHS MC is as flexible as my (already unusually flexible) headphone wire while having a much larger diameter.
I suppose that depends on how much soldering you plan on doing, and what purposes you’re trying to achieve. Sure, this iron isn’t going to do high precision joints, and the crude output wouldn’t lend itself to success in soldering surface mount stuff that gets twitchy when you leave the heat on it for too long, but for run of the mill stuff, why the heck not? It will, in fact, heat wire and melt solder… and as I recall, those are the two most important bits of the soldering process. I still have my old 30w Rat Shack iron and it still gets used now and then (just desoldered a blown diode from a CB radio with it on Saturday, in fact)… and you know what? It still works. Didn’t have to unbox my weller rig and clear counter space for it, just plugged the old iron in and waited for 5 minutes… sometimes cheap works just fine.
To anyone looking to recreate this project from scratch, though, please do yourself a favor and buy a high quality iron if at all possible… it *will* serve you better in the long run.
I have used many cheap irons throughout my life and for the really bad ones that overheat the solution has always been super simple: add a diode in series. Power is reduced and they appear to stay in a more reasonable soldering temperature.
Wow this is going for the really cheap irons. I think this cannot achieve any good performance since the temperature is measured incorrectly. The sensor is too far away from the tip, it is still in good contact with the air. He says that his PID is not working correctly so he might want to start with a simple ON/OFF temperature regulation.
adding a diode in series, please do explain…???
Being an AC iron, a diode in the circuit would block half the wave, so half the power.
Wouldn’t adding a diode mean half the voltage, and therefore 1/4 the power? (Power = I**2*R)
No, a diode will make it powered 50% of the time, thus halving the power. In fact, due to the fact that the heating element has a positive thermal coefficient it will consume a bit more than half the power.
You can also finely limit the current by using proper capacitors in series with such iron… you can have multiple capacitors with switches, so you can set the power on the fly… bigger capacitor = more AC power… you can try this with lightbulb instead of iron to see it works…
Well I’m using an old Weller Magnastat iron that I got for way less than $10. Guess it isn’t that exact in temperatures (being a bang-bang type regulator) but works well enough. The advantage with it is that spare parts are still widely available and relatively inexpensive.
Yes this reply _is_ on topic: just want to remind people that buying old used stuff can be more than worth it.
I paid $10 for my Weller WTCPN in a cardboard box of electronics junk at a flea market. So if you want to split the cost I paid between everything I suppose I paid less than $10 for my Weller too.
This is a good cookbook for a few other temperature controlled devices. One that I want is a temp controlled hot glue gun, one with a quick warm-up but won’t overshoot and burn the glue, and stabilizes to a desired temp. I haven’t found one for sale. I know Ben Heck made one, but I haven’t gotten around to building my own. This station would do the job with very minimal changes.
I was thinking use readily available solder station replacement irons, maybe one that has replaceable parts at that.. Often, two thirds or more of your cost is in the solder station “head unit”. I also think the hardest part to DIY well is the iron, get something that’s known decent and build something to power it. It should have a good heating element and temperature sensor. Using an off-the-shelf iron allows you a range of solder tips that go with it.
I got a Dremel hot glue gun for free once when I bought one of their rotary tools. That moto-tool is long dead now but Dremel sure made a good hot glue gun. Just putting the unsolicited endorsement out there for what I think is a good tool. Though it is likely they no longer make it.
I found one on ebay and it is being called vintage. On the box it claims it has a Solid State PTC heating system
http://i.ebayimg.com/00/s/MTIwMFgxNjAw/z/pQ4AAOxy4YdTSsQY/$_57.JPG
Actually I used to use one of these for quite a long time(5-6 years maybe): http://www.tme.eu/en/details/pensol-sl20c-i/soldering-stations-accessories/sorny-roong-industrial/ in a home made soldering station. For about 12 EUR it is quite a good choice and for some reason the available tips last a long time. I made a simple analog circuit with amplifier + comparator. The transformer was a 100W halogen one, which had two 11.5V secondaries, so it easily turned into 23V supply. I did not care for complicated stuff like PID or display, I simply used a thermal sensor(stuffed inside) to mark some useful points on the panel.
I would guess it is more true for bigger companies that the iron is a significant part of the station cost.
I would say he needs to actually find out the temperature of the tip, as that’s the important bit, so something like a cheap hakko tip thermometer clone off ebay, then he can measure the actual tip temp vs his pid sensor temp, graph it all out and see what the correlation is, then work out his offsets.
Most people that would be doing this hack are not the type that cares about the actual temperature of their iron to a few C anyways. If you are doing mil/areospace/ISO9000/IPC/manufacturing work, you would be buying a proper soldering station and follow the soldering guidelines.
I usually do most of my SnPb soldering at 500F (260C) to 550F (290C) range depending on pitch and size of parts I am working with. To me anyways, the number is relative. I like to keep iron at lower temperature to save the tip’s life, but hot enough to get good solder joints.
This project of soldering station looks like more professional http://paja-trb.cz/konstrukce/mikropajka_2011.html
PID doesn’t even matter in a temp-controlled soldering iron, AFAIC. Temp can fluctuate plus or minus a few degrees, and it matters squat. It’s heat mass of the tip, temp-control, and total power output that matter.
The most important point is for the thermocouple to be as close to the tip as possible. There’s no PID that can account for a big gap, unless it can read your mind or see what you are doing.
FTR, I have an iron with PID control. When it reads 250C, it takes about 5-10 seconds before the tip will melt solder. That’s cuz the thermocouple is built into the heater, not the tip of the iron. This makes PID control practically useless in any soldering iron.
Something like the Weller WRMS solder tips have a very fast and accurate temperature control with the sensor positioned very close to the tip. The downsides to those are that they are tightly integrated (sensor, heater, solder tip) and so very expensive, the other one is that they are relatively low power.
Better idea: Buy the iron from a more expensive station (You can get the weller WP80 pencils for about 100 bucks) and make your own station for it. You would get a much more useful iron. I don’t see much use in precision temperature control of something like this – Too unwieldy.
This is not the commercial grade soldering iron. But, it is definitely a fun project to tinker with.