The KIM-1 wasn’t the first microcomputer available to computer hobbyists and other electron aficionados, but it was the first one that was cheap. It was also exceedingly simple, with just a 6502 CPU, a little more than 1k of RAM, 2k of ROM, a hexadecimal keypad and a few seven-segment displays. Still, a lot of software was written for this machine, and one of these boards can be found in every computer history museum.
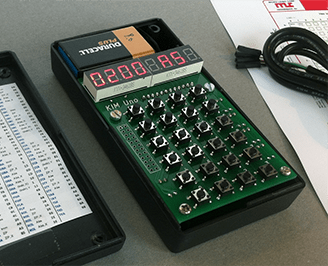
[Oscar] thought the KIM-1 was far too cool to be relegated to the history books so he made his own. It’s not a direct copy – this one uses an Arduino for the brains, only breaking out some buttons, a pair of four-digit seven-segment displays, and the I2C and SPI pins on the ‘duino. The KIM-1 is emulated by the Arduino, allowing for the same interface as an original connected up to an old teletype, and [Oscar] got his hands on the original code for Microchess and the first 6502 disassembler from [Woz] and [Baum].
[Oscar] put the schematics for his version of the KIM-1 up, and has the PCBs up on SeeedStudio. If you’re looking for an awesome replica of a vintage computer and a nice weekend project, here ‘ya go.


Nice website [oscar]! I loved my Suzuki too! It lasted about 18 years.
Pretty cool
Althout I think firs should be first ;)
Does it have a 20ma current loop to connect to an ASR33 teletype to punch paper tape?
… so you can print an ASCII maze on an entire roll of teletype paper …. }:~)
Not the first one and not the smallest one, check Mats’s credit-card sized KIMCard KIM-1 clone back 3 1/2 year ago:
https://github.com/SmallRoomLabs/KimCard
http://dangerousprototypes.com/forum/viewtopic.php?f=56&t=4646&hilit=kimcard
Sorry, but this is like putting a “transistor” radio
inside an antique vacuum tube radio set (no original
guts, just the outside knobs and housing).
And what is wrong with that? The transistor radio uses 7 watts and the tube radio uses 70 watts.
Ceci n’est pas une pipe–this is a simulacrum, a model. The original is built from logic chips and discrete components; you can poke at it with a scope or experiment with adding additional circuitry, and perhaps even change the memory architecture if you’re really ambitious. The replica, while having the form of the original, has all the magic as software running inside a microcontroller; you can’t physically poke at everything, only the externally exposed bits.
The original may have some logic chip glue but it isn’t made up of discrete components or at least the Kim-1 I have isn’t (mine is a blue one made by Commodore). All the magic is inside the 6502.
Keypads should be easy to make – but they aren’t. Kudos for trying.
When a computer keyboard is too big, and a touch screen isn’t appropriate (as in this case) getting custom keycaps etc. can make the desire for a “decent” keypad frustrating and expensive.
Cherry MX switches and caps could do the job at a reasonable cost.
The cheap and lazy way, of course, is to use a $2 matrix keypad and paper labels.
I really like this guy’s site, and the build’s not too shabby either!
If I remember correctly, the 6502 is a real current hog–seems like it took an amp to power the Kim board.
Yup, I haven’t fired mine up for a while but last time I did I was using a small power supply and the regulator was getting a little toasty. It seems all of the older stuff is a little power hungry. CPU, RAM and logic.
I quite like this. It’s the nicest looking Kim-1 simulator I’ve seen. I find, it’s one thing to make something work and quite another to make it attractive. This one does both. I ordered the kit today.
Well, the kit arrived last week and it’s really good quality.
It took a few hours to put together, mostly because I was avoiding soldering the 28 pin arduino pro-mini but it went together fine.
It’s a lot like tinkering with the real thing, sans the external power supply and it literally fits in the palm of your hand. Aside from that, with a USB serial cable it’s easy connect to a terminal (PC). I highly recommend if only for the build quality.
Neat post. I bought a Kim-1 Uno last November and didn’t do much with it other than assembling it. The article about the Kim-1 Uno clock inspired me to revisit this thread.
One thing this made me wish for was some bigger button caps… does anyone have suggestions on a nice looking way to fit these switches with label-able, finger-friendly tops?