Nerdalert: German TV Producers’ Amazing Vectorscope Animations

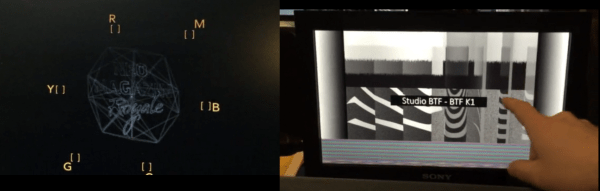
German weekend late-night comedy show “Neo Magazin Royale” has a bunch of super-nerds behind the screens in the production studio. This is apparently what they do when they’re (not) working: making test screens that render as multiple animations on their test equipment.

While others out there are limited to displaying cool graphics on oscilloscopes, these guys have vectorscopes and waveformer monitors. A vectorscope is like an oscilloscope in X-Y mode, but with one screen that decodes the color space and one screen for the audio (in stereo). A waveform monitor that plots out the brightness levels of a test image. Normal studio techs use these to calibrate their colors, brightness, and audio levels.

Apparently, these guys programmed a custom test screen that would: a) encode a small animation of a 20-sided die spinning around the show’s logo in the color channel b) encode the show’s logo in the left and right sound channels, and c) their production company’s logo in the screen’s brightness.

At the end of the video, the director Patrick (in the glasses) admits that they’ve spent about three months working on this project and everyone starts laughing. “And who gets anything from this? Nobody!” says the show’s host.

One way to rectify that, though. Post the source code!

DIY Drill Battery Replacement

Replacing Dead Battery Pack Cells Saves You Some Coin

No one will deny that cordless drills can be super convenient. Sure, they need to be charged once in a while but that’s not a big deal. The big deal is when the batteries no longer hold a charge. Buying a new battery pack from the drill OEM is not cheap. If you need several, it’s almost cheaper to buy a new drill/battery combo.

It is not uncommon for only one cell is bad in the battery pack. Getting a replacement cell makes economic sense. And at about $1 per cell, even replacing all of the cells in the pack is way cheaper than the alternatives. [ksickafus] had a battery pack that did not work and not only did he replace all the cells, he wrote a great instructable about it.

The process started by removing the cells from the plastic container. Since they were soldered together they came out in one unit. The cluster of cells was then laid down on a piece of paper and the perimeter of each cell was marked to document the cell orientation. Next, the leads connecting each cell to its neighbor were noted on the same sketch.

The new cells were then laid out on the template to make sure they were in the same orientation as the originals. [ksickafus] uses braided shielding as his new tabs to connect the cells together and learned from experience that flux is necessary for this type of repair. Once everything is soldered up, it’s time to re-assemble the cells in the plastic case and give it a charge. If you do this at home, make sure you keep an eye on it the first time so nothing goes wrong!

If replacing NiCd’s with NiCd’s isn’t cool enough for you, maybe popping some LiPo’s in your drill would be up your alley.