Solar nightlight

Nocturnal Solar Light Bulb Saves Your Lungs

India has a bit of a problem with electricity. In fact, over 74 million rural households live without power altogether. Instead they rely on burning fuel for light — and coincidentally, inhaling harmful smoke. Not to mention fuel isn’t cheap. [Debasish Dutta] wants to change this — so he came up with yet another solar powered light that is a low-cost alternative.

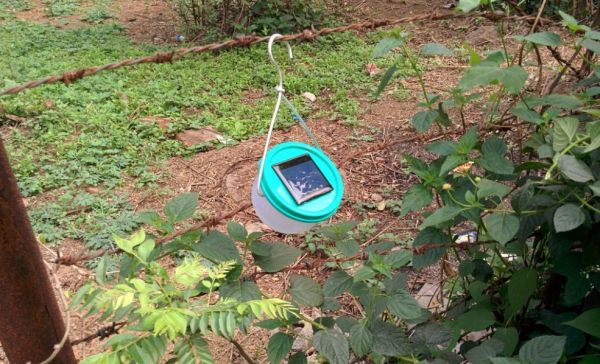
It’s a very simple light made out of a cheap Tupperware container, a 2V solar panel, a white LED, a rechargeable AA or AAA battery, a photo diode and a Joule thief (voltage boosting IC). One day of charging can provide approximately 20-22 lumens for the entire night of operation. While it doesn’t seem like much, a typical kerosene lamp puts out less than half that brightness.

And with the photo diode, it automatically turns on at night, and off during the day. A coat hanger doubles as both a stand for charging, and a hook for hanging it at night.

[Dabasish] says this is just the beginning and has a website dedicated to creating green energy and sharing it with the world. Video below.

Continue reading “Nocturnal Solar Light Bulb Saves Your Lungs”

How Cheap Is Cheap?

The Nordic Semiconductor nRF24L01 is the older sibling of the nRF24L01+ and is not recommended for new designs anymore. Sometimes, if you’re looking for a cheaper bargain, the older chip may the way to go. [necromant] recently got hold of a bunch of cheap nrf24l01 modules. How cheap ? Does $0.55 sound cheap enough?

Someone back east worked out how to cost-optimize cheap modules and make them even cheaper. At that price, the modules would have severe performance limitations, if they worked at all. [necromant] decided to take a look under the hood. First off, there’s no QFN package on the modules. Instead they contain a COB (chip on board) embedded in black epoxy. [necromant] guesses it’s most likely one of those fake ASICs under the epoxy with more power consumption and less sensitivity. But there’s a step further you can go in making it cheaper. He compared the modules to the reference schematics, and found several key components missing. A critical current set resistor is missing (unless it’s hiding under the epoxy). And many of the components on the transmit side are missing – which means signal power would be nowhere near close to the original modules.

The big question is if they work or not ? In one test, the radio did not work at all. In a different setup, it worked, albeit with very low signal quality. If you are in Moscow, and have access to 2.4Ghz RF analysis tools, [necromant] would like to hear from you, so he can look at the guts of these modules.

Thanks to [Andrew] for sending in this tip.

Measuring Filters And VSWR With RTL-SDR

Once again the ubiquitous USB TV tuner dongle has proved itself more than capable of doing far more than just receiving broadcast TV. Over on the RTL-SDR blog, there’s a tutorial covering the measurement of filter characteristics using a cheap eBay noise source and an RTL-SDR dongle.

For this tutorial, the key piece of equipment is a BG7TBL noise source, acquired from the usual online retailers. With a few connectors, a filter can be plugged in between this noise source and the RTL-SDR dongle. With the hardware out of the way, the only thing remaining is the software. That’s just rtl_power and this wonderful GUI. The tutorial is using a cheap FM filter, and the resulting plot shows a clear dip between 50 and 150 MHz. Of course this isn’t very accurate; there’s no comparison to the noise source and dongle without any attenuation. That’s just a simple matter of saving some scans as .csv files and plugging some numbers in Excel.

The same hardware can be used to determine the VSWR of an antenna, replacing the filter with a directional coupler; just put the coupler between the noise source and the dongle measure the attenuation through the range of the dongle. Repeat with the antenna connected, and jump back into Excel.

Happy Pi Day. 3.14159265359……

Unless you were alive in 1592, this is the closest to the perfect “Pi day” you’ll ever get.  3/14/15.  And if you want to take a moment to pause at 9:26:53 (am or pm?  Time zone? Country?) we’ll be right there with you. Well, sorta of.

Now, before you laugh, and think Pi is just a number, think again.  It’s almost magical in nature.  It’s effects on our daily lives is found everywhere.  From biology to astrophysics.  In the perspective of history, it can be used as a milestone to mark many different culture’s advancement of math and science.  In short, Pi is a keystone of the modern world.  With out it, we’d never would have gone to the moon. We might sill be on horse back.  And forget electronics.  That fun stuff never would have happened.

(As a side note, on this day, 3/14,  just happens to be Albert Einstein birthday.  Happy birthday!)

We hope you have an awesome Pi day.  We would love to see you in the comments too.  For example, we’d love to hear about and see posts of algorithms that can compute Pi.  How far can you compute Pi on a Raspberry Pi?  Or even child hood stories of your first encounter with that magical number.  Post up, and let us know your thoughts.

We’ll leave you with this cute video after the break, It’s an 8-year-old reciting 200 digits of Pi .  But if you need more digits….There is 1 million digits of pi.

Continue reading “Happy Pi Day. 3.14159265359……”

Open-Source Robotic Arm Now Within Reach

For anyone looking for a capable robotic arm for automation of an industrial process, education, or just a giant helping hand for a really big soldering project, most options available can easily break the bank. [Mads Hobye] and the rest of the folks at FabLab RUC have tackled this problem, and have come up with a very capable, inexpensive, and open-source industrial arm robot that can easily be made by anyone.

The robot itself is Arduino-based and has the option to attach any end effector that might be needed for a wide range of processes. The schematics for all of the parts are available on the project site along with all of the Arduino source code. [Mads Hobye] notes that they made this robot during a three-day sprint, so it shouldn’t take very long to get your own up and running. There’s even a virtual robot that can be downloaded and used with the regular robot code, which can be used for testing or for simply getting the feel for the robot without having to build it.

This is a great project, and since it’s open source it will be great for students, small businesses, and hobbyists alike. The option to attach any end effector is also a perk, and we might suggest trying out [Yale]’s tendon-driven robotic hand. Check after the break for a video of this awesome robot in action.

Continue reading “Open-Source Robotic Arm Now Within Reach”

How To Identify Plastics Before Laser Cutting Them

If you own a pickup truck, you’ll quickly find yourself making friends with people who just happen to need help moving next weekend. Trust me, it’s almost magical. And if you own a laser cutter (or work in a hacker/maker space that has one) you’ll get some odd requests to cut or engrave plastic items of unknown type. Before you do, you should read this (pdf) chemistry lab written by [David A. Katz] to learn how to identify what type of plastic it is.

There are several reasons why you don’t want to cut or engrave some types of materials. A few make a gooey mess that you’ll regret even trying. Others make a horrendous odor. Some hackerspaces will even charge you extra if you stink up the place (aka: malodorous material charge.) Some tend to catch on fire. Yikes.

But that’s not the worst of it. Some types of plastic release potentially deadly hydrogen chloride gas. It’s bad for the optics, it’s wreaks havoc on the electronics and mechanics of the machine, and could do a really good job of messing up your lungs forever. In the video after the break, you can see the flame test for such plastics in action at the NYC Resistor as they test several common items using nothing more than a blow torch and some copper wire. In short, if the flame test produces a green flame, do not put it in the laser.

If you want to see a good list of what is and what isn’t ok to cut, head on over to ATXHackerspace’s wiki. They will give you a nice run down with lots of notes and helpful hints as well.

Continue reading “How To Identify Plastics Before Laser Cutting Them”

Off Road Jack

Lift Kits For Car Jacks Do Exist

When needing to change a tire or work under our vehicles we humans reach for a trusty jack. The standard jack in your trunk or mounted behind the seat of your truck works fine 99% of the time. But what happens when the vehicle in need of repair has a lifted suspension, raising the frame in relation to the ground and making the stock jack now too short?

Off-Road enthusiast [am4x4] had that problem and came up with a neat solution. He made a lift kit for a roll-around mechanics jack! He started with a 1.5 ton jack from Harbor Freight. This jack had 2 small casters in the rear and one wide roller in the front. This combination works great on concrete but [am4x4] needed this to work out in the dirt so a few mods were in order.

First the front roller was scrapped and replaced by two large 8 inch diameter tires. To get these to fit the bolt holes for the roller were enlarged to the same diameter as the wheel bearings. A new solid axle was then made from 5/8 inch solid rod. Those may look like pneumatic tires but they are actually solid rubber and only cost $6 each, also from Harbor Freight. These tires not only raise the jack up several inches but also increase the surface area contacting the ground. This better distributes the weight of the vehicle and prevents the jack from pushing itself into the ground.

In the back, the small stock casters were removed and replaced with larger, heavier duty ones. Even with the larger casters, the jack leans rearward. [am4x4] plans on making an extension to level the jack out but for now, it works well and is definitely a conversation piece at the off-road get togethers.