The term RepRap is fairly common and gets thrown around too often when generally talking about DIY 3D Printers. We must remember that the intent of the RepRap project “…is about making self-replicating machines…” and of course “…making them freely available for the benefit of everyone…“.
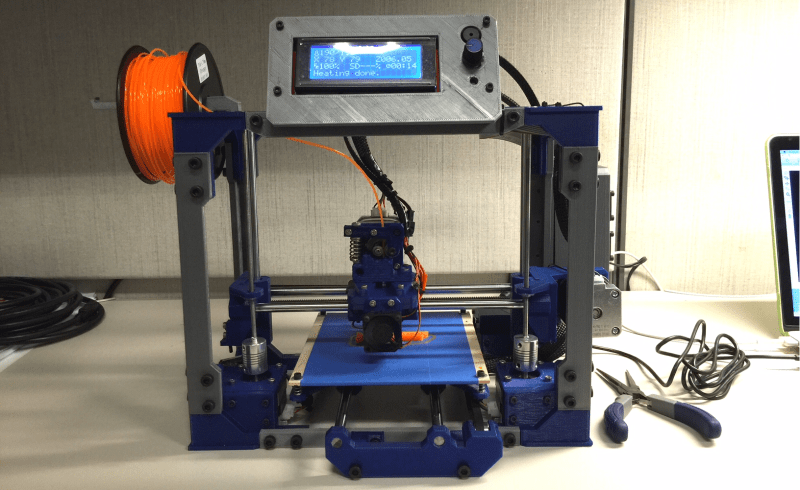
[MiniMadRyan] has recently designed a printer that could be considered the embodiment of the RepRap philosophy. He’s calling it the MapleMaker Mini V2. An extremely high percentage of the parts required to build this printer are, in fact, printable themselves. The frame pieces are printed, all of which can be printed on the printer thanks to the 6x8x6 inches print volume. The overall design is aesthetically pleasing, resembling that of a Lulzbot Mini.
The MapleMaker Mini V2 is self-replicating. The other part of the RepRap goal is to be free to the community. The design files are available on YouMagine and the assembly manual is better than those provided by most commercial companies. So if you’re looking to build a printer, be sure to add this one to your short list!


Anyone remember Tantillus?
Yep, that was the first thing I thought about.
oh, gawd… the filament path! This will be a jam-o-matic :(
Hey there! Thanks for the comment regarding the filament path. Indeed you’re right, the initial design led to some issues. The released files and design though include a thoroughly revised spool holder that mounts to the top of the chassis and provides a clear path to the extruder. There’s also been slight changes including a revised extruder since that photo was taken.
I’m glad to hear that it’s been reworked :) Also, I didn’t mean to pee on the parade, this is absolutely something to be proud of!
Neat printer! I’d be concerned about using this for any large period of time due to warping, but that’s not the point now, is it?
Very cool though, next step is printing the screws, or a screw replacement. If people can make houses with wood pegs, it stands to reason that you could do the same with a 3d printer.
It is very nice, but I thought people lightened up on the RepRap purism.
Plastic structural members & joints generally don’t make a very rigid frame. Plastic is fine for a molded deck chair, but if you’re looking for precise actuation, the flex of plastic parts is undesirable for making parts.
I wonder what the next step is though. Friction-fit square keys & pegs instead of metal fasteners?
With all the new materials and filaments coming out you cant generalise about there properties not being up to the job.. Nylons are getting easier to print. Other filaments with fibres and additives to modify there properties are making them more useable for accurate and stable structural parts. Many hobby printers can now print accurate and precise parts that can slot together properly.
So its achievable now with abit of care.
Compared to a decent metal frame & joints? And I’m not including Makibox or the single plate i3 in that. Nylon is nice but it isn’t a magical material. You want something that holds shape & position to a high degree.
Even 2D printers have metal structure inside. The plastic you see is largely parts that make it pretty.
Eh, I suspect the reprap purism will stick around for a good while – it’s interesting to me the same way that an all-mechanical clock is interesting. It doesn’t really detract from pragmatic, higher-performance machines to have some machines with a higher self-produced fraction.
Vik Olliver was doing friction-fit stuff quite a while back, although that was on tubular frames for a printer. It’s probably a thing that’ll happen, just because.
It’s not the plastic being incapable of holding form. PLA is incredibly rigid, up to and including shattering before bending. The issue is how parts are printed. We don’t create truly solid parts, they are corded. So they are weak depending on the grain of the plastic pathways. Printing hotter generally forms better bonds but then it’s a hot mess literally. Plastic strings and blobs become all to common.
Anyone know how easy it will be to convert this to using a 3mm filament extruder? I have 28kg of 3mm PLA and an ultimaker 2 sat in my lab. Would be nice to get a second printer going. Seriously doubt i could swing buying any 1.75mm filament though when i have enough 3mm to build a small house….
Swap out the hot end, and probably swap out the filament drive, and you’re pretty much good to go. Hard to tell if the extruder mount is the usual 50mm, but if it is, then you can just print whichever 3mm extruder body looks good to you instead of the 1.75mm this is using. Nice and modular :)
Does anybody remember the original Printrbot. When I first saw it I was amazed how Brooks could come up with a much simpler design and elegant than any RepRap at the time. I’d say it still is the most 3D printable printer there is.
I have one. It still prints to this day. He made a bold statement with the cost to get into printing but at a major disadvantage to quality. He uses printed pulley gears, the wrong belts, imperial hardware, absolutely no bracing for the smooth rods, too narrow a base footprint (which leads to it falling over), and various other things I’m sure I’m missing. Basically, you bought into the kickstarter…then spend the rest of your life fixing and upgrading everything with the proper parts. That’s why it was a success. He quickly ditched the plastic design in favor of laser cut wood because it was faster and cheaper than a 3D printer farm. He used the kickstarter money to buy the laser cutter after all the plastic kits were shipped.
Despite all that, once you upgrade the essential parts of the printer (bracing the smooth rods, floating x axis, metal pulley gears, metal z couplers, gt belts), the printer does remarkably well. Keep in mind by floating x axis, it decouples the x axis ends from the z threaded rods, I use it on all printers, immediately removes z axis rod wobble effects on printing. That was the biggest upgrade to printing quality.
It also wasn’t very fault-tolerant. I used a crappy Mendel to print the RP for an original Printrbot before realizing it was going to be even crappier. In my mind what makes a design “RepRappy” is when it’s at least capable of replicating something better than itself; this typically means printing higher quality RP at a slow print speed in order to create something that can print the same and/or higher quality at a higher speed.
None of my current bots have a bed large enough to RepStrap the upper print bed deck for this design ( Replicator 1 Dual, LulzBot Mini, Kossel ).
Do you have a recommended alternative? Can a laser cut piece of acrylic or other similar material be used?
Forget laser cutting. Cut a square of plywood or acrylic roughly the bed shape, overlay the Y carriage, mark the holes, and hand drill. There, I saved you 15 minutes of workflow and 5 minutes of tube life. Not every problem requires a laser in the 40 watt range to solve.
that’s true, some require a laser in the 400 watt range…
I like where you’re head’s at–
i applaude this design!! I miss the challenge of the pure RepRap. I
have drawings of a rework of the original Printrbot to improve it and make it more printable. I need to spend a couple weekends working on this ;)
Brook
Thank you everyone for the kind comments, I greatly appreciate them! I’m continuing to work on the design and have several upgrades and additions planned for the near future. This project has been a labour of love, from the first design to the last pages of the build guide. I hope everyone has a chance to see one in action soon at their local makerspace, or maker faire and see how well a printed printer can print (I know I’m still surprised how rigid it is!) Hope to see more ideas, upgrades and mapleMaker printers in the wild!
Cheers
Ryan
I am currently printing out the parts in my local FabLab, I feel kind douchey to block the Makerbot every time for the whole day they are opened, but I guess its worth it for the future :)
Just curious, is there any material which it should NOT be printed with ? Im currently using a Makerbot 2 with standard PLA.
Awesome! Can’t wait to see the printer! Regarding materials, I’ve printed primarily in PLA, though I did print a kit in ABS with some minimal warping. I obviously wouldn’t print the frame in any flexible filaments, but most any filament with similar or better specs than PLA/ABS would work!
Thanks, just one more question if I may.
I got 5 files I cant print on the makerbot due to size restrictions, any suggestions and what printer CAN print it ?
Bed Upper
Lower Frame (left & right)
Upper Frame (left & right)
Any ideas?
Never mind, I just figured out that the Ultimaker which the FabLab also has can do the Frame parts, but the Bed still doesnt fit on either device.
Check the latest files on YouMagine. I’ve uploaded a 2 piece bed design that should fit!