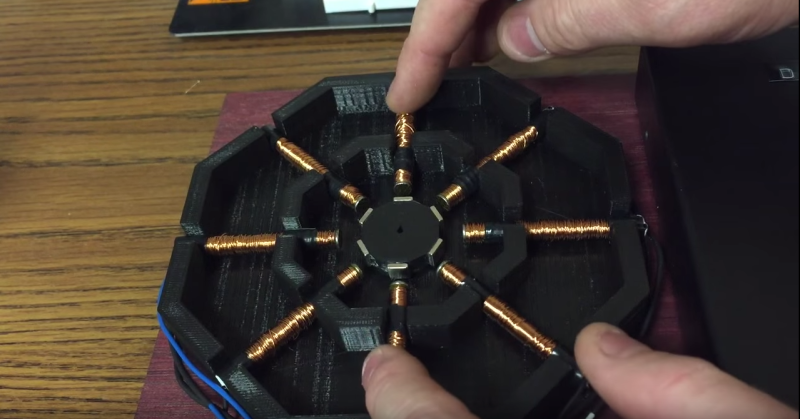
Few hackers have trouble understanding basic electric motors. We’ve all taken apart something that has a permanent magnet DC motor in it and hooked up its two leads to a battery to make it spin. Reverse the polarity, reverse the spin; remove the power, stop the spin. Stepper motors (and their close cousins, brushless DC motors) are a little tougher to grok, though, especially for the beginner. But with a giant 3D printed stepper motor, [Proto G] has made getting your head around electronically commutated motors a little easier.
While we’ve seen 3D printed stepper motors before, the size and simple layout of this one really lends to understanding the theory. With a 3D-printed frame, coils wound on nails, and rare-earth magnets glued to a rotor, this is an approachable build that lays the internals of a stepper motor out for all to see and understand. You can easily watch how the rotor lines up as the various coils are energized in a circular pattern, although it might be more revealing to include bi-color LEDs to indicate which coils are energized and what the polarity is. Those would be especially helpful demonstrating the concept of half-stepping. We’d also like to see more detail on the controller electronics, although admittedly all the video-worthy action is in the motor itself.
[Proto G]’s project isn’t going to have you cranking out usable stepper motors from your 3D printer anytime soon. Indeed, with NEMA-17 motors going for $14USD on Adafruit, and plenty of surplus motors of all shapes and sizes available on the cheap, it won’t be cost effective to roll your own motors for quite a while. Then again, if we’re ever to release the full potential of additive manufacturing and start the decentralized industrial revolution, understanding how complex electromechanical devices like steppers work is going to be key to developing processes to manufacture them on demand.


So why are steppers that are found in things like printers so loud. Is it just that they are rotating faster?
there is other mechanical parts in a printer… belts and such
They “notch” into each position and move step at a time. (which is usually a really small part of an entire rotation)
If you spin a stepper motor by hand, it’ll almost instantly stop spinning. They don’t spin very freely like other electric motors. Those “steps” translate to vibrations in the chassis of whatever it’s mounted to. Things like microstepping helps smooth things out, but they’re still noisy little buggers. (microstepping uses PWM ratios between two phases to get sub-steps between main steps of the motor.)
+1
Good explanation.
The motor isn’t usually all that noisy by itself, but when it’s bolted to a larger structure, it vibrates the whole thing, making quite a racket, especially at certain speeds/frequencies.
Needs LEDs on each coil to indicate which ones are energized.
Absolutely… Though it might get a bit weird with micro-stepping if it is in use.
Wouldn’t it just be dimmer depending on the PWM? Definitely needs LEDs
I will definitely be adding LEDs to version 2. For the next version I will be making an axial flux stepper motor with a twist!
A twist? Would that make you the M. Night Shyamalan of 3D printed stepper motors? ;)
I will definitely be adding LEDs to version 2. My next version will be an axial flux stepper motor with a twist!
I would add the LEDs on independent lines from the Arduino. It’s probably for the best as you may not want to expose the LED to the spikes of a highly inductive load. And it would solve any brightness problem associated w/PWM (if you are doing that – not sure you are). It sounds like cheating, but if you carefully write your software (i.e. always set the LED in the same code where you activate the magnets) you should be fine.
Turns the knob counterclockwise to speed it up…
Why, yes, my jimmies ARE rustled, why do you ask?
+1
Might do well with a bit of mass on the rotor…
Haha, I’m sorry. Try thinking of it increasing the delay as it’s turned clockwise :P I’ll make sure the axial flux stepper motor I’m making has your preferred method of speed control.
Cool! That could be a way to make big steppers motors with custom shapes at home!
Thank you. Wait until you see my second version! The axial flux stepper motor I’m working on will be much stronger and may actually be worth using for something other than education.
Try making one without neodymium magnets, that operates on just the path of least reluctance principle with an iron core.
Basically: try to imagine two iron gears: a regular gear surrounded with a ring gear with teeth facing inwards. The two gears have a tiny gap between them so they can spin freely.
Now, suppose the gears have an equal number of teeth. When you stick a magnet on the outer rim of the ring gear, the magnetic field goes through the teeth of the ring gear and attract the teeth on the inner gear, which makes them align to each other and holds the inner gear stationary no matter where you put the magnet.
Now suppose the two gears have different amount of teeth. The outer gear is 33 teeth, the inner is 32 teeth. When you place the magnet on the outer gear, the teeth align as best as they can in-phase with each other at that spot, but elsewhere along the gear they don’t line up. In this case, when you move the magnet around the outer ring, the inner ring spins along because the teeth try to align themselves wherever you place the magnet.
And so, you can add a number of coils around the circumference of the outer ring gear, and when you energize them in sequence, the phase-wave between the two gears travels around, and the inner gear turns – extremely slowly and precisely. When the phase wave has travelled one turn around the outer ring, the inner ring has turned 1:32 of a revolution.
This is a key part of the understanding of how stepper motors work and is not at all obvious to the beginner. It should be explained in a thorough tutorial. When I first learned of stepper motors I imagined a rotor like a compass needle pointing at whatever coil was energized. Power each coil in sequence and the needle would follow and make a rotation. Besides being inefficient it would require 200 coils to do a common 1.8 degree stepper.
You can see in the video he has 8 coils but only 6 magnets. If you watch you can see the “phase wave” traveling around.
You can sort of imagine the same effect in a mechanical way if you had a gear inside the ring gear with one less tooth, and you actually engage the teeth together and roll the center gear around in the ring gear. With one less tooth when you go all the way around the center gear has rotated only the angle of one tooth. Sort of like the old Spirograph drawing toy
.
I dig it! Great “demo”
You don’t need a 3d printer for this! You could’ve carved that shape out of dried guacamole!!!!!11
/thatguy
Or a real breadboard. A slab of wood or even particle board.
Or you could just have made it out of your own dried poop. Seriously now!
i have an issue on how the electro-magnets were wound. When the wire reaches the end of the nail and he coils it back to the driller, would not that create a reverted magnetic field, nearly cancellling out the previous round?
Nope. The direction of the magnetic field is determined by the wounding direction of the wire (i.e., direction of the current). As long as the two layers are wound to the same rotation direction, the fields add up.
Another suggestion for the next version is put a well defined indicator on the rotor, camera shutters make it much harder to see the steps and aliasing makes things even more confusing when it’s going fast. paint 1/2 of it white or something along those lines, it makes it easier on the eyes.