The weakest point in a laptop case may be the screen hinges, especially in heavily used machines. The mechanical stresses involved with opening a laptop can often break the thin plastic screw bosses and cause the threaded insert to pop out. What do you do? Get a hammer and some tacks of course!
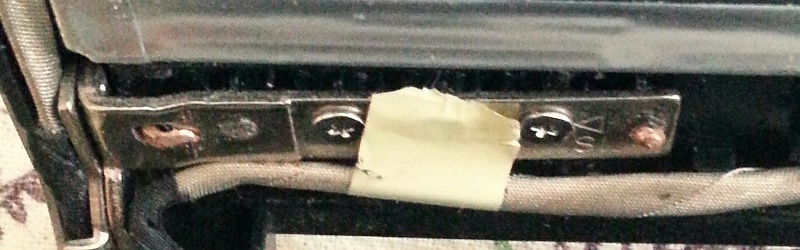
[mightysinetheta]’s solution involves popping the bezel off the offending screen, then aligning the hinges in preparation for drilling holes though the computer’s plastic lid. Then he placed some short tacks though the holes and the hinges. Pressing the hinge down into the lid to ensure a tight fit, the hammer comes out to peen over the tip of the nail. Course that can be time consuming so just bending the tack over and flattening it down with the hammer works just as well.
With the hinge secured back into place his trusty laptop is back in service. The new additions on the back of the lid add a bit of a custom look that is purely functional.
While you’re in there… might want to replace that charging port that’s been wiggling mysteriously.


Hammer nails in your laptop gets posted, but I put laptop batteries in my cell phone and its ignored… https://m.youtube.com/watch?v=xkR23zkcOXA
Makes me wonder.
might want to make a better video or at least a blog post writeup. a single video of a dude holding a cell phone talking in monotone is not captivating.
I agree with dingus. Your idea looks well implemented.. but a write up of some sort would be beneficial. Not making any jabs here.. but your voice nearly put me to sleep.
I admit the video was a last minute thought. Maybe I’ll redo it with something else.
As one of your youtube commentors has already said. The battery that you replaced had circuitry to protect for over current, temperature and voltage, all of which can make it go boom in your hand. We won’t mention the unprotected terminals which can do the above much faster if shorted.
I have an MSI that came with terrifically weak hinge anchor points that got shredded pretty quickly. Rebuilt them with some carefully applied JB Weld over a year ago and it’s still holding up without having to treat the lid gingerly.
Just a possible alternate approach.
Yeah it’s weird I submitted a reasonably well documented 7″ tablet install into my cars dash with custom buttons decals camera etc years and years ago that wad ignored and then I saw a slew of similar (but not as nice imho) builds years later being published. *shrug*
Do you still have that floating around somewhere, would be cool to see.
I repaired a similar laptop recently. The hinge broke, which caused excess strain on the bit of the hinge still attached to the back cover, which broke the bosses right off the back cover. The solution? With the bosses still attached to the hinge, I glued them back in place, missing plastic and all, using super thin CA. Then I carefully loosened the broken hinge, make sure all of the bosses were still aligned with their original position on the back cover, and then put some baking soda around the bosses, and squirted CA into it. Once it hardened, I added more. Repeat for about an hour until its cured, solid, and as strong as the original plastic. I put in a new hinge ($15 on amazon) and reassembled it. If it weren’t for the broken plastics I didn’t replace, you’d never know it wasn’t factory. Saved $90 for the plastic back cover as well :)
CA = Super Glue?
Yeah
CA = ‘cyanoacrylate’ = Super Glue™ and other brand names.
This is a joke. This person is a idiot. What a complete rubbish way of repairing his laptop. I hope he don’t do electronics, he would use metal clips to hold components on the board with a bit of glue. Come on hack a day, there is better you could post on here. This is a insult to all of us here.
I’m shocked you put this on here. It’s a Bolch job.
I have a Toshiba Satellite L55t where the plastic around the pressed in nuts behind the hinges broke off. Plastic, threaded insert, and all. Apparently it is a common thing with this model. First try I just glued the plastic rings and threaded inserts right back where they were, then reinforced around each one with epoxy. That lasted about a week and the plastic and threaded inserts just pulled out of the epoxy. I ended up cleaning all the plastic off the threaded inserts so the knurled outside surface was exposed, then using some good JB Weld epoxy around each nut. I even epoxied an extra nut under each hinge where there was an unused hole and added an additional screw. When I was sure they were all right, I then filled the whole area under the hinge with JB Weld and screwed the hinge down tight, so the whole back surface of the hinge is epoxied to the shell. So far, it’s held. I took a bunch of video of the process but never got it edited and put together for upload to YouTube.
I did make a short single take video when it was apart called “How to void the warranty on your laptop.”
https://www.youtube.com/watch?v=LM45zcgF_5I
Dv/Dt.
The faster you open that lid the more stress you put on that mount. SSSSllllOOOOOOWWWWlllYYY. Pretend you have a sound effect like in an old sci fi. The sounder is a second and a half long. Take that long to open the lid, or more. Remember those cassette decks whose doors could not just pop open but had to have added dampers to let the door slowly open. That was BS hype, this is not.
One I fixed was with solvent and powder, but I bent the crimps to loose fit. So I told their kids to prop it up when opening the screen. It had been detached.
The friction devices in those hinges are too much and get worse with age.
Nice hack, but I’m fine with genuine replacement hinges for my ThinkPad
You have to wonder about the basic mechanical design of many laptops, some big names too.
I agree. I don’t understand how the mechanical engineers that did the hinge design on my laptop thought it would work without breaking. Tiny little threaded inserts in a small ring of plastic with just a few little radial supports. I don’t know how it lasted as long as it did. They didn’t even include a full metal frame around the LCD panel. When I completely disassembled the thing so I could get the hinges out, it is surprising how much force is required to turn the hinges holding them in your hand, And don’t get me started on the connectors inside that are so flimsy they break if you look at them funny.
one of my old laptop hinge fixes welded on a threaded pin and barrel while on the pc then used a jamb nut to keep orientation: http://tinyurl.com/q59a8tq
Ridiculous. He’s heard of nuts and bolts, I assume. A nail? Seriously?
So I’m 5 weeks late on this, but I finally got my videos edited and uploaded to YouTube on how I fixed the broken hinges in my Toshiba Satellite L55t laptop. Better late than never, maybe…
https://www.youtube.com/watch?v=5ZLAisnFDrg
https://www.youtube.com/watch?v=N2bTiMnv0KU
That happened to my laptop some days ago. I used 2 part epoxy to glue the base back into place. Works like a normal one.