Recycling A Laptop Screen Into A Portable Folding Monitor

There’s plenty of times we’ve seen a laptop fail, break, or just become too slow for purpose despite the fact that it’s still packing some useful components. With all the single-board computers and other experiments lurking about the average hacker workshop, it’s often useful to have a spare screen on hand, and an old laptop is a great way to get one. This recycled display build from [Gregory Sanders] is a great example of how to reuse old hardware.

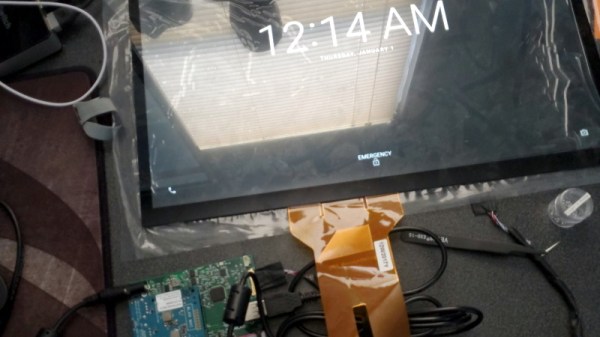
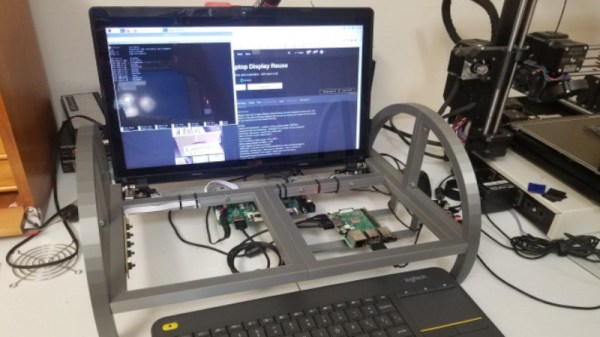
The build doesn’t simply package a laptop monitor in the same way as a regular desktop unit. Instead, [Gregory] designed a custom 3D printed frame with an arch design. The laptop screen is installed onto the frame using its original hinges, and [Gregory] designed in standoffs for an laptop LCD driver board to run the display as well as a generic frame where single-board computers can be installed.

The result is a portable monitor that can be folded up for easy transport, which is also self-supporting with its nice large base. It can also be used with other hardware, as it has a full complement of DVI, HDMI and VGA inputs on board. Of course, while you’re tinkering with laptop displays, you might also consider building yourself a dual-screen laptop as well.

Open Source Smart Display Takes The Long Way Around

Thanks to the relatively low cost of the Raspberry Pi and high resolution LCD screens, “smart displays” have become a favorite project of those looking to clear out their parts bins. Just hook the Pi up to the screen, setup some software, and you’ve got yourself a digital bulletin board for your home that can show your schedule, the weather, etc. Build it into a mirror, and you’ve got yourself at least double Internet points.

But when [John Basista] started planning his own smart display, he decided to take the path less traveled. He’s entered the resulting open source project into the 2019 Hackaday Prize, and we’re very excited to see where it goes from here. Even in these early days he’s already made some great strides, with nary a Raspberry Pi in sight.

[John] has nothing against using the Raspberry Pi for these smart displays, and indeed, it has a number of traits which make it particularly well suited to the task. But the problem for him was that it only supported HDMI, and he had his heart set on using an Embedded DisplayPort (eDP) screen. Namely the Innolux N173HCE-E31, a 17.3 inch IPS LCD designed for laptops.

He tried to find a Linux or Android compatible SBC that featured eDP, but found it to be a challenge. There were some x86 options, but didn’t want to go down that road. Eventually he settled on the Dragonboard 410c, which features a quad-core Qualcomm APQ8016E CPU running at 1.2 GHz and 1GB of RAM. This board didn’t have eDP either, but it did have Display Serial Interface (DSI), which he could convert to eDP with the Texas Instruments SN65DSI86 IC.

From there, he started developing a PCB which would hold the Dragonboard 410c and the SN65DSI86. The board also breaks out I2C and UART so he can connect it to various other sensors and gadgetry down the road, and includes all the necessary power regulation to drive everything. The whole thing fits in the palm of your hand, and judging by the renders [John] has put together, should nestle nicely into the back of the 3D printed enclosure when everything is finished.

There’s still quite a bit left to do on this project, but [John] has plenty of time to tie up the loose ends. Currently there’s little information about the software side of things, but as you can see in the video after the break, it’s now running Android which should make things relatively easy.

Continue reading “Open Source Smart Display Takes The Long Way Around”

Broken Screen Becomes Polarizing Art Lamp

Got a broken laptop screen sitting around? If you haven’t already pilfered the LEDs and used the polarizing sheets for screen privacy filters, why not turn it into a unique table lamp? See if you can use more parts of the screen than [alexmaree-ross] did.

This is a simple idea with great-looking results, but the process is a bit fiddly. After all the layers are separated and the LEDs extracted, there’s still the matter of figuring out how they’re wired up. [alexmaree] tested them in pairs to see how they’re grouped together and ultimately powered them with a transformer from an old printer. To build the case, [alexmaree] carefully scored and snapped the pieces from the plastic layer and carefully glued pieces of the polarizing layer on top to give it that underwater infinity mirror look. The finishing touch comes from edging the shade with thin metal from the bezel.

The case could be in any shape you want, but we think the prism is quite appropriate considering the polarizing effects. And it looks really cool when you walk around it, which you can do vicariously after the break.

If the screen still works but laptop doesn’t, why not drive it with an FPGA?

Continue reading “Broken Screen Becomes Polarizing Art Lamp”

When Your Screen Breaks In The Himalayas

If you’ve ever had the screen break on your laptop, you’ll know it can be rather annoying to have to use an external monitor for a while as you either wait for a replacement panel to arrive from the other side of the world, or wait for that new laptop you were just desperate for an excuse to upgrade to.

Spare a thought, then, for [tom bh] whose laptop screen broke while he was in Ladakh, Northern India. Two days bus ride from the nearest city in which he could hope to source a replacement part, he had to make do with the resources in front of him. A laptop with a broken screen, and his Android phone.

He was fortunate in that a few lines at the top of the screen still worked intermittently. So after logging in blind and finding himself in a shell, he could execute commands and then scroll the results up to the point at which they were visible. He first enabled an SSH server, then connected his phone via USB. A bit of work to find the laptop’s IP address, and he could get himself a laptop shell on his phone with an Android SSH client. He goes into detail about how he was able to use the laptop’s keyboard to emulate a Bluetooth device which he connected to the phone. He could then run a VNC server on the laptop and connect to it with a VNC client on the phone, resulting in a phone-sized laptop display using the laptop’s keyboard as input. Not a perfect physical terminal by any means, but enough for him to continue working.

His writeup is an especially interesting read for its side-by-side evaluation of the various different application choices he made, and contains some useful suggestions as to how anyone might prepare themselves for a dead screen related emergency.

We’ve featured a dead-screen laptop connected as a serial terminal with an Arduino in the past, but unlike this one that only gave its owner a prompt.

Via Hacker News.

Laptop Broken? Get A Bigger Hammer

The weakest point in a laptop case may be the screen hinges, especially in heavily used machines. The mechanical stresses involved with opening a laptop can often break the thin plastic screw bosses and cause the threaded insert to pop out. What do you do? Get a hammer and some tacks of course!

[mightysinetheta]’s solution involves popping the bezel off the offending screen, then aligning the hinges in preparation for drilling holes though the computer’s plastic lid. Then he placed some short tacks though the holes and the hinges. Pressing the hinge down into the lid to ensure a tight fit, the hammer comes out to peen over the tip of the nail. Course that can be time consuming so just bending the tack over and flattening it down with the hammer works just as well.

With the hinge secured back into place his trusty laptop is back in service. The new additions on the back of the lid add a bit of a custom look that is purely functional.

While you’re in there… might want to replace that charging port that’s been wiggling mysteriously.