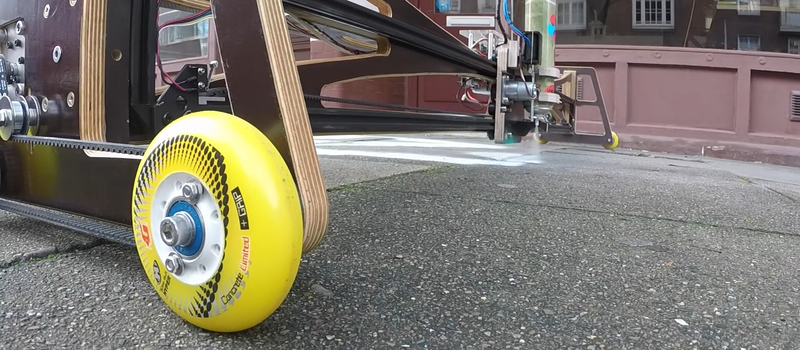
Our hero [Alex] just built a sidewalk graffiti machine, and it’s a beauty to behold, so make sure you check out the video below the break. But don’t neglect [Alex]’s blog, and the build videos throughout. (Nice t-shirt in the wheel-making video, BTW.)
The machine itself is basically a two-meter wide printer where the roller is replaced with drive wheels. The frame, made of plywood, looks great and helps keep the machine light weight. Everything is done with DC motors and timing belts, which means motor encoders and closed-loop control in the firmware. It connects via a WiFi serial bridge, made with an ESP8266, to [Alex]’s cell phone.
Everything, from plans to software, is available on [Alex]’s GitHub for the project.
Watching the video, it occurred to us that this printer doesn’t have to limit itself to printing rasters like the Chalkjet or the txtBomber, but instead can do actual vector artwork — smooth curves and all. It’s going to be tricky getting the 2D motion planning to work, and it’ll have to be tuned to the chalk-flow from the spray can, but being able to mimic the fluid lines of a real spray painter will be worth it. And if we’re lucky, the smoother motions will help sort out the PID control’s quirks as well.


It was probably limited to rasters to have only one travel direction in the Y-Axis. Moving back-and-forth on that surface will probably accumulate position errors in no time.
The machine looks great, and 2m is quite large, but a better demo would be nice. If you have to do rasters, at least pick a better drawing, like the space invader for example, that he scrolled by on his phone.
or more overlap in the Y-direction, which would probably also look much better.
Your wish is my command ;) https://www.flickr.com/photos/8123185@N02/23315768096/in/album-72157661140670280/
Space Invader looks fantastic! I half take back my request for vector graphics. :)
It’s very nice to see it in the “just working” stages, and then see the refinements as they come along.
awesome!
That is very cool… As I was watching it though, I thought about how awesome it would be to load it up with a can of Easy Cheese!
And yes, it’s limited to raster because that was the easiest to start with.
A beautiful machine!
I am impressed once again with the closed-loop control of DC motors. In my opinion it is far superior to steppers, for machines of this size. He had some PID issues which I also encountered in my adventures but these can be solved.
One thing about doing a raster print is that the accuracy is going to be a bit better. In a vector print, the toolpath will make multiple passes in the “friction axis” as it goes forward, slows, stops and then reverses as in the case of printing an arc. Inkjet printers are raster machines in the sense that they do not back up (or very minimally, if they do) and cover the same spot on the paper again.
The accuracy of the “down the sidewalk” axis could be improved by using long toothed belts laid along the sidewalk and held down with heavy weights to keep them from moving, and then toothed wheels driving along them, just like he’s doing the gantry axis.
Or keep the machine stationary, and print with a swinging arm.
Great project! Presumably you get much more resolution by just moving the can closer to the sidewalk. Really neat, i love the exposed plywood edges – hate when those get painted.
How is it that nobody says anything about you painting the ground?
It looks like that special kind of paint that washes away
Yeah according to Alex’s tinkerlog the paint is “SparVar Kreidespray Neon mit Überkopfdüse” It’s a can of spray chalk, water soluble and the cans are designed to be used upside down. He lives in Germany in case the name of the paint didn’t give that away. I’ve seen spray cans of chalk here in the USA, but all the ones I’ve seen don’t work if the can is upside down. The pigment will stop coming out and just the compressed gas will come out.
This shows the painting after 4 days with a bit of raining. https://www.flickr.com/photos/8123185@N02/23665955766/in/album-72157652380447475/
Now its almost completely gone.
Great project! One thing that occurred to me is that, as a sidewalk is optically ‘interesting’, you could have a downward-facing camera at each end that maps the ground under it. For any given accuracy, the next position will be ‘X’ pixels offset from the current one, which is both easy and inexpensive to determine. In fact, if you change the lens (to work at longer distances), you /might/ even be able to reuse an optical mouse, as that is exactly how they work.
Even chalk in heavy density will leave long lasting marks, especially on that quarried stone.
The city will determine whether it’s OK.
Awesome Build! Funny how similar your design ended up being to the 3rd prototype of a project My buddy and I worked on a few years ago. https://www.youtube.com/watch?v=nmMuScCz-8E&feature=youtu.be Keep Up the awesome work =3
Wow. Nice one. I hope that kitchen is in a rental…
(Says the man who had to refinish his floor b/c the electrician’s tape for the line-follower robots pulled up the varnish.)
And suddenly all those Wifi chips make sense… set ’em in access-point mode, connect your phone, load a local webpage… how’d I not see it before?
@Alex
Superbe execution. Very impressive synthesis of fabrication, electronics, firmware and software!