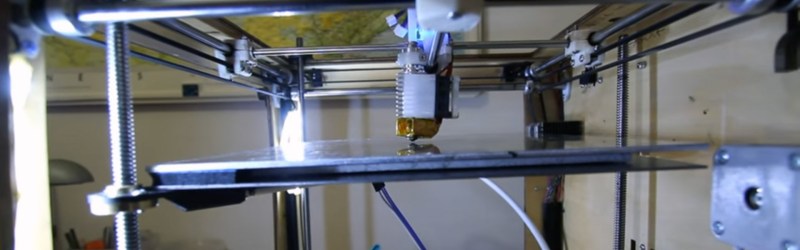
[Jeremie Francois] has been thinking about ways to improve tool height adjustment and bed leveling in his 3D printer for a long time. His dream was to never ever think about Z height again. A dream that’s shared by many. These days, a lot of 3D printers have a mechanism for auto leveling in the software of the 3D printer. This works pretty well, but for various mechanical reasons, it’s better to have the bed itself be level.
[Jeremie]’s approach is pretty clever. Since you can define any plane mathematically with three points, he has three Z-axis lead screws. This lets him tilt the bed at any angle he likes. Once he had the mechanics in place, he added some force sensitive resistors, an Arduino, and wrote an extension for the popular Marlin firmware. That’s when the problems started.
It turns out that solidly mounting the bed to the resistors transmitted way too many vibrations. The solution was a layer of neoprene rubber. The neoprene also acts as a cushion, so the nozzle won’t break the glass bed during the leveling procedure.
The video after the break is a bit wavy, due to YouTube’s terrible auto-stabilizing software, but if you watch closely, you can see the system at work.


Is that a good mic or some noisy steppers?!? Or perhaps the R2D2 noises are a feature? Reminds me of the cupcake days when people would have their printers sing Imperial March.
Anyway good build, was thinking about doing just this earlier today, it’s how auto leveling should be done, if a little wasteful on hardware!
Noisy steppers due to not using a dampening layer between the stepper motors and the frame of the machine. Cork is a popular material, and nearly eliminates these noises.
I don’t know what’s up with the swimming look, but that’s definitely not Youtube image stabilization – there’s some really crazy stuff going on there. Youtube only stabilizes the entire frame, you never see things moving around within the frame. Jeremie needs to re-film this, because you basically can’t tell what’s going on, at all.
I have seen this in quite a few youtube vids..
It actually is youtube, I have had several videos turn up like this, and some worse.
Looks more like the lighting frequency is beating against the rolling shutter of the camera sensor.
Oh just looked at more of the vid and realised I was looking at the wrong thing – that’s definitely a video stabilisation artefact.
especially the vertical….
cool. I think, though, that the waviness is from using the camera in portrait mode and LED’s on a not-so-greatly filtered power supply, so the “ripples” in the light are amplified by the scan rate that is “supposed” to be going up and down. Just a guess, though.
I think they were talking about the Jell-O effect around the 1:00 mark when the hotend stops moving to the right. Pretty funny looking.
Cool. Why did it take so long? I thought it would just get 3 measurements from right on top of the 3 sensors and done. What else was going on?
It was my first successful attempt and probably the worst video I ever filmed, but I optimized it much since. Two passes are still required because of the “lever” effect: the sensors are not exactly on top on the Z screws, so “fixing” one slightly impacts the other side of the bed.
I definitely shall see if I can replace the video on youtube.
As for speed, check this video https://www.youtube.com/watch?v=lTeF73TdQvk
I wish HaD took this one instead ;)
Nicely done, except it gives sea sick!
:o)
It’s a nice hack, and I certainly approve this being on HD …. but similar things have been done as well :)
The CEL ROBOX has a tilting head that touches the bed, notices it has touched it (it opens an otherwise closed circuit), registers X Y Z and makes 9 measurements of the bed. Automatically. On everyprint.
Some other printer has metallic mechanized screws that hold the glass bed. Calibration touches those, closes a circuit, and because those “screws” are known it knows the 4 corners of the plate.
On the DIY there’s quite a lot of touching microswitch deployed by servos arms, or non-touching capacitive sensors for most RepRap printers …
I swear i’ve seen the touch detector pressure thing months ago, in a Delta-type printer, on youtube.
Used to follow all this more closely (since I worked with these machines), started losing interest after I left that workplace and followed my dreams.
Follow my dreams = Having a job where I am actually paid accordingly to the job, where its not toxic to work at (physically and mentally) and where the tools are up for the task (try modelling in 3D in a 8 year old low range computer. Not even duo core.)
Congratulations, it’s so great when you find yourself one of those.
…I’m still modelling on my 8-year-old laptop, but at least it’s not for work.
My printer has a non-contact IR z probe on it now; works amazingly with Marlin’s auto bed levelling (actually it’s compensation, but whatever) and I’ve not had to mess with it since. Perfect bed adhesion every time, and no need for the nozzle to touch the bed. A lot less clunky than the microswitch-on-servo-arm or inductive sensors, too.
True, and I acknowledged it on my blog post. Now for the main difference with 99% of existing probes: this setup will accomodate any tool length, which is a nice feature to have when you change the hot end or the bed (e.g. with or without PET sheet). The usual probes require you to set the Z-offset manually one way or another.
http://www.urbandictionary.com/define.php?term=tribing
Past tense of tribing? Terrible name. Please hyphenate or consider a different numeral-prefix.
Traditionally it’s called a 3-point bed, not a tribed.
https://www.youtube.com/watch?v=Bt9zSfinwFA
Lol. Love it.
+1 UP!
Excellent one! And I swear I knew it… Even the light is totally ugly. I cannot believe they chose this one, which at least may give me a unique and special reward: “the maker of the crappiest video on hackaday”! :D
Actually I wanted to have both the trigger leds in the bottom and the bed in the same frame to show to a friend, and I did not have a wide angle. The other videos are much nicer, shot with a DSLR, a tripod and a ultra wide lens (just to keep the sickening effect). But too late, I am screwed :D
Well, at least you have a cool 3D printer featured on Hackaday! :)
YouTube’s terrible auto-stabilizing software? How about not filming with a potato in the first place?
is that a 3 axis Z? but not a delta bot? hmmm…
Place copper tape in three locations on your bed and wire it to a pull up pin on your arduino. Ground your nozzle, and program the leveling locations. It is very reliable and repeatable.
I use the same technique for limit switches, but they are connected directly to the direction pin on the stepper motor controller. If you reach the end of your bed, the motors reverse away without depending on your firmware to detect the incident. It also lets the print finish, which is nice when you are merely close to the edge of your printing area.
I agree except if you want to swap the bed surfaces quickly so that one cools down while the other makes the printer ready asap for the next part to print. We would then have to plug/unplug the sensors. Also I suspect they might end up coated with oozed plastic btw, making unreliable connections. And finally, each head must be wired back to the electronics. This depends on the holder. Also, floating wires near powerful noisy hashed heating signals may get corrupted (not that probable).
Anyway, I agree it would work, it would probably be reliable enough and quite easy to set up (just like CNCs are usually probed). But it would not be practical for my expected needs: tool changer + quick bed surface swap without any assumption. E.g. when I want to mount a pen on the heat to use the printer as a plotter, it works idem.
Check out the Leapfrog Xeed 3D printer which has exactly the same self-leveling, self-zeroing functionality. Although, the Xeed has different sensors which attach to the extruder carriage to find the zero.
Just read your comment now. “Pro” printers are often way abusively priced, but thanks for the link.. there are definitely features to learn from them, will try to get more info (it is hard to tell so far for me what they are really doing, but I am quite sure they are using a retracting probe on the hot end — this will not compute and compensate the Z offset if/when the tool is changed).