Setting up a desktop CNC brings along two additional problems that need to be resolved – noise and dust. [Nick] upgraded from a Shapeoko2 to the Shapeoko3 and decided to build a fresh dust and noise proof enclosure for his CNC , and it turned out way better than he had anticipated.
When trying to build something like this, aluminium extrusions seem like the obvious choice for the structure. Instead, he opted for low-cost steel frame shelving units. The 3mm thick steel frame results in a nice rigid structure. The top and bottom were lined with 18mm thick MDF panels. For the two sides and back, he choose 60mm noise dampening polyurethane foam lined with 6mm MDF on both sides, and held together with spray adhesive and tight friction fit in the frame.
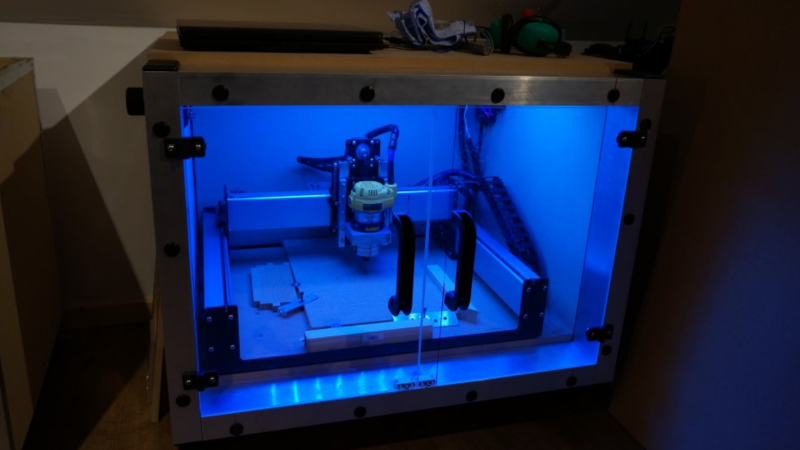
The frame was a tad shallower and caused the spindle of the Shapeoko3 to stick out the front. To take care of this, he installed an additional aluminium frame to increase the depth of the enclosure. This also gave him a nice front surface on which to mount the 10mm thick polycarbonate doors. The doors have magnetic latches to hold them close, and an intentional gap at the top allows air to enter inside the enclosure. A 3D printed outlet port was fixed to the side wall, where he can attach the vacuum hose for dust collection. The final step was to add a pair of industrial door handles and a bank of blue LED strip lights inside the enclosure for illumination.
It’s a simple build, but well executed and something that is essential to keep the shop clean and dampen noise.


I’d be curious to see a measurement of the reduction in volume. Looks great.
You mean the reduction in noise level? Yes, I’d love to see that too, unfortunately there is no video. If he wants to improve further, he might want to cover all enclosure surfaces (especially internal ones) with something soft and put the enclosure onto erasers or other rubber objects.
Very nice looking
Was anyone else hoping to see a usb device that you insert into a computer or a phone and it sends out an sos message with your coordinates from every available port.
^^^ Damn word press, that’s not where it was supposed to end up.
Usually things on Hack a Day are things I’m planning or musing over, so it’s actually kinda nice to be able to read an article and be all “OMG that’s a damn nice build and I’ve actually kinda built one of those” :D
Kinda wish I’d documented my build but it was just furring strips and plexiglass, nothing to write home about. But it does have the basics, external venting and dust collection. Wish it had been a little bigger but it’s already eating up 2/3 of the main desk and relegating my LCDs to what was once a typing alcove :P
Funny, I was thinking about ordering a Shapeoko 3 just last night. I really want to make stuff / prototype at home after work. An enclosure is a must, the noise would be super annoying. I think the biggest thing I would do in addition to this is leave room for a small shop vac inside the enclosure, you want to clear chips and without a vacuum and dust shoe you really won’t be able to cut much without the chips piling up. You’d just break cutters left and right I would think.
Do! they are awesome for the price! Yeh I tend to give the machine a quick vacuum if the chips are building up otherwise i just keep it plugged into the port on the side to keep the airborne dust in the enclosure down and to stop it escaping.
Obvoiusly built by a young person… no one with used knees and a used back would setup a machine on the floor like that ;-P. But seriously, it’s a nice build. At a hackerspace shit tends to end up everywhere and pieces get borrowed for kit machines all the time. We’ve found that dedicated enclosures like this help reduce the chances of working machines getting parted out in the middle of the night. It also reduces clutter from showing up where it shouldn’t be like on the workbench with the Shapeoko or the 3D printer.
Hahaha yes, I would have liked it higher as well, but because of the shape of the roof in the room, I was forced to make it low down.
Attaching a vacuum and reducing noise must be quite a trick. What’s the quietest way to vacuum out the dust?
I would assume that the vacuum is in it’s own sound baffling box.
It isn’t unfortunately!
http://www.makealittlemore.co.uk/?p=1042&preview=true
I did a sound test with the enclosure this morning :)
http://www.makealittlemore.co.uk/2016/02/19/shapeoko-3-enclosure-sound-isolation-test/
Wrong link, apologies.
Shame about the automatic microphone gain but still quite effective demonstration (albeit only at the instant the doors closed).
Quite surprising the sound isolation those doors give to say that it’s only a single layer of solid plastic (and not tightly fitting either so plenty of gaps for sound to get around).
Two questions:
– Is there any additional material added to the top and bottom sheets?
– Is there any sound isolation of the shapeoko to the floor of the cabinet (rubber feet, etc)?
Actually, I wonder how much the sound is cut down by having the negative pressure inside the cabinet?
While the vacuum is adding to the sound outside, I would have thought that having it on should contribute to reducing the sound escaping (much like wind direction being able to carry sounds further).
Yeh, I’m going to try and figure a way to do it better.
Nope just 18mm MDF.
Yes, the shapeoko sits on rubber feet.
I’m not sure it is that much the vacuum noise overpowers any noise escaping from the enclosure so I tend to just use it occasionally (not in the port of the enclosure) to clear up the chips.