Everyone wants their prototypes to look polished, as opposed to looking like 3D-squirted weekend afterthoughts. The combination of Delrin and a Laser Cutter make this easy, especially if you learn a few tricks-of-the-trade that will make your assemply pop, both functionally and aesthetically.
Last time, we took a deep dive into fabbing parts with Delrin and a typical 40-watt laser cutter, and we discussed some of the constraints of the material. More recently, [Gerrit] gave us a close look at the material itself. It’s been about a year since our first post, but the list of tricks is far from complete.
If you’re just getting started in this domain, let me introduce you to two classic techniques for laser-cut prototypes: puzzle-piecing and the T-nut-slotting. While these techniques are tried-and-true, I hope, fearless reader, that they’ll leave you hungry for something cleaner, something more refined. If that’s the case, read on!
Riveting
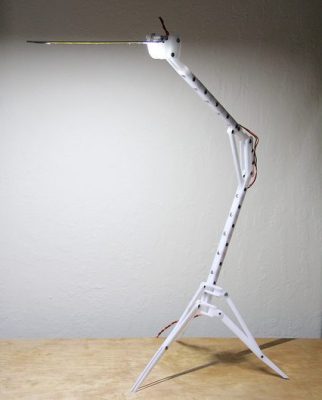
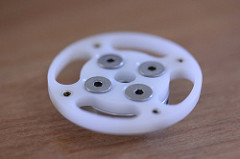
Rivets offer us a similar feature to screws: they’re great for fastening down two plates together. An added benefit to rivets is that their shaft offers a smoother surface for parts that need to rotate relative to each other. In quantity, rivets are comparable in price to screws, and they offer a different aesthetic appeal, possibly because we don’t see them as often in hobbyist projects. Rivets come in all sorts of shapes and sizes, but I prefer the standard, semi-tubular variant since their top and bottom protrude only slightly from the installed material. With semi-tubular rivets, the exposed bottom mushrooms into a characteristic button feature that we’ve seen on clothing and many-a-hinge in consumer goods. As a heads-up, specifying the rivet length takes a bit of prior foresight into the dimensions of the part. For a back-of-the-envelope calculation, rivets should stick out of the part by about 55% of the rivet diameter [PDF] before they’re crushed.
A word from the wise: rivets are permanent! Unlike screws, rivets are (barring fancy removal equipment) a one-time operation. When working with rivets, we must clearly keep the order-of-operations in mind when assembling our parts together. True story: I have scrapped many parts after riveting two pieces together in the wrong order.
Countersinks
Countersinking offers us two immediate benefits. First, it enables us to put screws into our designs that are flush with the plate. Second, it dramatically cleans up the part’s look and feel. No longer must our screws poke grotesquely from our parts, a pragmatic pimple of necessity.
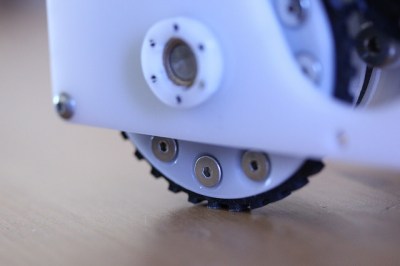 On the practical side, flush screws invite us to squeeze together the clearances between parts, saving us space that those otherwise protruding screwheads so eagerly want to take away from us. In the example on the right, this robot wheel’s tight clearance to the body mandated a flathead screw solution. On the aesthetic side, countersinks are not commonly seen in laser cut prototypes. They make our audience think harder about the how in “how did they do that..” rather than jump the gun and cry “laser cutter!” on our project.
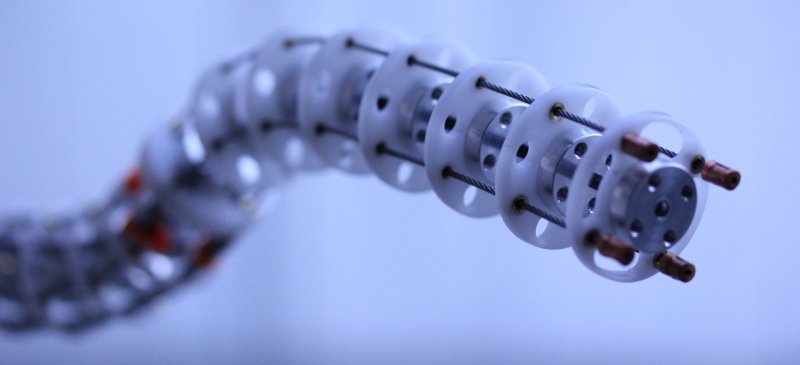
So how does one create such a cavity? Fortunately, Delrin takes to standard metal tooling like butter. For the tentacle mechanism vertebrae shown above, I created the feature with a miniature countersink cage. These tools were designed specifically for the aerospace industry for efficiently riveting planes together on the factory floor. Pro-tip: you can achieve the same effect with a traditional countersink cutter by setting your drill press’ hard-stop nut appropriately.
Heat-Set Inserts
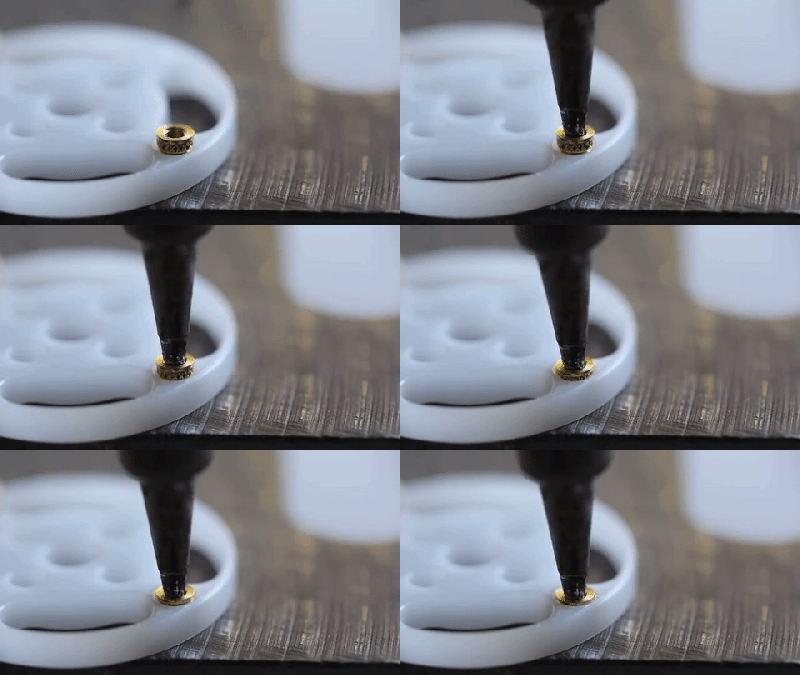
Do you need a thread feature capable of withstanding both heavy loads and repeated screwing and unscrewing? Then heat-set inserts may be for you! Like many other self-respecting thermoplastics, Delrin is a prime candidate for these brass nuggets.
Heat-set inserts do exactly what they sound like: take any thermoplastic with a hole cut to a predefined dimension and stake a hot metal insert into that hole. Let the result cool off and — poof — a resilient thread feature is now permanently embedded in your part! Vendors sell specific insertion tools, but we’ve found that our soldering irons (cranked up to 250ºC) and a pair of steady hands works just as well.
Arm yourself with 3 new techniques
Sometimes, finding new tricks is a matter of opening our eyes to the world around us. Just have a look around. Nearly every consumer product that surrounds us was fabricated in quantities that mandate techniques for mass production. To make these products, designers need repeatable, reliable techniques with predictable outcomes. Rivets, countersinks, and heated inserts aren’t anything new. They’re borrowed from this world. With some careful attention to detail, perhaps you’ll find a few more techniques that lend themselves to laser-cut Delrin. Let us know in the comments! Until then, keep rolling out those prototypes!



Great article! I think you made a small confusion, heat-staking, is when you mushroom a plastic stake to fasten 2 parts, I don’t think it’s really something amateurs would like to do. Your example is using a metal insert, which amateur probably want to use a lot, because one shot projects get taken appart a lot and plastic threads suffer.
Wasn’t it in this pages that I recently saw someone using short lengths of 3D printer filament and a heat source (soldering iron?) to create heat stakes as you describe them? Not nearly as neat as a rivet, but very cheap & easy.
that’s smart! I guess it’s technically a rivet since it’s a separate fastening piece (of course, the spirit is exactly the same). I think it’s a better “at home” alternative to heat stakes, you can cut your plastic rivet with a knife and put a new one when you need to open the system.
My understanding is that rivets are a compression bind whereas heat-staking is diffusion bonding so it technically could be called a form plastic welding. The rivets mentioned in this article seem more like blind bolts or screws.
I have also seen heat stakes in which no welding took place. Like fastening a PCB or metal part in a plastic enclosure. In that case it was just a plastic rivet. So, depending on the melting point of the parts, both is possible.
You are completely right. I’ve made the changes accordingly. Ah, gotta love the flexibility of online writing.
Says someone who is allowed to edit his posts…
Zing!!
Can anyone recommend a good source for Delrin sheets? It’s nearly double the cost of acrylic of the same dimensions. I can’t find a 1/16″x12″x12″ sheets for anything less than around $20.
Delrin is a much more expensive material. Really the only advantage to it over PS, PVC or ABS is that it “gives” a bit more and is a bit more resilient. For a lot of my projects I prefer ABS or PVC, Heat staking isn’t the best process for these as it gives off some unpleasant odors (not true of delrin which is a nylon), but both of those materials respond much better to glue than delrin does.
White is even cheaper yet at 5.78 a sheet.
Delrin is also much more chemically resistant for common solvents
Delrin is not a Nylon; it is polymerized Formaldehyde.
The smell it makes is from it depolymerizing, which releases Formaldehyde. That is also why it burns with a nearly clear flame.
Yeah, which makes it nasty stuff and expensive to replace when you find out those facts after a very expensive fire which will probably cause the untimely deaths of those involved with putting that fire out, not realizing they just inhaled tons of vaporized embalming fluid. And it burns very, very well.
I suggest to anyone that they find a new material to work with, and if you stick with Delrin, you make sure to carbon filter and exhaust the fumes outside your workspace.
Oh, for sure there are differences in the material. The problem with PVC and ABS is that it’s not safe to laser cut either of them. Cutting PVC with a laser produces chlorine gas. Not good for the optics and definitely not good for lungs. ABS produces cyanide gas and melts too easily. Polystyrene just doesn’t cut well – gets melty and smokes a lot.
Delrin is pretty great for a number of reasons. It machines fantastically and is easy on the cutting tools. It’s also great for laser cutting.
If it were cheaper, it’d be my top choice for most laser cutter projects.
You should know though that Delrin is not a kind of nylon. I’m not a chemist, but I do know that the molecular structure of nylons are quite a bit different than Delrin’s.
http://www.usplastic.com/catalog/item.aspx?itemid=32866&catid=439
Mind you that is only listed as acetal rather than specifically delrin. It is, however, half the price you said you could find.
https://www.onlinemetals.com/merchant.cfm?id=209&step=2&top_cat=181
12″x12″x0.0625 for about $4.50 :)
That’s a great price! Time to place an order.
Thanks very much. This is the type of article I come here for.
Agree. So far, Joshua writes *only* quality articles.
No Raspberry Pi USB hub, case mods, glorious-US-look-at-my-big-gun or polemic, click-bait pseudo articles.
Congrats !
On top of that his writing respects grammar, is expunged from any superlatives and “darn, fricking” useless words, and never starts with “as-everybody-in-the-world-knows”
just… “everyone”
Actually, there’s only one HaD writer, who dons different hats (well, handles) and styles depending on his mood and the content. Internet commenters should be familiar with this game.
Strictly speaicing it’s not a ‘he’, it’s a machine.
Quality does not include the diet of the North Vietnam Army as the Nixon War in Vietnam went on for 10 years. Cong rats. Hardly any redeeming accolades here. Please spell out in full.
echo delta… ED… hmm… I suppose it’s logical that erectile dysfunction might unhinge someone.
Nixon was President from January 20, 1969 – August 9, 1974. Vietnam war November 1, 1955 – April 30, 1975. How the USA got into it. http://www.history.com/topics/vietnam-war/gulf-of-tonkin-resolution
Unrelated to the main topic of the post, but do you have more information posted about the tentacle mechanism anywhere? Looks like an interesting project.
I’ve just tried to find anything similar to that image and found ‘nada’.
Maybe there is something in the works that we will see soon. :)
Isn’t it just a bunch of disks strung together on wire cables? It doesn’t look to me like it would actually ???????? anything.
It looks like your standard animatronic tentacle. You pull on a cable and the whole string curves in that direction.
Ah, that makes sense.
Love these! I can’t see why I hadn’t thought of heating the threaded inserts as opposed to just jamming them in with a hammer or vice :P
Typical factory install process uses ultrasonic vibration of a tool against the insert. The vibration creates very localized heating, just far enough into the plastic so the insert can be pushed in.
Countersinking also helps prevent screws from loosening. The higher surface are helps lock them in.
When buying countersinks be careful what you get. Most screws are 82 degree but there are 90 degree sinks available, 90 degree screws are found in a lot of aircraft stuff.. Also do not buy multi flute countersinks, they tend to chatter. Buy single flutes, preferably MA Ford brand.
If it’s chattering, you may be spinning it too fast.
No, they are just crap. You can get away with using them sometimes on a mill or drill press if it is rigid enough. You will almost never see multi flute countersinks in a machine shop.
I’m not sure what shops you’re visiting. The shops I’ve been in definitely use multi-flute countersinks. And if they chatter, it’s likely because the speed they’re spinning at doesn’t allow enough time for the chip to form, break, and clear.
I’d assert that multi-flute countersinks are used more often than single flute for countersinking. Look at any cutting tool catalog and compare the multitude of multi-flute countersinks compared to the handful of single flute countersinks. That’s not an accident.
Speaking of multi-flutes – since you recommended a MA Ford brand countersink, I’ll do the same. The best, most chatter free countersink I’ve used is MA Ford’s 6 flute HSS Chatterless Countersink. They’re cheap, come in every possible angle and size, last forever, and tend to work at any speed.
Here’s a good source:
http://www.kbctools.com/products/CUTTING%20TOOLS/COUNTERSINKS/SIX%20FLUTE%20COUNTERSINKS/3432.aspx
I believe aviation sheet metal is 100 degree screws. Helicoils ask for a 120-degree c’sink. 90-degree is what we normally use because people just want holes chamfered or their edges broken. Makes for a better guide for screws and pins.
Yeah, I think you are right about the 100 degree. Shallower taper for thinner metals.
82° is for inch screw sizes
90° is for metric
100° is used a lot in aerospace (larger holding area and reduced depth in sheet metal)
120° for Helicoils
I’ve used something similar to what is referred to as heat-staking in the article.
A 3D printed part where the hexagonal hole was just too small to fit the nut, so i gently melted it in place using a soldering iron. It’s really solid and doesn’t require any special inserts.
just to throw it out there as a subtle variation, i’ve had a lot of success with using a hot air rework station to soften/nearly-melt nut traps before inserting the nut. or put the screw through, start it on the nut, and then apply hot air while tightening down the screw. helps to keep things aligned. (none of this is to say that the depicted soldering iron technique doesn’t work just fine, as well.)
a hot air station is nice in general when working with 3D printed PLA parts, as you can selectively soften and reshape bits that didn’t print quite right. (presumably you can accomplish the same effect with other plastics, but i’ve just stuck with PLA.)
Geez… The first sentence… Snarky, much? Or is that just elitism? I expect that from the comments, not the posts themselves.
Maybe you shouldn’t be so f-ing sensitive?
“as opposed to looking like 3D-squirted weekend afterthoughts” It hasn’t been all ???????????????? long since we’d have been overjoyed to be able to squirt out 3D parts. Why, back in ???????? day…
…we built printers from Erector Set and Mecanno and hot glue guns!
One of my pet projects that is currently going very slowly is a CNC to rout various aluminium (aluminum) extrusions into Meccano like parts.
It sad that today’s youth don’t have the fun and educational things we had as more or less toys.
The only thing that will be odd about this CNC is the fact that one axis will be the extrusion itself. The CNC will climb along it so to speak. This will minimize the size of the CNC and also reduce the cost by a small amount.
So I’m not entirely sure why you mention that rivets are permanent, and mention throwing out parts because you riveted it together in the wrong order.
Every rivet I’ve ever used is easily removed by carefully drilling out the center of the rivet. And since rivets are usually in the realm of a few cents, it is considerably cheaper to drill out your rivets and re-assemble the project than to throw out your fabricated parts!
And for new parts you need new rivets anyway. :-) But sometimes the heat of drilling softens the plastic enough that the rivet can spin instead of getting drilled out properly.
Can sign the fact that inserting brass inserts works perfect with a solder iron, in Delrin as well as in many other plastics. Additonal it increases the strength a lot and reduces the potential to break at thin materials (<3mm).
Great article, more of this please :)
If you don’t care about having a 100% perfect mating of the underside of the screw head with the countersink, the tip of an oversize regular drill bit can usually be used as a substitute for a dedicated countersink cutter if you don’t happen to have one on-hand.
Just be ???????????????? careful to not let it grab and go all the way through your workpiece. Been there, done that, many more times than I like to remember.
a small smooth tube cut to the right length and fastened with some blutack is excellent for avoiding that problem, also makes multiple holes a lot quicker and easier (hence the blutack or the tube would fall off after each hole)
Ah, good idea! I’ve tried drill stops (the metal rings with setscrews), but they don’t like to hold securely in the fluted section of the bit and for this purpose you of course need to get very close to the end.
Regarding the countersinking with a laser cutter, it is somewhat possible. On our Epilog Legend 75 watt, we use the color mapping feature to etch a set of rings inset to each other. Each ring towards the center is using a higher power setting and the result is a deeper etch in the delrin for each ring. This results in a stepped conical etch pattern that works relatively well as a countersink. For a smooth finish, a second pass at lower ranges of power will help reduce the ridges. It works great on MDF and 8-32 screws as the steps are barely noticeable. We have thought about trying the delrin countersinking with the laser out of focus to help “blend” the steps a bit more.
That sounds like a possible HaD-worthy article. :)
Nice job working around the limitations of that cutter.
That takes much longer than counter-sinking with a drill and the results significantly worse.
As stated above doing a raster on acrylic for example will create a recessed cavity for screws. Just need to play with power and speed to that the desired depth
So you took the 3d stl files from this instructable? which also has all the coding done already?
http://www.instructables.com/id/Animatronic-Tentacles-with-Arduino/?ALLSTEPS
Here’s the zip including all the arduino code and 3d files to create it.
Knew this project looked very similar to something I looked at years ago.
Nah, this one’s home grown, although the design is inspired by Richard Landon’s Two Stage Tentacle from the Stan Winston Tutorial Series.
I’ve posted a bit more info on building these here:
http://hackaday.com/2016/09/13/the-bootup-guide-to-homebrew-two-stage-tentacle-mechanisms/
More coming soon!
Any tips on where to find hole designs by plastic material for heat-set inserts? I’m using the McMaster https://www.mcmaster.com/94180a504 but their only design dimensions are the taper angle and the drill bit size. Where are you supposed to place the bottom of the taper angle or is half way close enough?
If you’re laser cutting these holes, you can ignore the taper angle altogether and just shoot for the drilled hole size. The laser “kerf” serves the same effect as the taper angle in that it holds the part in place before you melt it in with the soldering iron.