There was a time when making a high voltage project like a Jacob’s ladder took time to build or scrounge some kind of high voltage circuit. The neon sign transformer, Marx generator, or voltage multiplier was the hard part of the project. But nowadays you can get cheap high voltage modules that are quite inexpensive. [PaulGetson] picked up one for under $20 and turned it into a quick and easy Jacob’s ladder.
Honestly, once you have high voltage, making a Jacob’s ladder is pretty simple. [Paul] used a cheap plastic box, some coat hanger wire, and some stainless steel bolts.
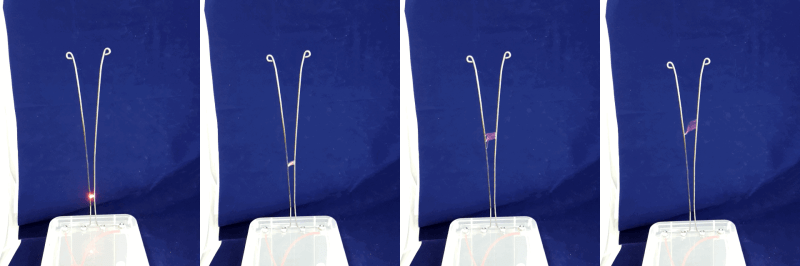
If you haven’t seen a ladder before, the theory is pretty simple. The high voltage ionizes the air between the two electrodes. The ionized air gets hot and since hot air rises, the spark rises with it, and the electrodes can get further and further apart. Once the spark rises above the electrodes, the process starts over again. You can see these in many old movies to signify some sort of mysterious scientific equipment.
We have covered Jacob’s ladders before, but few of them as simple as this. We’ve even seen simulated ladders, in case you are too timid to work with the high voltage.


Hardly a hack. He bought it already made
Using something for other than intended use counts as a hack. ;-)
And… what -was- this intended for?
Probably the first comment. :P
One part of the device, the flyback, was intended to provide the high voltage necessary to make a CRT work. The other part, the ZVS driver, has it’s own uses as well.
A Jacob’s ladder is NOT what they were designed to do, so it’s a hack.
So if I write my name in blood, it’s a hack?
Only if your account balances are still positive or aren’t signing a contract with any extra-dimensional beings and/or demons.
If you did it hundreds of thousands of years ago before anyone else thought to use blood for the purpose of writing then yes it would be.
Only if you use the finger you used a hatchet to hack the end off. :)
My point, exactly.
First high voltage project I build when I was a kid using a neon sign xformer acquired scrounging about a demolished strip-bar.
Me too, though I got my transformer from a sign shop. My first one was a 7500V transformer from a beer sign. My second one was a 15,000V transformer from a larger outdoor sign. I have built many of these over the years. One of these days I want to make one with a box with an acrylic face over the ladder part that I can purge with different gasses and see how that effects the arc.
One simple trick that HAM operators don’t want you to know! Click here!
Yeah, well, I’m not going to take a lighter and jump start my furnace every time it gets cold in the house this winter either… I think the cats long out of the bag on spark gaps, pal.
Heads-up, some NSTs shutdown when shorted or if the arc is lost.
Usually you’ll need to power-cycle from main power to reset it, but it can still make a ladder if you have the patience. :)
”One thing I like doing is sitting back and watching this in the dark.”
If they are using 12kV is that enough to generate UV-C (4.43–12.4eV) and damage DNA ?
The Amazon page says that it can use between 50-100 Watts.
Really good question!
I usually wear UV protecting glasses, so I don’t usually think about this. Unfortunately wiki doesn’t give much info.
https://en.wikipedia.org/wiki/Spark_gap#Health_hazards
UV-C don’t think so, but I have no actual data to cite.
Thanks for the link i found out more info from it
https://en.wikipedia.org/wiki/Talk:Spark_gap#Any_light_emission_hazards_with_Jacob.27s_Ladder.3F
“Low current (typically 10’s or 100’s of milliamperes) Jacob’s Ladders do not generate appreciable amounts of UV light. However, higher current atmospheric pressure arcs (which generate plasma that’s a bright blue-white color) can be a problem.”
In case you’re curious, there’s a schematic for the module in the AliExpress listing for it: https://www.aliexpress.com/item/Zero-Voltage-Switching-Tesla-Coil-Flyback-Driver-for-Sgtc-Marx-Generator-jacob-s-Ladder-Ignition-Coil/32715388083.html
I ordered three ($16.90 each w/ free shipping if you order from the AliExpress app) just in case I get a dud and/or destroy one–reportedly, that’s not hard to do.
Also, if you want to order the recommended power supply for this module from AliExpress, search for “S-250-24” (250W, 24V). That pattern works for lots of combinations of power & voltage. Up to 350W there’s a trivial difference in cost for the 24V supply, so you might want to order a S-350-24 just for the versatility (I spent a bit more to get a S-500-24). And, if you order from a single vendor more than one item that has a shipping charge (as these power supplies typically do), remember to specify the same shipping method for all of them to get the best price–the shopping cart won’t do that by default.
One more thing about ordering power supplies from AliExpress: Since you’re ordering from 220V China, be careful to get the rated input voltage (110/120 or 220/240) that you need. Modern (switching-mode) low-power supplies will generally (not always!) tolerate the entire range. High-power supplies (like those needed here) will be one or the other or manually switchable between them because they’re cheaper to make that way. AliExpress listings more often than not contain contradictory information on specs (thanks to careless copy & paste), so if in doubt contact the vendor for clarification (and hope that they understand the question). I like the versatility of being able to use whatever I can get my hands on, so I have both 120V and 240V outlets throughout my workshop. Much cheaper than using kilowatt transformers.
You’re actually better off buying directly from Sainsmart: $15.67 with free shipping.
http://www.sainsmart.com/zvs-zero-voltage-switching-tesla-coil-flyback-driver-for-sgtc-marx-generator-jacob-s-ladder-ignition-coil.html
Thanks! I foolishly assumed that AliExpress would be cheaper.
I made my ladder from a $12 neon sign power supply that puts out 12KV. I used a couple of brass welding rods and brass ground rod clamps attached to a piece of wood. It looks and works quite awesomely. I love the fresh rainshower smell it puts into my garage.
PSA: ozone (that “fresh rainshower smell”) is toxic.
Lots of things are toxic. As always, dose is the key parameter. This link (http://www.cdc.gov/niosh/docs/81-123/pdfs/0476.pdf) says that OSHA approves concentrations of less than 0.1 ppm for 8 hours, and that the odor threshold is about 0.1 ppm. Ozone also decays very rapidly. So unless the smell is overwhelming and you sit there for hours on end, it’s probably ok.
I used a solid state neon sign transformer and got only one arc. I had to keep turning it on and off to get intermittent arcs. Any help will be aplreviated
I’m probably missing something here… how is this better than wiring a CRT flyback straight to the rods/electrodes? You can salvage the flyback from any “donated” CRT, bringing the cost effectively to zero.
The only major difference is that most CRT flybacks usually have a diode hidden inside.
So does this one.
A flyback does nothing on its own. Either you include the entire PCB or build your own drive circuit. It can certainly be done.
This isn’t new – the “Zero Voltage Switching Tesla Coil Flyback Driver for Sgtc /Marx Generator/jacob’s Ladder” circuit is just the old two 2N3055 self-oscillating driver circuit that has been around since the ’70s, I think But updated with MOSFETs and a built-in center-tapped inductor so it can drive a wider variety of transformers.
http://pe2bz.philpem.me.uk/Power/-%20Inverters/-%20AC/Inv-013-12v-to-120/inverter.gif
You can drive a flyback transformer with that by putting a set of center-tapped windings around the exposed part of the ferrite core. You might even scavenge the HOT (horizontal output transistor) from two CRT sets for those parts.