Hackaday Prize Entry: 1337 Haxxor Keyboards

If you’re like us, you spend most of your time in front of a computer keyboard, wondering where your life went wrong. [AnonymouSmst] has a slightly more positive outlook on life, which led them to create a truly DIY keyboard with OLEDs, Bluetooth, NFC, Analog joysticks, an ‘Internet of Things thingy’, local storage, and ostentatious backlighting. It’s a 1337 h4x0r keyboard, and one of the coolest input devices we’ve seen since that weird GameCube controller.

[AnonymouSmst] was one of the very elite, very privileged hackers that made it out to the Hackaday Munich meetup where [sprite_tm] first demoed his firmware hack that allowed anyone to play Snake on a keyboard. Here, the idea of building the ultimate keyboard was planted, and [mst] quickly began researching which keyswitches to use. Apparently, [mst] hates his neighbors and chose the obnoxiously loud Cherry Blues.

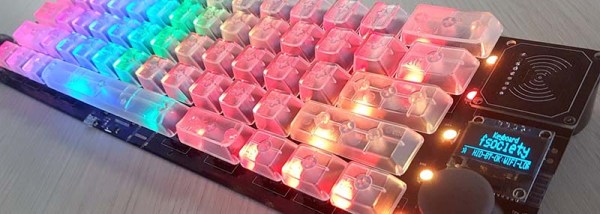
To a standard 60% keyboard layout, [AnonymouSmst] added a lot of hardware you don’t usually see in even the most spectacular mechanical keyboard builds. A few dozen WS2812 RGB LEDs were added to the build, as was an Adafruit Bluefruit module, an NFC reader, a LORA module and a ESP8266 for WiFi capability, an OLED display just because, and two analog joysticks on either side, one acting as the arrow cluster the other acting as a mouse.

We’ve seen dozens of mechanical keyboard builds over the years, but this takes the entire concept of a DIY keyboard to the next level. It’s bright, shiney, glowey, and a vulgar display of conspicuous consumption and engineering prowess. It is the perfect keyboard, if only because it was designed and built by the person who would ultimately wield it.

Really Easy Jacob’s Ladder

There was a time when making a high voltage project like a Jacob’s ladder took time to build or scrounge some kind of high voltage circuit. The neon sign transformer, Marx generator, or voltage multiplier was the hard part of the project. But nowadays you can get cheap high voltage modules that are quite inexpensive. [PaulGetson] picked up one for under $20 and turned it into a quick and easy Jacob’s ladder.

Honestly, once you have high voltage, making a Jacob’s ladder is pretty simple. [Paul] used a cheap plastic box, some coat hanger wire, and some stainless steel bolts.

Continue reading “Really Easy Jacob’s Ladder”

DIY Electric Pennyboard Can Hit 40Km/h!!

Home-made transportation is a thriving area for makers to flex their skills. Looking to shorten their university commute, [doublecloverleaf] modded his penny board by adding a motor that can have him zipping along at 40 Km/h!

The electric motor is mounted to the rear truck and delivers power to the wheel gear using a HTD 5 m pulley belt. Finding the deck too flexible to mount the battery pack under, [doublecloverleaf] strengthened it with a pair of carbon-fiber tubes bracketed on the underside. A few custom PCB boards connect ten 5 Ah LiPo battery cells in series to create two, five-cell packs which are kept safe by a thick housing mounted between the board’s trucks. [doublecloverleaf] calculates that they could make up to a 15 km trip on a single charge.

Continue reading “DIY Electric Pennyboard Can Hit 40Km/h!!”

Musical Proximity Detection Pet Bowls

An essential skill for a maker is the ability to improvise or re-purpose existing materials into new parts. Sometimes, one needn’t make many modifications to create something new, as is the case with [Robin Sterling] and his musical pet bowl.

Originally, it was a sealed pet bowl that opened when the proximity sensors detected an approaching pet. Having helped design the bowl, [Sterling] had a bit of an advantage when he decided to convert it into a theremin/light harp-esque instrument for the company BBQ. He routed the PWM outputs from each of the three proximity sensors (in each of the three bowls) to a small guitar amp, adjusting each sensor’s output to a different frequency. Despite the short amount of time [Sterling] had to practice, it works fairly well!

Continue reading “Musical Proximity Detection Pet Bowls”

Characterizing A Death Ray… Er, Solar Oven

Many of you will probably at some point have looked at a satellite dish antenna and idly wondered whether it would collect useful amounts of heat if you silvered it and pointed it at the sun. Perhaps you imagine a handy source of  solar-cooked hotdogs, or maybe you’re a bit of a pyromaniac.

[Charlie Soeder] didn’t just think about it, he did it. Finding a discarded offset-focus DirecTV dish, he glued a grid of 230 inch-square mirror tiles to it and set to investigating  the concentrated solar energy at its focus. 

Cotton waste, newspaper, and scraps of fabric char and burn with ease. A cigarette is lit almost from end to end, and it burns a hole right through a piece of bamboo. Most of the energy is in the form of light, so transparent or reflective items need a little help to absorb it from something dark. He demonstrated this by caramelizing some sugar through adding a few bits of charcoal to it, once the charcoal becomes hot enough to caramelize the sugar around it the spreading dark colour causes the rest of the sugar to caramelize without further help.

Solar furnace calculations

To gain some idea of the power of his solar furnace, he recorded a time series of temperature readings as it heated up some water darkened with a bit of charcoal to absorb heat. The resulting graph had a flat spot as a cloud had passed over the sun, but from it he was able to calculate instantaneous power figures from just below 30W to just below 50W depending on the sun.

He records his progress in the video you’ll find below the break. Will we be the only ones casting around for a surplus dish after watching it?

Continue reading “Characterizing A Death Ray… Er, Solar Oven”

How Accurate Is Microstepping Really?

Stepper motors divide a full rotation into hundreds of discrete steps, which makes them ideal to precisely control movements, be it in cars, robots, 3D printers or CNC machines. Most stepper motors you’ll encounter in DIY projects, 3D printers, and small CNC machines are bi-polar, 2-phase hybrid stepper motors, either with 200 or — in the high-res variant — with 400 steps per revolution. This results in a step angle of 1.8 °, respectively 0.9 °.

Can you increase the resolution of this stepper motor?

In a way, steps are the pixels of motion, and oftentimes, the given, physical resolution isn’t enough. Hard-switching a stepper motor’s coils in full-step mode (wave-drive) causes the motor to jump from one step position to the next, resulting in overshoot, torque ripple, and vibrations. Also, we want to increase the resolution of a stepper motor for more accurate positioning. Modern stepper motor drivers feature microstepping, a driving technique that squeezes arbitrary numbers of microsteps into every single full-step of a stepper motor, which noticeably reduces vibrations and (supposedly) increases the stepper motor’s resolution and accuracy.

On the one hand, microsteps are really steps that a stepper motor can physically execute, even under load. On the other hand, they usually don’t add to the stepper motor’s positioning accuracy. Microstepping is bound to cause confusion. This article is dedicated to clearing that up a bit and — since it’s a very driver dependent matter — I’ll also compare the microstepping capabilities of the commonly used A4988, DRV8825 and TB6560AHQ motor drivers.

Continue reading “How Accurate Is Microstepping Really?”

Hackaday Prize: 20 Projects That Are The Height Of Automation

Automation makes the world go around. Whether it’s replacing elevator attendants with buttons, replacing songwriters with computer algorithms, or giving rovers on Mars the same sense and avoid capability as a Tesla, Automation makes our lives easier and better. Today we’re excited to announce the twenty projects that best demonstrate the possibilities of Automation in the running for the 2016 Hackaday Prize. These projects tackled problems ranging from improving the common stepper motor to flying Lidar around a neighborhood on a gigantic ducted fan.

The winners of the Hackaday Prize automation challenge are, in no particular order:

If your project is on the list, congrats. You just won $1000 for your hardware project, and are now moving up to the Hackaday Prize finals where you’ll have a chance to win $150,000 and a residency at the Supplyframe DesignLab in Pasadena.

Assistive Technologies
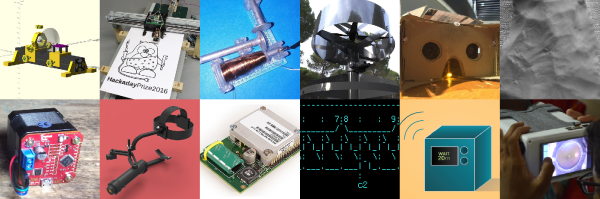
If your project didn’t make the cut, there’s still an oppurtunity for you to build the next great piece of hardware for The Hackaday Prize. The Assistive Technologies Challenge is currently under way challenging you to build a project that helps others move better, see better, or live better.

We’re looking for exoskeletons, a real-life Iron Man, a better wheelchair, a digital braille display, or the best educational software you can imagine.

Like the Design Your ConceptAnything GoesCitizen Science, and Automation rounds of the the Hackaday Prize, the top twenty projects will each win $1000 and move on to the Hackaday Prize finals for a chance to win $150,000 and a residency at the Supplyframe DesignLab in Pasadena

If you don’t have a project up on Hackaday.io, you can start one right now and submit it to the Hackaday Prize. If you’re already working on the next great idea in assistive technologies, add it to the Assistive Technologies challenge using the dropdown menu on the sidebar of your project page.

The Hackaday Prize is the greatest hardware competition on Earth. We want to see the next great Open Hardware project benefit everyone. We’re working toward that by recognizing people who build, make, and design the coolest and most useful devices around.