If you are reading this, it is a fair bet you like to take things apart. Sometimes, you even put them back together. There are two bad moments that can occur when you do this. First, when you get done and there is some stuff left over. That’s usually not good. The other problem is when you are trying to find some little tiny bolt and a washer and you can’t find it. SMD parts are especially easy to lose.
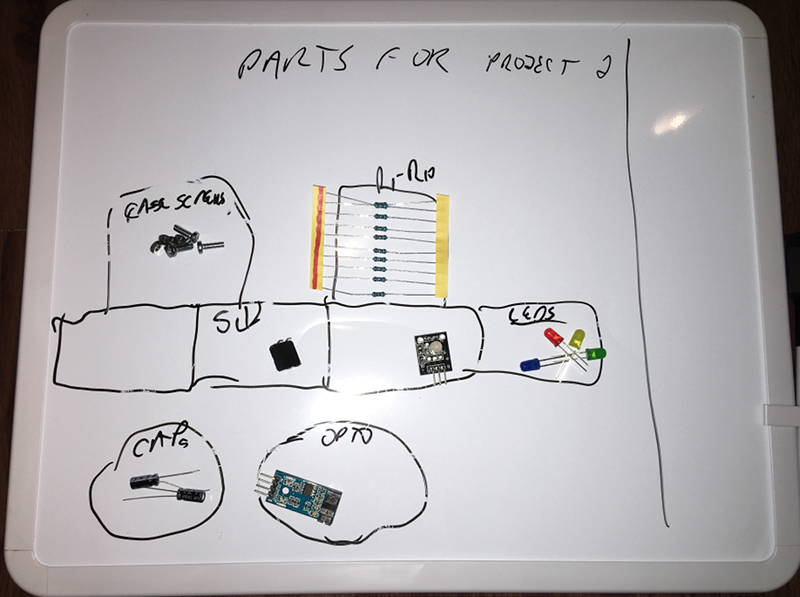
A few months ago, I was browsing through a local store and I saw a neat idea. It was basically a small whiteboard with lines dividing it into cells. It was magnetic and the idea is you’d put your small loose (and ferrous) parts like screws, bolts, nuts, and resistors on the board. Since it was a marker board, you could make notes about what each cell contained. Great idea! But the thing was about $20 and I thought I could do better than that. As you might guess from the picture, I was successful. I spent about $5, although I had some rare-earth magnets hanging around. If you don’t, strong magnets aren’t that expensive and you can often raid them out of hard drives.
First Attempt
My first attempt was a failure. I went to a local discount store and looked at the cheap whiteboards. Here’s what I found out. What they sell as “magnetic” whiteboards are boards that will hold a magnet. By themselves, they aren’t magnetic. Luckily, I had brought a small bolt into the store to test, so I didn’t buy one and I sort of forgot about it for a few months.
Regroup
 Recently, however, I was about to disassemble something and realized I really wanted something like this to get organized. A trip to the local drugstore netted me a $5 whiteboard with a little marker that attaches with a clip or with a magnet. The thing also came with some sticky tape, some magnetic tape, and a few little weak magnets to grip on it.
My first attempt with the new board was to simply stick some strong magnets to the back of the board. That didn’t work. Turns out the frame has two pieces of cardboard in it. One piece has the thin whiteboard surface glued to it. The two pieces of cardboard were keeping the magnet too far away to be useful.
How you get to the whiteboard surface will probably depend on exactly what you buy. On mine, the frame pulled apart easily at one corner and I just slipped everything out. Be careful, though, because the inner cardboard was glued to the whiteboard surface, I did manage to bend the thin metal surface when I pulled it out. It wasn’t bad though, and it is so thin, it mostly bent back out.
Law of Attraction
Once you have the metal exposed, you can mount magnets on the back and they’ll stick. You could probably also use some magnetic tape (the sticky kind, not the old computer or audio kind). Then you just have to put the cardboard back and reassemble the frame. In my case, I cut up one piece of the cardboard to make shims that went around the edges to hold in the other piece of cardboard. I didn’t think the whole sandwich would go back in with the thickness of the magnets. I used several different kinds, but if I had stuck to the thin ones, that might not have been a problem.
Oops — Should Shop Better
After I was done, I made the mistake of looking on eBay. If you don’t mind shipping them from around them globe, you can get the $20 pad for about $5 anyway. However, what fun is that? With this method, you can make as big or small of a mat as you want. You can customize it as you like, too. I thought about using a dual whiteboard/corkboard so you could stick components into the cork or use pushpins to hold things in bags. Anyway, if being able to buy something means that you’re not allowed to build it, Hackaday would have a lot fewer articles.
Even though we don’t think magnets cure arthritis, we do think they are a little bit magic. Some people even use them to avoid being groped in the shower (assuming, of course, you think that’s a bad thing). Now, I only have to figure out why I have these two extra M3 bolts.


Egg cartons and muffin pans FTW.
Spray the muffin tins with whiteboard or chalkboard paint for the win;-)
No need to bother, wax/grease pencil writes on them well enough, or whiteboard marker, or sharpie and wipe off with alcohol for next time.
I don’t usually need labels though, just work top left to bottom right and reassemble bottom right to top left. They’re also movable without the parts rolling around or skidding off target, I’ve had one or two things I pulled apart 5 years previous, ended up shoeboxing for some reason, then been able to work backwards easy enough when I got them out again.
Don’t forget ice cube trays, tackle boxes and jewelry/bead boxes.
Yup, I was saving the ice cube tray for the spot the vegan riposte. :-D
The whiteboard is a great idea, I generally do this method with a sheet of brown paper.
Your method doesn’t add all the ESD.
Do you use an ESD gun on your parts to get the same effect as this lifehack?
You mentioned “magnetic tape.” If it is the thin black stuff that you stick on fridge magnets, that stuff will NOT work. That strip magnet consists of alternating north and south domains running perpendicular to the length of the tape. Those alternating domains will cancel out, leaving no net magnetic flux. Hard drive magnets are probably your best bet.
Yes, HaD covered “one sided magnets” a couple years ago, IIRC.
You can get large sheets of magnetic material sold as vent covers for furnace vents. in your local discount supply store. These hold small ferrous parts pretty well. They come with a white surface already, or you can apply contact paper etc. if you want.
Hackaday, the LifeHack Content Proxy, a product of Supplyshame Barbeque Channel.
LifeHack #496239 for real(TM) h4xx0rs, Hang a shoe organiser beside your bed to store all your phones, devices and handhelds overnight.
Implying I ever go to sleep
Cuz sleep is the cousin of the two horned creep from the deep.
When I have parts left over, I always pat myself on the back for being smarter/more clever than the engineer who designed the widget in the first place :-)
…..and I thought it was just me. I have an old speaker with a large magnet that has been my workbench companion for years.
You can also laminate a piece of white paper or printed photos. The lamination takes white board markers really well, and can be removed with the standard erasers or tissue. Wouldn’t be magnetic all over, but it’d be easy enough to stick some small magnets to the back with adhesive.
I save the trays from fresh mushrooms. They nest and will hold a lot of bits and pieces. And you can’t beat the price ;-)
When I have a part left over I take it back apart. Guess it’s an attitude thing.
Guess you’ve never did serious work on a car before…..
What I find most helpful is cheap sandwich bags and taking pictures each step of the disassembly. The best tool is the one everyone has but never uses, an old cellphone with a decent camera.
Magnets can be a godsend, if used correctly, aka knowing when and where not to use them.
Everyone that has ever seen me do this has a smart ass comment to make, but my stuff always goes back together correct, wether it’s a tablet or a front wheel drive car, while I’ve seen them do exactly what you and a few others do, either have “extra parts” or spend time redoing the job.
Smooth white panelboard from your local hardware store is probably the cheapest whiteboard surface available. $10-15 for an 8’x4′ sheet. Find a good scrapyard for the sheet metal, though.
I take corrugated cardboard, crudely draw the shape of what I’m disassembling on it, and then push the screws into the cardboard where I removed them from the real item. Whoo, lifehacking!
Yah, I’ve used that one, especially where you’ve got a lot of different length and type screws on one “layer” as it were.
Same here. Very useful for laptops :D
I got one of those commercial ones from iFixit… It’s pretty handy
Large sheet/roll magnet and liquid chalk markers…. I just save all of the jello/pudding/graze trays from my girlfriend and use those.
I use different methods –
Laptops that have different lengths of screws that aren’t printed near the screw hole – two pieces of paper. One for back screws and one for front screws. I use the position on the paper to indicate the position where it came from.
Desktop computers that have only two or perhaps three sizes of screws that have obvious location – and old hard drive magnet does the trick here.
Larger equipment that has lots and lots of screws. Little plastic bags that are marked for each stage of disassembly – screws visible from the outside, case / outer shell screws, scanner attachment screws and cables, printer chassis screws, image unit drive screws, etc
Bag method is handy when you’ve got lots of smaller sub assemblies of many parts you want to keep all together.
How do magnets work?
Pixies…. Frantically waving their buddies over… Or away
Put a webcam over your work area and have it record a 1 second interval time lapse. Whenever you reach a key step pause what you are doing, perhaps pointing at a relevant part or writing a note on a flip pad, then after a minimum of 2 seconds continue.
Placing parts in those $2 12 Cell Propagation Cases in order of removal helps to ensure each step of a reconstruction does not have left over parts. The Propagation cases actually give you three trays two large and 12 small, but you may need to tape over (or glue gun) the small holes in the bottom if you are working with small parts. You can always just use the entire tray as one unit then you get 12 cells to hold stuff and a clear lid that can be held on with rubber bands. As for rubber bands buy some thin walled but large diameter silicone rubber tubing and slice bands off that, because it does not go of like cheaper rubber bands do.
If you are serious about it and have a lot of these storage boxes that are the same size you can route a cross section outline for casting custom bands in silicone, but just runing a clean continuous line of it on a sheet of glass with a paper visual guide underneath will often be good enough. Wax or grease the glass to make the peel off easier. you can get fancy and do a O–O type shape to get connected bands that utilise the flexibility of the material to go from 2D to 3D.
Google “Magnetic Vinyl Sheet”…..
That’s great.
You were able to locate an antistatic white board!
Right?
So are you saying this will work in a zero gravity envorment..? NASA, are you seeing this?!
But my screws are already loose and I lost my marbles a long time ago since they are not magnetic.
I have a stack of “school lunch” trays with 6 compartments each (drink, fries, pizza, chips, cookie, Ranch Dressing) in multiple colors. They came from the restaurant supply store for about a dollar each. I put stuff in them, when the tray is full, use the next tray. Bonus for me is that white board markers work on the trays, I can write on them as I go and cleanup with a paper towel.
I also have a collection of magnets, if I’m paranoid, I drop a magnet into the compartment, and all the parts stick to it. (This is under the theory that small things easily can escape, but when attached to a larger thing it’s harder.) It works well, but in full disclosure I will tell you if you upend the tray, all the parts and magnets become a single Borg block.
I was hoping that this was about hacking a prometheus whiteboard.