Anyone who regularly presents to an audience these days has known the pain of getting one’s laptop to work reliably with projection hardware. It’s all the more fraught with pain when you’re hopping around from venue to venue, trying desperately to get everything functioning on a tight schedule. [Seb] found that the magic keystrokes they used to deal with these issues no longer worked on the Macbook Pro Touchbar, and so a workaround was constructed in hardware.
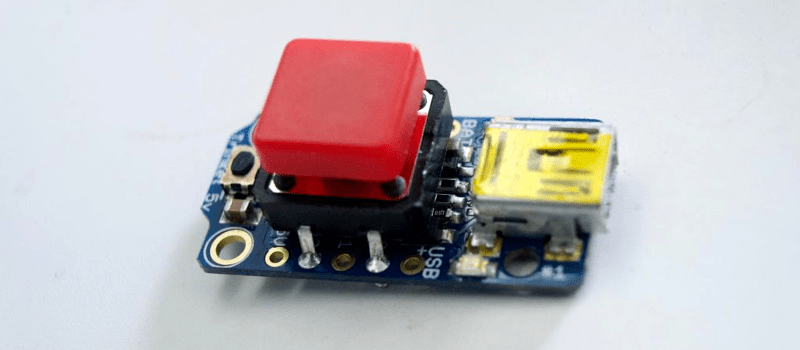
The build itself is simple – an Adafruit Trinket serves as the brains, with a meaty 12mm tactile button used for input. The Trinket emulates a USB keyboard and sends the Cmd-F1 keypress to the computer when the button is pressed. The button’s even mounted in a tidy deadbugged fashion.
While it’s not at all complicated from a build standpoint, the key to this project is that it’s a great example of using the tools available to solve real-life problems. When you’re in a rush with 300 people waiting for your talk to start, the last thing you need to be worrying about is a configuration issue. [Seb] now has a big red button to mash to get out of trouble and get on with the job at hand. It does recall this much earlier hack for emulating a USB keyboard with an Arduino Uno or Mega. It’s a useful skill to have!


A big red button.
Dr Who would be happy.
And Stimpy as well.
i hear things all the time about people having issues with projectors but i have had 4 laptops and not one had issues projecting xP
nifty little thing nonetheless!
Paint it white, call it iSwitch and set the price of 200 dollars. Profit!
Can’t the letter I is trademarked
Then you use the ” | ” not the ” I “
It was the double lined thing. I dont know the name of it it is on top of the backward slash.
I know on the screen they both look the same.
Pipe?
Win+P on Windows.. Is it that hard to output to a projector on OS X where you have to construct an Arduino to do it?
Ohh you want to connect your Mac to a projector? There’s an app^Warduino project for that!
I personally don’t have preblems with any of the three I mess around with on a daily basis (a PowerBook G4, a 2006 Mac Pro, and a 2010 Macbook Pro). However I avoid any fancier screen casting tech and just use a mini display port to vga or DVI adapter (aftermarket, of course). Hasn’t failed yet.
That being said, I think his presenting software is what’s misbehaving in this case.
I think the issue was that they removed some quite useful buttons and placed the fancy touchbar in place.
Try it – you may be surprised. BetterTouchTool + touch bar = user definable key strip — add your own icons or menu options, bind layouts to specific apps, etc. etc. A huge improvement over crtl-shift-F1 does “something”. I wouldn’t go back now.
I don’t get it, this saves pressing two keys at once but you have to plug it in first? Nothing wrong with a dedicated key or a few though. Stick-of-gum sized controller from cheap or sticky USB keyboard, solder what you need for keystrokes with switches and stick it in an enclosure.
I don’t get it too…
Solving this task by using remaining parts of a broken keyboard might have some hack quality but using an ATtiny85’s keyboard library for exactly what it is meant for is definitely just generating white noise in the net.
All thumbs down and a huuuuge YAWN!
Why all this negativity… sure I get the point that with some proper preparation before a presentation it should be no problem at all to connect a projector to a computer…
But, don’t be so negative about the project itself. There have been much more useless projects on hackaday. I guess the problem with this one is that it does not have (enough) sound or light coming out of it. But in my opinion, I think it is great, a whole device (actually a whole microcomputer with a high tech communication protocol) just to add one silly button, it can’t be more overkill then that…
Therefore I love it!
PS: I’m a little bit dissapointed that the computer this will be used on required this add-on to make this possible. Perhaps it is an idea to add another button that one could be for the “backspace” function as I’ve heard that that function isn’t available either?
Apparently what’s the problem is that the “pressing of the two keys” doesn’t work on the new Macbooks, because the F1-key doesn’t properly exist (the touch bar replaces the function-keys row). I haven’t used any Macbooks with the touchbar myself, but I can image that the functionality has been removed (the ESC-key was apparently removed).
Remember when they removed the headphone jack? Quite a useful thing. And yes they did remove the function keys to replace them with the touchbar.
For experience gain this project might be good, but exactly which real world problem does it solve? Seems lika a bit of time wasted.
it should be wireless
Exactly where is the Raspberry Pi connected to an Arduino that’s linked to a ESP8266 variant connected to a wireless mesh network that uses a BLE module attached to the router near the Laptop.
You forgot the 555 to debounce the switch…
I don’t see why anything arduino-related (much less this very specific thing) is a “useful skill to have”. It’s trivial to do on most platforms… Most modern ones (Cortex M) even have full USB stacks. And a decade ago we were doing it with V-USB (called AVR-USB at the time) on crappy low-end atmels.
Is it possible to alter the key sequence? That would make it much more useful for a number of things, like windows 10 switch desktops (windows+Ctrl+Left arrow
“The key to this project is that it’s a great example of using the tools available to solve real-life problems.”
Thanks for the key, here is the decoded version, cheers ! :
“One day he wanted to show the usual justification for his work and expenses on Powerpoint, [Seb] was shocked to discover that his shinny new $2000 laptop missed the F1 key needed for his favorite keyboard shortcut (that happens to be the one that is provided by the operating system for everyone to toggle “screen-mirroring” to an external display).
Rather than boringly finding the new “touchbar” shortcut provided for it (a simple option to enable in a control panel, like explained all over the Internet), he prefered to boringly make another “arduino usb button” (a quick setup that requires minor modifications of a code example from a provided USB-keyboard library… like explained all over the internet) with the actual benefit to impress his friends and blog’s readers, mostly web-designers who are fascinated by those dark and dirty “low-level” electronic things.
The key to this project is to make such a trivial thing look like a “solution to a real-life problem”, with a blog entry, a video on Vimeo, and the mandatory Github project (mostly a full copy of the old existing USB keyboard library), claiming it to the world (“calling all speakers !”) then take some “hardware credibilty” from hipsters for it. As a bonus, it could even get reported on HackaDay, which now targets the same superfical but profitable audience.
You probably nailed it, Seb is an “artist” (a word that used to define people serving the Arts, but now serves exclusively as a mere status to market soulless sanatized digital visuals and sounds), so he’s accustomed to spend tons of public money without batting an eyelid, and he went directly at his usual supplier Adafruit and, after reading their nice “usb keyboard” tutorial, bought the $20 of proposed products required for his unimaginative build
But for those of you spared from the vicissitudes of the poor fresh macbook’s owners, and who could stoop to deal with “no names” clones gathered from some stinkin’ chinese vendors, the same exact thing is doable for a small fraction of the previous amount. And if, unlike Seb, you don’t need other’s money to be creative, you could even add a some resistors and a touch of humour, i.e. replacing the button by a rotten apple ;)”