For the last few months, I had been using Sparkfun’s Phant server as a data logger for a small science project. Unfortunately, they’ve had some serious technical issues and have discontinued the service. Phant was good while it lasted: it was easy to use, free, and allowed me to download the data in a CSV format. It shared data with analog.io, which at the time was a good solution for data visualization.
While I could continue using Phant since it is an open-source project and Sparkfun kindly releases the source code for the server on Github, I thought it might be better to do some research, see what’s out there. I decided to write a minimal implementation for each platform as an interesting way to get a feel for each. To that end, I connected a DHT11 temperature/humidity sensor to a NodeMCU board to act as a simple data source.
What Makes IoT Data Logging Services Useful?
To start, I had three main requirements. First of all, the service would be primarily used for data logging , so a proper export feature is a must.
Second, it needs to support MQTT well, and be properly documented so that I can implement it on a wide variety of hardware. An Arduino library is useful, but not sufficient. We’ve previously covered the basics of MQTT if you need a quick refresh.
Finally, it had to be available at a reasonable cost. It did not have to be free of charge, as there are plenty of ways to make a reasonably priced service pay for itself in effort saved or actual income.
After that, there are a lot of things that were optional. A slick dashboard with live graphs is a great way to quickly share data and get people interested. Support for MQTT QoS level 2 (each datapoint is sent exactly once using a 4 way handshake) would be nice as some of the networks I’ll be using will not exactly be reliable and this means better quality data. Finally, if I can host it on my own VPS so that I can rent a server in the countries where I am collecting data, that would really improve reliability in my area.
After considering the above I found five options that seemed to fit the bill: Adafruit.io, Cayenne, Thingspeak, Thingsboard, and Ubidots. I also considered Blynk, but they don’t seem to have documentation available yet to use MQTT with their service. This is a shame because otherwise it looks pretty slick and has a neat smartphone app.
In each case I’ll explain the pros and cons from my standpoint, and provide an implementation example in Lua using a generic MQTT library (from NodeMCU). Most platforms also provide custom libraries or ready-made solutions for Arduino, Raspberry Pi, and others, however I wanted to investigate at a slightly lower level how each service works. As an added benefit, the code will run directly on NodeMCU firmware that supports MQTT.
One criteria not in consideration is security – these data loggers are collecting non-critical scientific data. They’re on an encrypted Wi-Fi network, and do not accept commands from the Internet.
Adafruit IO
I’ve always been impressed with Adafruit’s documentation, and Adafruit IO was no exception. The MQTT communication protocol was well-defined, it was clear how to set things up without any aspect ever feeling ‘dumbed-down’, and there were links to further reading.
Setting up a device in Adafruit IO starts with creating a feed in the user interface, which is easy on the eyes and well thought out:
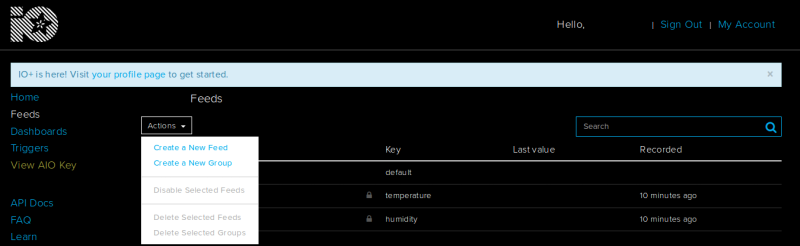
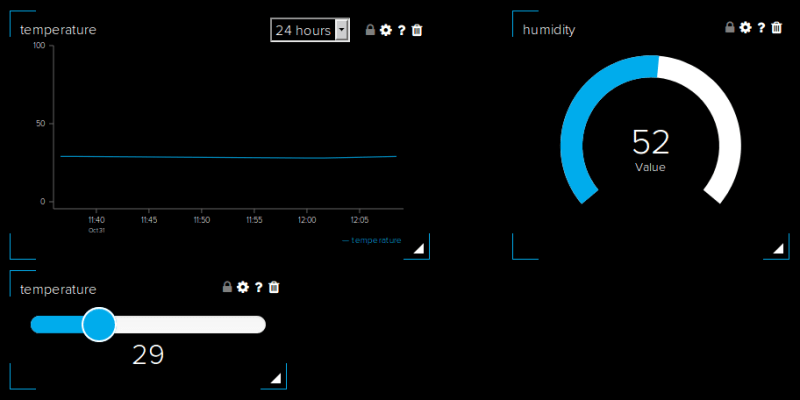
Once you’ve created a feed, you’ll be able to add it to a dashboard if you wish. The collection of widgets is somewhat sparse compared to some other platforms, but all the necessary ones are there and they can be resized as you need:
To add data to a feed, you need to set your MQTT client to connect to io.adafruit.com, using your Adafruit account name as your username, and your AIO key (to the left in yellow when you log in) as your password. Note that if your device is not using SSL, these credentials can be intercepted, and that Adafruit IO supports SSL. If your device supports SSL, it’s a good idea to use it.
Once connected, the MQTT topic to publish to is simply your-username/feeds/feed-name. Even though JSON data format is supported, one caveat is that you can really only record one value at a time per feed. You can add latitude, longitude, and elevation to a single feed, but could not add temperature and humidity. By contrast, some platforms let you add more or less arbitrary amounts of variables inside a single feed, which I often find useful for things like weather stations. Nothing stops you from tying multiple feeds to a single dashboard, so I don’t see this as a major flaw. The only shortcoming I’ve been able to find is that Adafruit IO only supports MQTT QoS levels 0 and 1, with no support for 2.
Adafruit IO has convenient data management as well. You can manually add and delete values, a feature missing on some of the other platforms. Downloading the data from a feed is trivial, there’s a button for it when you are viewing a feed.
One truly excellent feature I would like to point out is that there’s an error console. Not only that, but the dashboard flags it red when there’s something new for you to see there. This feature combined with the excellent documentation made Adafruit IO the best platform to learn with — none of the complexity is hidden, but it’s documented and there are tools for debugging. Our sample code to try out this platform is below:
ClientID = 'put anything here'
username = 'your username here'
AIOkey = 'your key here'

m = mqtt.Client(ClientID, 120, username, AIOkey)

m:connect("io.adafruit.com", 1883, 0, function(client) print("connected") m:publish(username.."/feeds/temperature", temp, 0, 1) m:close() end)

function postThingSpeak(level)
m:connect("io.adafruit.com", 1883, 0, function(client) print("connected") m:publish(username.."/feeds/humidity", humi, 0, 1) m:close() end)

end

tmr.alarm(1, 5000, tmr.ALARM_SINGLE, function() postThingSpeak(0) end)
Cayenne
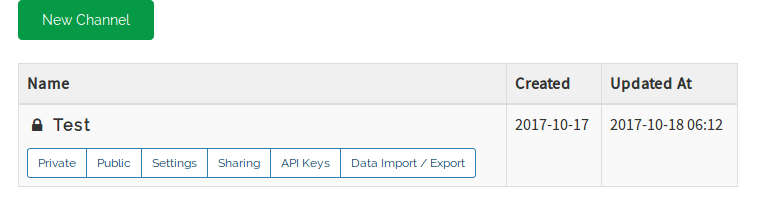
The interface in Cayenne is organized by device. Each device has channels that contain your data. When sending data to a channel, the device can indicate what type of data (e.g. humidity) is being sent to assist in processing. There are quite a few supported data types.

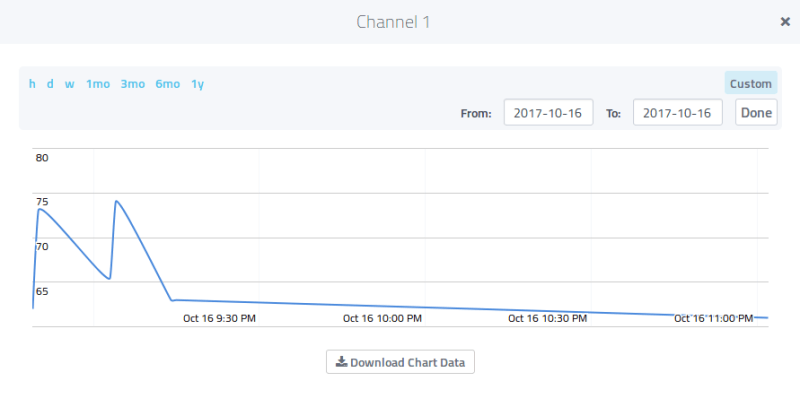
You can create different ‘projects’ that take data from channels on different devices and add them to a common dashboard. Each channel can be displayed as a graph of preset or custom time intervals. The graphs are clean, but are a bit on the small side for larger data sets, and have an odd smoothing effect that created curved lines that didn’t represent the data. I don’t like this feature at all as it makes it harder to see what’s really going on. What I would liked to have seen was an ability to turn off the trend line entirely or at least the smoothing feature.
On the graph view is a ‘Download Chart Data’ button that downloads the data as a CSV file.
Overall Cayenne checked all the boxes, but how easy is it to code for? As it turns out, it has one of the more unusual MQTT setups of the services I investigated. It requires a client ID, a username, and a password specified to connect, and the client ID and username specified again in the MQTT topic:
ClientID = ‘your client ID here’

username = ‘your username here’

password = ‘your password here’

channel = ‘your device channel’

m = mqtt.Client(ClientID, 120, username, password)

m:connect("mqtt.mydevices.com", 1883, 0, function(client) print("connected") m:publish("v1/"..username.."/things/"..ClientID.."/data/"..channel, "temp,c="..temp, 2, 1) m:close() end)
The channels added to each device are named in the web interface, and are simply identified with a number. For example your first channel would be v1//things/<ClientID>/data/0.
In the end, this worked fine and it even supported MQTT QoS level 2.
Thingspeak
First off, Thingspeak has integration with MATLAB. Being able to store, visualize, and analyze data in the same place seems like an excellent feature. I prefer to do hypothesis testing in Python but MATLAB is an excellent choice and all common statistical tests are available.
In Thingspeak, data is sorted into channels. Channels contain fields, and fields contain your data.
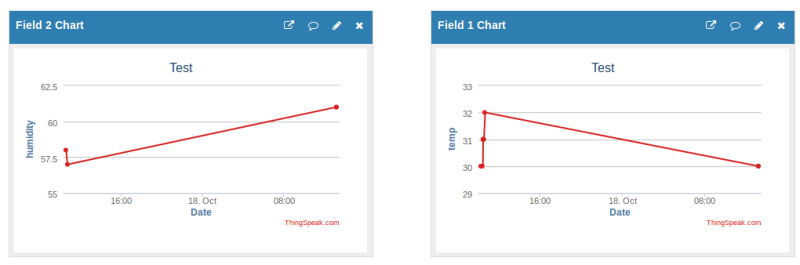
The graphs on Thingspeak are tidy and clearly show the data points. However, I couldn’t find a way to resize the graphs in the interface, which ought to be possible because they seem to be generated as SVG graphics.
One very interesting feature is the ability to generate an iframe from the graphs and include them on another website. I gave this a quick try, it worked like a charm. It would have been a neat add-on to this radiation detector.
The MQTT implementation at Thingspeak is dead simple, requiring only the channel ID and API key:
ChannelID='your channel ID' apikey = 'your API key' m = mqtt.Client(ClientID, 120) m:connect("mqtt.thingspeak.com", 1883, 0, function(client) print("connected") m:publish("channels/"..ChannelID.."/publish/"..apikey, "field1="..temp.."&amp;field2="..humi, 0, 0) m:close() end)
Unfortunately, Thingspeak only supports QoS level 0, which means data can be duplicated or missed on shaky Internet connections. I’m not sure how much this matters in practice, but given their focus on data analysis it would be nice not to have to deal with missing data points.
Thingsboard
Up to this point, we’ve only investigated externally hosted services. If you need something that you can host yourself, Thingsboard is worth checking out. Their setup is a little different from anything we’ve seen so far. Much of it is access control for different users, rule setup for raising alarms/actions, and exciting things that are beyond the scope of this article.

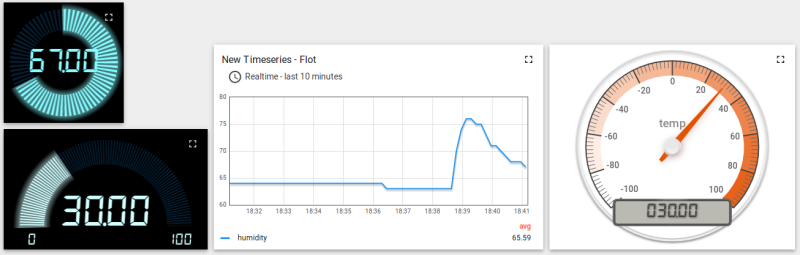
For our purposes in Thingsboard, devices contain telemetry data. Then widgets on dashboards are connected to the telemetry contained in devices. The dashboard creation workflow is convoluted compared to some other platforms, but they have by far the widest selection and coolest looking dashboard widgets I’ve seen, and each of them can be set to display full screen.
However, data export is somewhat inconvenient at first – there’s no download button but it can be done programatically via Curl. This way data export and backup can be automated (e.g. with cron), which suits me fine.
The MQTT implementation here is very straightforward and supports QoS level 2. An access token associated with a device is used on connect, and then any telemetry sent will belong to that device. A very important consideration is that you must not send integer or float data as a string – it will work on real-time displays such as gauges, but any graphs will fail to pull historical data correctly. In other words, do not send {"temperature":"57"}, be sure to send {"temperature":57}. Code example below:
ClientID = 'put anything here'

token = 'your token here'

m = mqtt.Client(ClientID, 120, token)

function postThingsboard(level)

status, temp, humi, temp_dec, humi_dec = dht.read(pin)

print(string.format("DHT Temperature:%d.%03d;Humidity:%d.%03d\r\n",

math.floor(temp),

temp_dec,

math.floor(humi),

humi_dec

))

print('{"temp":'..temp..',"humidity":'..humi..'}')

m:connect("demo.thingsboard.io", 1883, 0, function(client) print("connected") m:publish("v1/devices/me/telemetry", '{"temp":'..temp..’,"humidity":'..humi..'}', 2, 1) m:close() end)

end

tmr.alarm(1, 10000, tmr.ALARM_AUTO, function() postThingsboard(0) end)
Ubidots
Unlike the other platforms reviewed here, Ubidots does not offer a free account tier. That being said, new accounts start off with enough credits to operate a device for 5 months, and USD $5 will purchase enough credit for a device to run for 2 months.
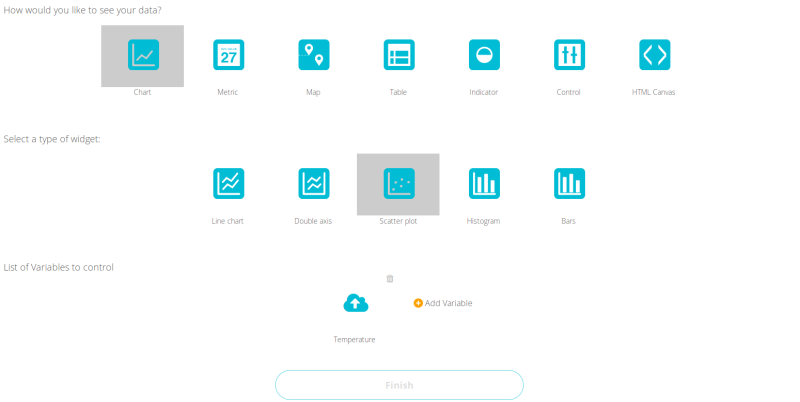
In Ubidots, data is sent to variables, and variables exist within devices. You can create a dashboard by adding widgets and selecting a data variable. User interface is where Ubidots really shines; it has by far the best dashboard creation process and overall it’s immediately clear how to do everything you might need to do… with one exception.
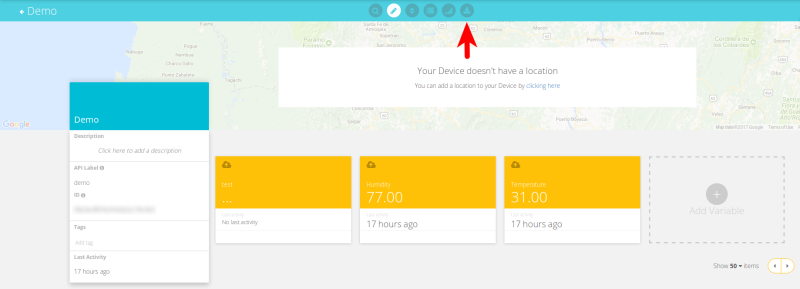
The option to export all data from a variable is accessed by entering the variable, then clicking on ‘variable settings’, where the only two options are ‘Export to CSV’ and ‘Delete Values’ – neither of which are settings. Exporting all data from a device on the other hand is intuitively labeled, and where you would expect it to be, which I’ve indicated with a big red arrow:
As for the MQTT implementation, it’s a bit clunky in my opinion. You connect with your token as your username, and the way data is associated with a particular device is via the MQTT topic. The data keys in the JSON dictionary then have to exactly match the variable names set up in the user interface (which must be unique).
This strikes me as less easy to manage than some of the other platforms, where you specify a device-specific token, and you can use non-unique variable names. Perhaps I’m missing something, but if I’m logging the temperature of 30 different pipes I would personally find it easier to manage unique keys than unique variable names. It does support MQTT QoS level 2 though, which is nice:
clientID = 'anything can go here'

Token = 'your token'

Device = ‘your device name’

m = mqtt.Client(clientID, 120,Token)

m:connect("things.ubidots.com", 1883, 2, function(client) print("connected") m:publish("/v1.6/devices/"..Device, '{"Temperature":"'..temp..'","Humidity":"'..humi..'"}', 2, 1) m:close() end)
Summary
All of these platforms provide data capture, display, and export. They differ a little in their MQTT implementation, but not by very much. For datalogging purposes they’re all sufficient. After trying each of them, a few things stuck with me.
Adafruit IO was hands down the best platform to learn with. They had excellent documentation, data management, and an error console for debugging. The free account is enough to get started, and the paid account is reasonably priced and powerful enough to get a lot done. If I had to suggest a service to someone wanted to learn how to add IoT data logging to their projects, I would recommend Adafruit IO without hesitation.
Thingspeak integrated data analytics into their platform. I haven’t dug deeply into it, but the idea of having data acquisition, storage, analysis, and decision making in the same place and automated seems brilliant. Can it perform automated hypothesis testing and control systems based on rejection/failure to reject the null hypothesis? I’m not a MATLAB user, but on the surface it looks like it could. Just don’t tell any direct response marketing teams about that.
Ubidots has a slick user interface and is easy to understand. If I had to introduce IoT to children or managers without going into many technical details, this is what I would use. That’s not intended to be a snide remark, it’s just ideal for both groups for different reasons.
Finally, Thingsboard. I had no idea something this mature existed in the IoT space. The possibilities are staggering for both personal and commercial projects since it’s open-source and can be self hosted. To top it off, it has beautiful dashboard widgets that I can actually show clients. My reaction when I saw it was to immediately pick up the phone and start making calls. I don’t know what I’ll be doing yet, but it’s going to be fun, and I’ll try to share it here one day.


Uhhhhhhhhhhhh… Or you can go get one of those el-cheapo VPS’es, throw linux on them, and install Mosquitto. I’ve seen them as low as $20/year, and can be used for a heck of a lot more than just MQTT. And if you add a domain name through your provider (DONT use the domain service with the VPS – they’ll likely take it), then you can turn on LetsEncrypt and get MQTT with websockets with Mosquitto.
I also did this project, in which my MQTT broker is available via Tor. My project’s here: https://hackaday.io/project/12985-multisite-homeofficehackerspace-automation
If you want to be super-cheap, use a home server like a RasPi, set up Mosquitto for local network and Tor. Then you don’t even *NEED* a cheap VPS because the blablabla.onion is now in a global routable scope (think of tor as a phone number pointing to your ip address, no matter where it is).
I used a VPS + Mosquitto as an interim solution. I wrote a little glue that dropped the data into MySQL and then put together a simple interface with web2py to manage and view the database. It was fun!
The advantage was that I could add support for OK encryption and authentication without using SSL (some of my lighter devices can’t realistically handle SSL). The disadvantage was that it wasn’t streamlined enough to show clients, and it wasn’t particularly user-friendly, so it cost me time in maintenance and I was the only person who knew how to use it. So I filed it under ‘interesting’ rather than ‘practical’, and wouldn’t recommend it to people who just want to get their current project working.
A lot of these services are way easier to use and set up than the VPS option without being that much more expensive (also some are essentially free for moderate use). This means I don’t have to do much maintenance, which is a big deal for me as it keeps costs down and helps me have semi-sane working hours. Since I already have a decent VPS though, thingsboard is an exciting option as I can just run an instance there and it has all the features I need.
I do realize though that thingsboard won’t run on the cheaper VPS offers. It requires a bit of memory. Overall I’ve never been satisfied with the el-cheapo VPS offers anyway, I always found it worthwhile to pay just a little more and get something powerful enough to host a few small websites, Odoo, and projects. In the end it paid for itself and a bit extra.
I took a look at your project and I could totally imagine using that for my own stuff. Your hardware setup is a little different than mine (I’ve moved away from Arduino to cut costs and parts count), but that doesn’t matter. Using MQTT with .onion addresses isn’t something my clients would appreciate, but I definitely find it interesting!
Sean, could you share the code you used to send moskitto data to mysql?
Thanks
Thanks to the author, Sean Boyce, for such a timely (for me anyway) article!… I am looking at a project where I am considering the same issues that were discussed. Thanks again!
or throw couchdb at that low-end-box (https://lowendbox.com/)…
couchdb works perfectly fine with curl… maybe some apache-proxy-voodoo to get client and serverside ssl-auth and you’re done with a perfectly safe, super flexible service :)
btdt
73
Thanks for a great article. As one of ThingsBoard authors I am happy to see our project in the list.
Good round-up of the available options. I’ll keep an eye on the comments for more ideas.
After trying a few different setups, I’ve settled on a hybrid system: Mosquitto MQTT broker and the mqspeak script running locally on a Raspberry Pi, along with a Thingspeak account. My home sensors collect data and send it to the MQTT broker, while the mqspeak script sends a subset of that data to Thingspeak at regular intervals.
Using Thingspeak gives me a graphical display (a somewhat clunky one, at least) and an archive of the sensor data. Having the local MQTT broker and mqspeak “in the middle” gives me a more granular view of the data while I’m on the local network, and lets me control the flow of data to Thingspeak and ensures that I don’t go over their limit for free accounts.
In the past I tried using software to locally store and display MQTT data right on the Raspberry Pi, but found it to be a PITA to set up, and prone to “breakage”.
For a LoRaWAN solution, we use AWS IoT. Set up a rule to dump incoming messages to an S3 bucket, a Lambda Python script to ETL the data to RDS or whatever. Easy peasy
Very nice article, I was struggling with such issues before I decided to write my own IoT MQTT wrapper. Thingsboard is probably what I should have a closer look at. The requirements for me were :
– self hosted as a must
– Data storage on text files and configuration-less directory structure.
– RAM mirror for complete database (load all files on startup).
– websocket server with json request response (same usage from servers and from browsers)
– plugin for custom RF mesh protocol support (converted to and from MQTT)
– Keeping the frameworks as basics as possible so that they’re all well standardized and documented (C++, javascript, d3js)
The complete RAM mirror was a revelation as is it more than enough for one home use case (hundred sensors, update every 10 sec, 1 year mirror). That brings lightning speed responsiveness and low complexity compared to complicated caching, unpredictable solutions.
I admit that the specification is a bit questionable, as I stick to c++ for the websocket server and db management, which is another level of efficiency and scalability but not necessarily required for this use case.
At the end everything plugged together and is kind of stable now, yet the dashboard with d3js is harder to expand than I expected, so I’m looking to enhance that but with a solution that fits with the rest, where I can control the query from the database and feed the display engine myself.
Diagram of the SW :
https://hackaday.io/project/20388/gallery#c1358909a27ce1104a0d9d783516a73c
The complete project :
https://hackaday.io/project/20388-home-smart-mesh
I have used Thingspeak in the past, now playing around with Adafruit IO but will probably ditch it all for Thingsboard. Got it up and running from scratch on a new server yesterday in 30 minutes and 15 minutes later was plotting my first data!
There is another 100% open source solution OpenRemote, which can do datalogging with MQTT, and it’s self hosted…
Anyone wants to play around and give honest feedback?
Background information can be found at:
https://hackaday.io/project/176370-openremote-open-source-iot-platform
https://openremote.io