There’s an old saying that goes “If you can’t beat ’em, join ’em”, but around these parts a better version might be “If you can’t buy ’em, make ’em”. A rather large portion of the projects that have graced these pages have been the product of a hacker or maker not being able to find a commercial product to fit their needs. Or at the very least, not being able to find one that fit their budget.
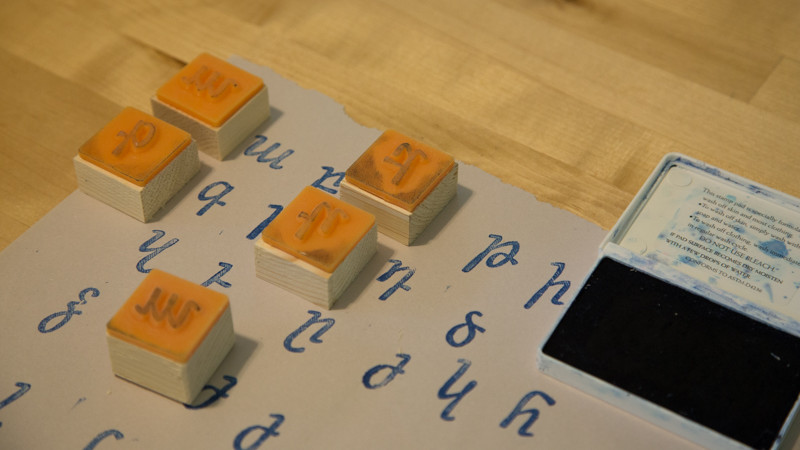
GitHub user [harout] was in the market for some rubber stamps to help children learn the Armenian alphabet, but couldn’t track down a commercially available set. With a 3D printer and some OpenSCAD code, [harout] was able to turn this commercial shortcoming into a DIY success story.
Rather than having to manually render each stamp, he was able to come up with a simple Bash script that calls OpenSCAD with the “-D” option. When this option is passed to OpenSCAD, it allows you to override a particular variable in the .scad file. A single OpenSCAD file is therefore able to create a stamp of any letter passed to it on the command line. The Bash script uses this option to change the variable holding the letter, renders the STL to a unique file name, and then moves on to the next letter and repeats the process.
This procedural generation of STLs is a fantastic use of OpenSCAD, and is certainly not limited to simple children’s stamps. With some improvements to the code, the script could take any given string and font and spit out a ready to print mold.
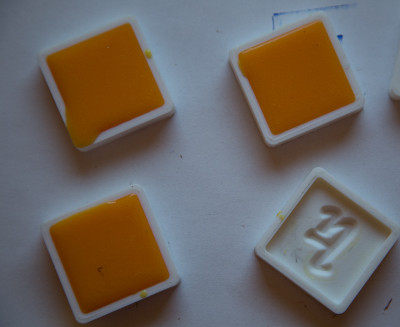
With a full set of letter molds generated, they could then be printed out and sealed with a spray acrylic lacquer. A mold release was applied to each sealed mold, and finally they were filled with approximately 200ml of Simpact urethane rubber from Smooth-On. Once the rubber cures, he popped them out of the molds and glued them onto wooden blocks. The end result looks just as good as anything you’d get from an arts and crafts store.
The process used here is very similar to the 3D printed cookie molds we’ve covered recently, though we have to assume these little morsels would not be nearly as tasty. Of course, if you had access to a small CNC machine you could cut the stamps out of the rubber directly and skip the mold step entirely.


What about using laser engraving to produce similar molds?
Or even stamps.
Directly engraving stamps was probably the very first widespread use of small laser engraving machines. I know that the first time I ever saw one was in the late 90’s at a rubber stamp store. It works quite well!
Yep, the ubiquitous $400 K40 laser engraver that everyone seems to buy when they first get into laser cutting was built and marketed to cut custom rubber stamps just like these. The bed even comes with a spring-loaded clamp designed to hold the wooden blocks.
But I don’t own a laser cutter – I have a 3D printer – and this technique neatly enables me to make molds, too. So I still don’t have to dedicate a new, large space for yet another infrequently-used tool. And I don’t have to come up with a noxious-smoke venting solution, or mess with a water cooling bucket, or deal with any of the other weird problems unique to laser cutting. (For those cases where I do need something cut, my friend has a K40 and I can just go over to his place and mooch some time on his machine.)
/like
Some machines even build it into their software. Curious exactly what types of rubber work the best though, there are literally nearly a dozen base rubber types before you even get into blended rubber compounds. Some rubbers (such as Neoprene which is also known as polychloroprene) contain, well, chlorine for example.
Can you laser-engrave or CNC-mill directly into a wood block, for xylography kind of stamp? Or would those be just too hard to use, especially for the kids?
Quick note for anyone with a CNC machine, regarding the last suggestion in this post: if you want to machine rubber, it works best if you freeze the rubber first on top of a block of metal to keep it frozen during the process.
For people a little less obsessed with 3d printing a good art supply shop can sell you printing blocks made of rubber, linoleum, or soft plastic which you can transfer an image to and then carve in relief with whittling tools with almost no experience whatsoever (I did one in a 5th grade art class which was kinda awesome). Sure it’s a little more craft and a little less hack, but there’s probably some good hacks to be found in getting the images transferred to the block.
That’s useful if you only need a few stamps, but with this technique you can easily make hundreds of stamps with very little effort.
That’s like saying:
“For people a little less obsessed with power tools, you can cut all the wood to build a table with a hand saw”
Why would you try to do by hand what we’ve already designed machine which are better and faster than we are at it? What sense does it make to have an aversion to tools?
Well moneybag$,
buying a couple of blank stamps at a hobby store, and carving them your self is a lot cheaper than buying an Anet A8 (or whatever).
Not everyone has full access to a decent 3d printer, or even access to more power tools than a drill or any workshop space. For all the apartment dwellers out there who think making a stamp would be kinda cool it’s nice to know it can be done with essentially zero space investment.
Ok, so…I have no idea how I found myself here but perhaps maybe one of you knowledgeable people can help. I am an artist and I LOVE anything printing/stamping related. I would like to know what would be the easiest and environmentally cleanest way to make rubber stamps from my art/drawings. I have hand-carved many a stamp from rubber/lino but really want to figure this out without spending a bundle of money I dont have on a piece of machinery that’s way too involved for my simple needs.
Thoughts? Thanks in advance!
Having a friend who does lino prints, I see no reason why the mold release and urethane process won’t work for you on wood blocks or lino etc.
But a small, cheap 3D printer (say 100mm x 100mm square platform) will set you back about $250 and playing with free software like OpenSCAD will really open your mind up to new possibilities. Oh, and you don’t have to actually own a printer to use OpenSCAD…
I hesitate to post this, because it’s “just buy something”, but haven’t you seen on the crafting TV-shopping channels, a computer stamp making kit? You just print from a normal inkjet onto acetate film. Then the film goes in a slot, and this gadget shines UV light through it. Where the UV isn’t blocked by ink, it causes UV-sensitive gel to set solid. The gel comes in a little plastic carrier. After it’s exposed for a while, you take the now set gel, and that’s your stamp.
With this, and a scanner (built into the inkjet), you could make stamps of anything on paper. I dunno how environmentally friendly the gel is, but it’s a commercial product so presumably not too horrible.
Actually, no, I’m pretty sure I haven’t seen what you’re talking about. I have seen a think called Mint, but it doesn’t allow for someone to create their own designs. I wonder why when I google, I’m not able to find it. Do you remember a name?
Easiest and environmentally cleanest beats out cost and time in terms of priority? We would need to know more about your specific requirements to be able to make a good suggestion. Do you need to do multiple stamps? How much do you value ease of use over cost? Are there any specific things that are relevant or unique here? Do you draw and create art using traditional or digital methods? Do you have a means of easily turning your art into digital art? Are you willing to learn how to vectorize your art? Would such a thing be useful or helpful? It’s not strictly necessary to do so in some cases for example but could be really helpful for others.
My art is simple line drawings- perfect for making into a rubber stamp. I will be using the stamps for making greeting cards and small framed pieces to sell in my online store. I wonder if the 3d printer mold idea makes a sharp, detailed design?
As mentioned, OpenSCAD might be able to help you, and it won’t cost you anything.
If your art/drawings are simple relief pictures then perhaps the OpenSCAD surface() command might be something to try. Take a look at the bottom of this page, Example 3, where it shows a smiley face png image imported and turned into a 3D relief that could easily be printed. A cheap 3D printer with flexible rubber filament could I believe make the stamp directly, rather than messing about with polyurethane casting.
https://en.wikibooks.org/wiki/OpenSCAD_User_Manual/Importing_Geometry#import
I’ve been doing this for a while now, I actually print my molds hollow and then epoxy glue them onto a piece of glass for a perfect stamp face. For floating bits, like the inside of an “O”, I build small shallow bridges that I snip off after gluing. I use a simple 50/50 mix of 100% silicone and cornstarch with a couple of drops of food coloring for my rubber.