Roller Coaster Tycoon IRL

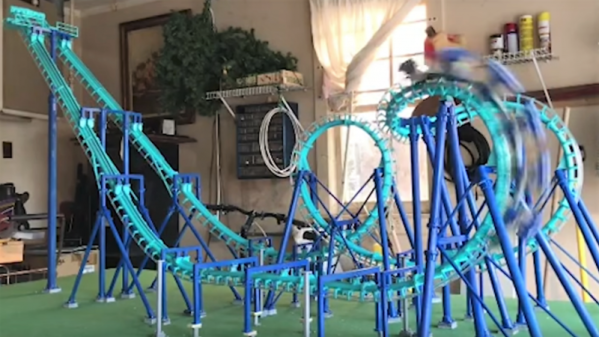
Additive manufacturing has come a long way, but surely we’re not at the point where we can 3D-print a roller coaster, right? It turns out that you can, as long as 1/25th scale is good enough for you.

Some people build model railroads, but [Matt Schmotzer] has always had a thing for roller coasters. Not content with RollerCoaster Tycoon, [Matt] decided to build an accurate and working model of Invertigo, a boomerang coaster at King’s Park, the coaster nirvana in Cincinnati, Ohio. Covering a sheet of plywood and standing about 3′ tall, [Matt]’s model recreates the original in painstaking detail, from the supporting towers and bracing to the track sections themselves. It appears that he printed everything in sections just like the original was manufactured, with sections bolted together. Even though all the parts were sanded and vapor smoothed, the tracks themselves were too rough to use, so those were replaced with plastic tubing. But everything else is printed, and everything works. An Arduino Mega controls the lift motors, opens and closes the safety bars on the cars, and operates the passenger gates and drop floor in the station. The video below shows it in action.

Fancy a coaster of your own, but want something a little bigger? We understand completely.

Continue reading “Roller Coaster Tycoon IRL”

Light Switch For The Lazy

[Will Donaldson] has whipped up a quick hack for anyone thinking of dipping their toe into home automation — or otherwise detest flicking off the bedroom light before navigating their way to their bed: a remote control light switch!

This remote switch uses a sg90 servo, an Arduino Uno, and pairs of ATtiny85s with HC-05 Bluetooth modules assembled on protoboards. The 3D printed mount screws easily on top of a standard light switch cover while still allowing the switch to be flipped the old-fashioned way. It’s also perfect as a temporary solution — [Donaldson] is presently renting his apartment — or for those unwilling to mess with the mains power of their abode.

Continue reading “Light Switch For The Lazy”

Hackaday Links Column Banner

Hackaday Links: December 10, 2017

We have a contest going on right now challenging you to do the most with a coin cell. There are already quite a few interesting entries, and a few Hackaday writers are getting into the action by asking the question, ‘how do you open up a coin cell?’. The first thoughts were to open a lithium coin cell up while submerged in oil, but eBay came to the rescue with the cases for CR2025 cells. Of course that’s a thing.

Also falling into the, ‘of course that’s a thing’ category, there’s a project on Hackaday.io to execute arbitrary code on a calculator. A small group of calculator hackers have discovered an exploit on a line of Casio calculators running the obscure nX-U8/100 architecture. Right now, there’s not much to the project — just an LCD filled with bits of memory. However, this is a project we’re keenly watching, and we can’t wait to see what comes of it.

Hold onto your butts, because the ultimate multimeter is here. [Dave Jones] of the EEVBlog has released the 121GW Multimeter on Kickstarter. What’s cool about this meter? SD card logging, the ability to send data over Bluetooth, a 15V diode test voltage, a burden voltage display, and a whole bunch of hackable features. If you have a Fluke on your Christmas list, you would do well to check out the 121GW.

Also on Kickstarter, a new LattePanda board has been released. What’s a LattePanda? It’s a small single board computer built around a low-voltage Intel processor. This board features an Intel m3-7Y30 processor, comparable to the processor you’d get in a proper laptop that doesn’t have an i3, 8 gigs of DDR3, 64 gigs of eMMC, 802.11ac, BlueTooth 4.2, USB 3.0 with a Type C connector, HDMI, and a whole bunch of GPIOs. Yes, it runs Windows (but why would you?). If you need a somewhat beefy x86 system in a small form factor, there ‘ya go.

We’ve seen 3D printed remote-controlled airplanes, but never one this big. The guys at Flite Test printed a 1.6 meter Spitfire. It’s got flaps, it’s got retracts, and it’s friggin’ huge. The files for the print came from 3DLabPrint, and it flies beautifully, despite being a Spitfire. Want to see the video? Here ya go.

Fully-functional Oscilloscope On A PIC

When troubleshooting circuits it’s handy to have an oscilloscope around, but often we aren’t in a lab setting with all of our fancy, expensive tools at our disposal. Luckily the price of some basic oscilloscopes has dropped considerably in the past several years, but if you want to roll out your own solution to the “portable oscilloscope” problem the electrical engineering students at Cornell produced an oscilloscope that only needs a few knobs, a PIC, and a small TV.

[Junpeng] and [Kevin] are taking their design class, and built this prototype to be inexpensive and portable while still maintaining a high sample rate and preserving all of the core functions of a traditional oscilloscope. The scope can function anywhere under 100 kHz, and outputs NTSC at 30 frames per second. The user can control the ground level, the voltage and time scales, and a trigger. The oscilloscope has one channel, but this could be expanded easily enough if it isn’t sufficient for a real field application.

All in all, this is a great demonstration of what you can accomplish with a microcontroller and (almost) an engineering degree. To that end, the students go into an incredible amount of detail about how the oscilloscope works since this is a design class. About twice a year we see a lot of these projects popping up, and it’s always interesting to see the new challenges facing students in these classes.

Continue reading “Fully-functional Oscilloscope On A PIC”

Making Rubber Stamps With OpenSCAD

There’s an old saying that goes “If you can’t beat ’em, join ’em”, but around these parts a better version might be “If you can’t buy ’em, make ’em”. A rather large portion of the projects that have graced these pages have been the product of a hacker or maker not being able to find a commercial product to fit their needs. Or at the very least, not being able to find one that fit their budget.

GitHub user [harout] was in the market for some rubber stamps to help children learn the Armenian alphabet, but couldn’t track down a commercially available set. With a 3D printer and some OpenSCAD code, [harout] was able to turn this commercial shortcoming into a DIY success story.

Filling the molds with urethane rubber.

Rather than having to manually render each stamp, he was able to come up with a simple Bash script that calls OpenSCAD with the “-D” option. When this option is passed to OpenSCAD, it allows you to override a particular variable in the .scad file. A single OpenSCAD file is therefore able to create a stamp of any letter passed to it on the command line. The Bash script uses this option to change the variable holding the letter, renders the STL to a unique file name, and then moves on to the next letter and repeats the process.

This procedural generation of STLs is a fantastic use of OpenSCAD, and is certainly not limited to simple children’s stamps. With some improvements to the code, the script could take any given string and font and spit out a ready to print mold.

With a full set of letter molds generated, they could then be printed out and sealed with a spray acrylic lacquer. A mold release was applied to each sealed mold, and finally they were filled with approximately 200ml of Simpact urethane rubber from Smooth-On. Once the rubber cures, he popped them out of the molds and glued them onto wooden blocks. The end result looks just as good as anything you’d get from an arts and crafts store.

The process used here is very similar to the 3D printed cookie molds we’ve covered recently, though we have to assume these little morsels would not be nearly as tasty. Of course, if you had access to a small CNC machine you could cut the stamps out of the rubber directly and skip the mold step entirely.

Tapping Into A Ham Radio’s Potential With SDRPlay

Software-defined radios are great tools for the amateur radio operator, allowing visualization of large swaths of spectrum and letting hams quickly home in on faint signals with the click of a mouse. High-end ham radios often have this function built in, but by tapping into the RF stage of a transceiver with an SDR, even budget-conscious hams can enjoy high-end features.

With both a rugged and reliable Yaesu FT-450D and the versatile SDRPlay in his shack, UK ham [Dave (G7IYK)] looked for the best way to link the two devices. Using two separate antennas was possible but inelegant, and switching the RF path between the two devices seemed clumsy. So he settled on tapping into the RF stage of the transceiver with a high-impedance low-noise amplifier (LNA) and feeding the output to the SDRPlay. The simple LNA was built on a milled PCB. A little sleuthing with the Yaesu manual — ham radio gear almost always includes schematics — led him to the right tap point in the RF path, just before the bandpass filter network. This lets the SDRPlay see the signal before the IF stage. He also identified likely points to source power for the LNA only when the radio is not transmitting. With the LNA inside the radio and the SDRPlay outside, he now has a waterfall display and thanks to Omni-Rig remote control software, he can tune the Yaesu at the click of a mouse.

If you need to learn more about SDRPlay, [Al Williams]’ guide to GNU Radio and SDRPlay is a great place to start.

Continue reading “Tapping Into A Ham Radio’s Potential With SDRPlay”

Rock Out With The Nod Bang

In our years here on Hackaday, we’ve seen our fair share of musical hacks. They even have their own category! (Pro Tip – you can find it under the drop down menu in the Categories section). But this one takes the cake. [Andrew Lee] is a student at New York University who had a task of creating a project for his physical computing class. In about 60 days time; he went from dinner napkin sketch to working project. The project is quite interesting – he’s made an instrument that plays music as you move your head.

It works as you would expect. An accelerometer in the user’s headphones feed data to an arduino. There are four (3D printed of course) buttons that are used to select the the type of audio being played. The operation goes as such:

  1. Press button.
  2. Bang head.

[Andrew] speaks of a particular satisfaction of hearing the music play in sync with the rhythm of head movement.  Be sure to check out the video below to see the Nod Bang in action.

Continue reading “Rock Out With The Nod Bang”