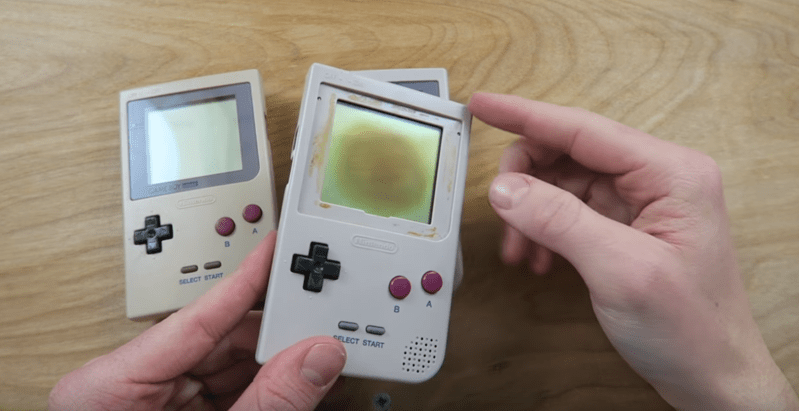
The original Game Boy is a classic. Sure, it had no backlight, but there is something special about playing on that classic green screen. Unfortunately, some of these older systems are suffering a terrible fate — screen burn. Game Boy’s played best with lots of light — especially out in the sun. But that same sun did terrible things to the screen. A black splotch in the center of the LCD is the telltale sign of a burned Game Boy. You might think that screen replacement is the only option, but [The Retro Future] shows us how to repair this issue.
A reflective LCD is a layer cake made up of polarizers, two panes of glass, and a reflector. The burns often seen on Game Boy screens usually are in the polarizer and the optically clear glue which attaches the plastic polarizer to the glass. We’re guessing these burns happen when someone leaves their Game Boy out in the sun. Between the sun rays directly striking the top polarizer and the rays bounced back from the reflector at the rear of the screen, that poor polarizer doesn’t stand a chance.
Repairing the burn is a delicate operation, as one false move could crack the thin LCD glass. The first step is to carefully peel off the burned polarizer. This leaves a mess of dried glue, which can be scraped off or dissolved with alcohol. A new linear polarizer can then be placed on the front of the screen. [The Retro Future] chose not to glue the polarizer, but we’re betting some UV cure LOCA (Liquid Optically Clear Adhesive) from a cell phone screen protector would do the trick.
If you love the look of the classic Game Boy, but want to play just about any classic game, grab a Raspberry Pi zero, and build a retro Pi Boy.


I suspect this person was lucky in that only the polarizer was damaged, rather than the LCD itself (which would have required a complete replacement).
The liquid crystals are organic molecules that are sensitive to UV (as well as heat, etc.) damage. With sufficient damage, they stop lining up in nice, electrically controllable rows that can influence the polarization of light. This will make the display go black.
From https://en.m.wikipedia.org/wiki/Liquid_crystal
“An extended, structurally rigid, highly anisotropic shape seems to be the main criterion for liquid crystalline behavior, and as a result many liquid crystalline materials are based on benzene rings.”
F me my fluke dvom lcd is pretty scortched after leaving on the dash :(
Cool video. I would not have thought you could replace the polarizer.
So you never took apart a cheap calculator to flip the front polarizer around and give it the “white on black” look to impress the girls in school? (Did that 16 or so years ago and it actually did work!)
Did it a few times in a factory I worked at just to see how co-workers reacted, stopped because a Quality person was chucking them as “the reversed display was an indicator that they were malfunctioning and couldn’t be trusted to do a 5 sample average” LOL
Wow! Thanks for sharing my video!
You’re welcome – great work!
> The original Game Boy is a classic.
Yeah, but this one’s Game Boy Pocket ;-)
Yeah but this one’s in DMG classic colors (the “off-white” special edition.)
Yeah, and this guy has three of them. I can’t stop to wonder if he got them before or after this whole “retro gaming” fad.
Use a heat gun to remove the polarizer
By far the easiest way is to lift one corner using a knife, and then let a drop of WD-40 work its way in. Involves no heat and no mechanical stress on the glass.
Dang, zosh, nice tip! Been staring at me the whole time and never thought to use WD40. Gonna have to add it to the list of 8 billion things it can help fix :)
Eh, WD40 dissolves adhesives, it’s not a secret. In fact, if something has been featured on one of those ubiquituous “let’s regurgitate the Wikipedia entry on this retro system, molest its innards with a soldering iron, and bleach the living shit out of its case” youtube videos, it can safely be considered common knowledge.
A simple “you’re welcome” would have sufficed. Yes, I have been using it on tape etc for years, just never thought to use it on a DMG-1 screen. Trying to stay positive here, but that is pointless on HaD :(
I had never heard about using WD40 on adhesives, thanks.
Did anyone notice he’s wearing a Guy Fawkes Mask in the reflection at the start.
Pretty cool repair. I did something similar with my uncle’s depth finder display which suffered a similar fate. I have seen many DMGs with this problem though, so hopefully RetroFuture’s guide will help some others :)
Just like my dog. Out, in, out, in, make up your mind!
I’m a Gameboy collector and did this procedure several times, but I don’t like the final result. The contrast is affected and the screen looks like a DMG’s green screen. Seems that this happens because that second film you removed (the most difficult one) is a color filter film that removes the green tint and improves the contrast. I’m looking for this film to buy, does anyone knows here I can find it?
ebay, google, all the usual suspects…
I have an old Toshiba T1000 laptop that got a damaged screen from being stored in a hot attic I wonder could it be repaired the same way?
Sometimes it’s more issue than just burn screen, I did a gameboy pocket restoration recently and even after removing the old polarizing filter, the lcd have other issue such as the horizontal lines which means that the soldering connection has worn out as well.
Watch the Gameboy restoration video here: https://www.youtube.com/watch?v=i4TnFPFvYYw