
One of humankind’s dreams has always been to fly like a bird. For a hacker, an achievable step along the path to that dream is to make an ornithopter — a machine which flies by flapping its wings. An RC controlled one would be wonderful, controlled flight is what everyone wants. Building a flying machine from scratch is a big enough challenge, and a better jumping-off point is to make a rubber band driven one first.
I experimented with designs which are available on the internet, to learn as much as possible, but I started from scratch in terms of material selection and dimensions. You learn a lot about flight through trial and error, and I’m happy to report that in the end I achieved a great little flyer built with a hobby knife and my own two hands. Since then I’ve been looking back on what made that project work, and it’s turned into a great article for Hackaday. Let’s dig in!
Happily Flapping for Successful Flight
The proof is in the pudding, and here it is. My ornithopter flew like a bird and my longest flight was 21 seconds. As you can see, when the rubber band has a lot of potential energy in it, the ornithopter has enough power to gain altitude. As it runs down, it slowly comes back to earth.
Check out the video, and then let’s continue with material choices for building one,the physics of an ornithopter, and the gotchas I met along the way.
[wpvideo dITa0mBh]
Light But Strong Structural Materials
That the ornithopter should be as strong as possible yet lightweight wasn’t a surprise. But I still had to find materials which met those criteria and I wanted readily available ones so that many others could reproduce what I did.
I started with popsicle sticks since they’re easy to find. Those turned out to be too short and too heavy. I figured that balsa wood might be too weak, and looking at ornithopter videos online I saw some using bamboo. Where do you find bamboo? Dollar stores sometimes have it for holding plants upright. If you’re careful, you can cut it into thin strips lengthwise using a knife.


But my ornithopter made with bamboo didn’t fly, and though I hadn’t eliminated the bamboo as the reason, I moved on to balsa wood anyway. I had originally avoided balsa wood thinking it might not be strong enough for the wing spars. It turned out that lengths of 3/32″x3/32″ balsa with an 8″ length weighed 0.5 grams whereas an equally strong and rigid length of bamboo was 0.7 grams. So I went with balsa wood.
Time Tested Tricks for Connecting Parts With Strength


I wanted an ornithopter which wouldn’t break easily from handling while remaining lightweight. Also, some areas of the ornithopter would be under considerable stress during flight. So it all had to be connected together well without adding too much weight. Looking at what others had done, I found that after gluing pieces together with cyanoacrylate (super glue), wrapping those pieces in cotton thread and wetting that with more glue made for a very strong yet lightweight join.
Lightweight Wing Material
 There are many lightweight but sufficiently strong materials for covering the wings and tail. I tried plastic grocery bag material and tissue from a flower shop used for wrapping flowers. But if you want to go even lighter, there’s what’s often referred to as Japanese Tissue.
A search for “jap lite flite tissue” will turn up all kinds and after placing an order I put it to the test. Flower store tissue for my ornithopter’s 16.5 cm wingspan weighed in at 1 gram whereas the Jap-Lite brand tissue was 0.25 grams. That may not seem like much, but the entire ornithopter with the rubber band is just 9 grams.
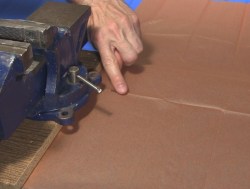
Mine came folded so to remove the folds, I stretched it between two heavy objects, vices in my case, and lightly dabbed water on the folds.
More Power: Not Your Ordinary Rubber Band
Common rubber bands, the kind you find in office and school supply stores do work, but flights will be short, usually only a few seconds. Using two such rubber bands at the same time at least gives a higher energy density for the same number of turns.
However, there’s actually a specific rubber used for this type of flying, one which stores a large amount of energy without breaking. It’s called TAN Super Sport Rubber and comes as long strips, in a selection of widths. I purchased 32 feet of 1/8″ wide rubber, though it’s also available by the pound.


What worked for my ornithopter was to make a band by cutting out a 30″ long strip and tying the ends together. Then I formed that into three shorter loops which then goes on the ornithopter.
Lubricate the rubber band with a silicon-based lubricant to get more turns. Do not use petroleum-based lubricant as that would damage the rubber over time. Armor All Original Protectant, available at auto parts stores, seems to be the preference for rubber band flyers. I apply it by spraying a little Armor All in a bag, placing the rubber band inside, and move it all around until the rubber is all wetted.
I found that I could wind it around 250 times before I worried about breaking either the rubber or the ornithopter. Winding that many by hand seemed a bit time-consuming so I purchased a 1:5 gear ratio rubber band winder.
The Engineering in Ornithopter Wings
It’s pretty impressive for my flapping machine to gain altitude at the beginning of its flight. How is this accomplished? For an airplane, the wings provide the lift and the propeller pulls it forward. But with an ornithopter, the wings do both.
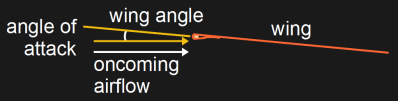 For rubber band ornithopter wings, something called the angle of attack plays a big part in creating lift. That’s the angle which a wing makes relative to its direction through the oncoming air.
With an ornithopter, the angle needs to be just a few degrees. But it’s hard to even conceptualize the angle of attack when you envision the wing spars in motion. The path to understanding begins by thinking about the wing during a few points along its travel.
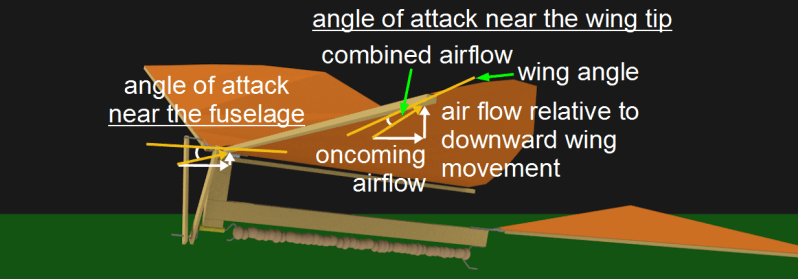
During a downstroke, near the fuselage, the wing isn’t moving very far and as long as the ornithopter’s nose is tilted up a bit then the wing there will have the needed angle of attack.
Near the wingtip, however, the wing is not only moving forward but also downward. The air near the wingtip is approaching the wingtip from the front, and the downward motion of the wingtip means the air is also approaching from below as the wingtip moves down into it. The combined vector of these two airflow directions is one angling up toward the wingtip. The wing’s shape must therefore change to meet this combined airflow at the correct angle of attack. Luckily the air pressure due to the downward movement and the flexibility of the wing material cause it to change to the needed shape.
On the upstroke, most of the wing ideally changes shape such that the angle of attack is zero, meaning the wing is moving straight into the direction of the airflow and thus producing no effect. However, the area of the wing near the fuselage is not moving much, and the ornithopter’s tilt means that it can still create lift.
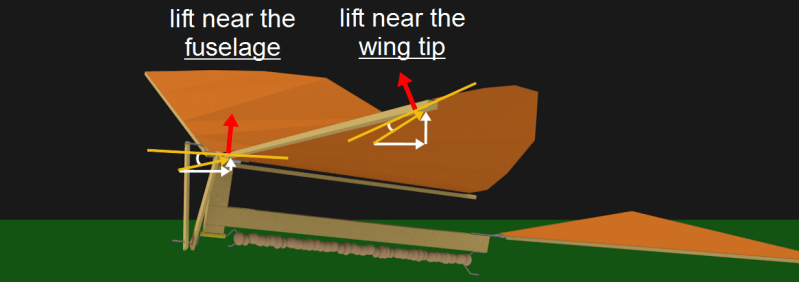 And how is forward movement, or thrust, created? The lift along most of the wing is angled forward a little, producing the forward thrust.
Getting The Right Tilt
The center of gravity should be just a little behind the center of lift, aka the center of pressure. This is to keep the ornithopter’s nose tilted up slightly. Most of the lift comes from the area of the wing closest to the fuselage, and as we’ve seen, this provides lift only if it has the needed angle of attack. Keeping the nose up does this.
The Hidden Lever
Making the ornithopter lighter and lighter got me to horizontal flight. The final step which resulted in it also rising vertically was realizing that I had a hidden lever. I’ve already described the lever detail in my article all about levers, but here’s how I found and fixed it.
With my earliest versions, the wings would lower with no problem, but when raising them, it seemed as if something was sticking somewhere.
Turning the ornithopter upside down eliminated a lot of construction defects as possible reasons. That’s because the difficulty reversed. With the bottom of the ornithopter now facing upward, it was still having difficulty lifting the wings. The problem sounded like something related to gravity and that’s when I noticed that each wing was part of a lever.
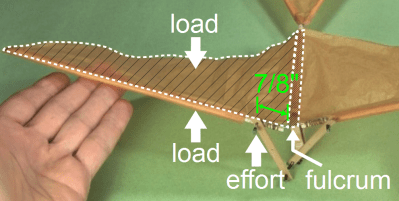
The wing mechanism works by having the rubber band turn a crank. That crank lifts and lowers two connecting rods which then lift and lower the wings. The wings both pivot at the top of the fuselage. Where is there a lever? The point at which a wing pivots forms the lever’s fulcrum. The load is the air pressure on the wing surface. And the force, or effort, is applied by a connecting rod where it connects to the wing.
The longer the distance between the fulcrum and where the connecting rod connects to the wing, the less work the rubber band will have to do to lift the wing. In my first version, the one made of popsicle sticks, this distance was 9/16″. Lifting became a little easier when I made it 5/8″. And the ornithopter began rising vertically when I increased the distance to 7/8″. The rubber band was able to lift the wing fast enough to get the needed number of flaps per minute to make the ornithopter rise vertically, as well as horizontally.
Success! A Wing-Flapping Flying Machine
In the end, my ornithopter flew like a bird and my longest flight was 21 seconds.
The next step is to make an RC controlled one. I’d love to hear from anyone who has worked with their own ornithopter projects or even worked with fixed-wing craft where you’ve designed your own wings. There are doubtlessly interesting differences between fixed wings and flapping ones. Share your stories in the comments below.


Awesome write-up and awesome work!
Thanks!
+1
I had such toys made from (steel?) wire, foil and a rubber band motor 50 years ago.
Are there websites describing them somewhere?
I was gonna say, that’s almost exactly like what we built back in the ’60s. We used glycerine to lubricate the rubber.
Must’ve made for an interesting time when it crash-lands into a freshly fertilised garden bed. (lots of nitrates for the glycerine)
You know, that this does NOT work that way, don’t you? You need some strong acids for a reaction to occur.
The kids these days still buy glycerine, but they smoke it in their vape.
Super cool, great write-up!
Ornithopter: check!
Stillsuit: check!
Sands of Arakis here I come!!!!
Saw this when you first posted it. Still haven’t made it. Thank you though. this is great.
What? You’ve been missing all the fun. :-) Glad you like it anyway.
What about the various workout bands? Theraband is quite popular in the slingshot community, it comes in different thicknesses and strengths. A rotary fabric cutter is suggested for trimming it into useful dimensions but putting some masking tape down first makes it pretty easy to cut straight lines with a razor or craft knife.
I haven’t heard of it being used for ornithopters but that does look interesting. It looks like you can stretch them quite a bit, probably wind a lot of energy into a short length.
I love ornithopters as well!
I built a very similar model from a kit. Yours is so much nicer. I think of the wing model for this style to be “bat wing” model. Bats are cool but will never be known as great flyers. They push against the air on the downstroke as is necessary but also the upstroke which is where they lose their efficiency. The way they dump the resistance seems to be to bring their wings in slightly on the upstroke making the membrane looser and able to spill air with less resistance. Bird feathers (my theory) allow them to dump some of the resistance by slight rotation of the feathers on the upstroke that allows the air to pass through the wing by presenting more edge than flat of the feather.
Beautiful write up! Thank you for sharing.
Leonardo da Vinci would have been proud.
What is the thrust?
Get larger be degree, then add an 0.10.or 0.05 engine. Sugical tubing can act to reduce drive shaft vibration. Rubber band pulley to gear rpm down. Still need a prop to cool engine. Elec? Rubber bands are great but while 21 seconds is actually great, 2.1 minutes is nicer. 21 minutes, a goal. Really, I want one to wear. Really. If it’s half flap, (impulse drive,) and 1/2 thrust, I can live w flying a hybrid. Balsa is partially acting as a tension-compression monoque hull. A tough skin on it adds great strength to it. Then you get to hollow it a bit for the aero-dirty rubber. Good job! You have the.mist essential part, the foundation of understanding.
Just don’t use wax to hold the wings together – it will melt when you get close to the sun. Don’t ask me how I know.
hear say. standard adabolic rate says it gets cooler until you get to the ozone layer, but you can’t breathe long before that unless you are in standing wave.
Neat…now build one you can ride :)
“The proof of the pudding is in the eating”, where “proof” means more like “test” in older English. Makes sense, right? You find out if something is good by putting it to use, eg eating a pudding.
So what is “The proof is in the pudding” supposed to mean?
If you eat all the pudding, nobody else can verify your testing.
No, that’s “the dog ate my homework”.
The original proverb is “The proof of the pudding is in the eating”, meaning you can judge something only after you’ve tried it. So the “eating” is the “testing”.
But I like @ChalkBored’s explanation better.
Sorry @Greenaum, I didn’t mean to repeat what you said. I read your comment too quickly and thought you were asking for the original meaning. I’ll go back to sleep now. :)
‘So what is “The proof is in the pudding” supposed to mean?’
It means the same thing as “The proof of the pudding is in the eating”, just a shorter version, although it always makes me think of pudding made with brandy or rum.
https://en.wiktionary.org/wiki/the_proof_is_in_the_pudding
The latter is an American corruption of the former.
That’s pretty awesome!
But a bluetit is only 10g, but has a much larger range, and also contains a fuel cell, a surprisingly loud speaker, stereo camera, some rudimentary GPS-type navigation, and autonomous control to allow it to find food…
More seriously, have you considered bones or feather quills instead of balsa?
Ooh, a little bit Frankenstein-like. Frankenflyer?
I guess there must be some place that sells long enough feathers which could be stripped down.
Fly fishing shops sell feathers that could be used. Ostrich feathers and certain Turkey feathers come to mind. Feathers could be overlapped for the wings.
Peacock tail feathers would give shafts as long as you would want !
Great writeup, wish HaD would do more articles like this that go over the entire prototyping till final build.
Excellent writeup. Top tip about the rubber lube.
Rather than fabricating rear wings I found it easier to fold one from paper – which allows you to put rigid downwards ribs to the outside & then glue.
This is great work! We took liberty to post this on our Facebook group https://www.facebook.com/groups/theornithopterzone/ and page https://www.facebook.com/TheOrnithopterZone/ . If you have not already done so, I would like to invite you and other enthusiasts you may know in your circle to check out our e-newsletter here: http://www.ornithopter.org/newsletter.shtml and you can also participate in discussions on the above mentioned Facebook group and follow our Facebook page as well. We are always looking forward to more participation in this field and try to encourage any attempts in this direction. You will also find that we have an ongoing competition for building an ornithopter that can lift a certain payload. You will find all the details to that on our website as well as our Facebook group and page.