In general, heat is the enemy of electronics. [Christopher Barnatt] is serious about defeating that enemy and did some experiments with different cooling solutions for the Raspberry Pi 3. You can see the results in the video below.
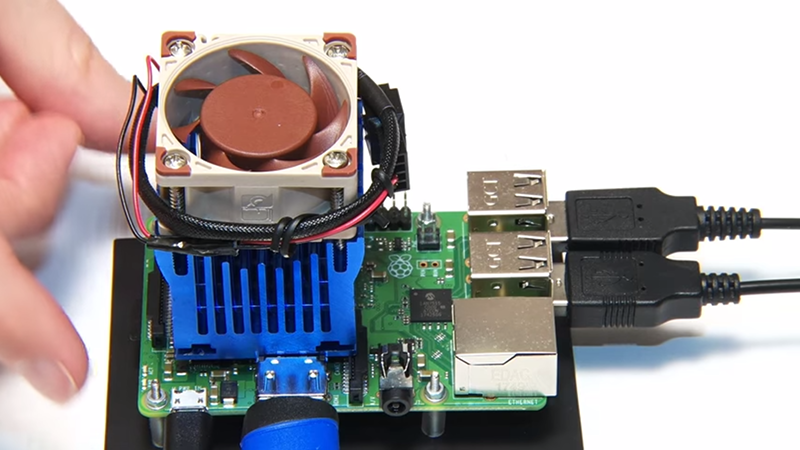
A simple test script generated seven temperature readings for each configuration. [Barnatt] used a bare Pi, a cheap stick-on heatsink, and then two different fans over the heatsink. He also rigged up a large heatsink using a copper spacer and combined it with the larger of the two fans.
We aren’t sure if we would have used his methodology for these tests. The script executes quickly and it wasn’t clear that the temperature rise was leveling off. We weren’t sure just how much this was loading the CPU either. However, the results matched up with what you’d expect, so the script and data generation methods were probably fine.
The really interesting part to this wasn’t so much the results. We expected a bigger fan to do better and bigger fan and heat sink to do best of all. However, it was interesting watching the way the different cooling systems were mounted on the Pi and powered. The final solution — which was overkill anyway — was not mounted in a way that would lend itself to deployment. But the rest of the fan and heatsink combinations could easily be adapted for real projects.
If you really want to get serious, you can always plunge the Pi in oil. Or mount a thermoelectric heat pump and dump the excess heat into a bucket of water. But for most of us, just about any of the fan solutions here will be more than enough.


“The script executes quickly ”
The video was sped up, not the script.
Ditto. The video is sped up and that fact is indicated in the video. I thought the results were large and pretty convincing. A few of the tests seemed to reach and hold a stead temperature at the end. He could have repeated a few of the conditions with the largest differences a few times in order to be really sure the results weren’t due to some subtle way in which the heatsinks were mounted or the thermal paste was applied, but otherwise I think it was a solid test.
Those heatsinks are rather sub-optimal:
1) the heatsink is anodized on the bottom – thermal barrier. Lapping the bottom of the heatsink will result in vastly improved performance
2) the self-adhesive tapes are poor heat conductors. The heatsink is compromized
3) the silver thermal compound needs some pressure applied to squeeze it into a thin layer, or it’s just going to be a thermal barrier like the tape. When you apply it to a CPU, you need to scrape the excess off with a blade and apply some considerable mounting pressure, or it won’t be any better than strawberry jam (someone actually tested that)
4) the “heat spreader” introduces another thermal barrier due to doubling up the interfaces, and his seemed to be less than flat on the surface
5) the chip itself needs to be designed for use with a heatsink. The casing may not be flat enough to contact the heatsink properly
If you want to go hi-fi, you’d lap both the heatsink and the chip flat. Done well enough, having any thermal paste in between is almost worse than none.
Many of these aftermarket heatsinks are really just cargo cult engineering. They work, but not well enough to have a point. The fan is doing most of the work.
Your set of observed faults makes obvious good sense. As an example, my pi3b+ runs at 38°C to 40°C with just a simple fan 3.2v pushing air directly over the CPU with about 0.8cm space between the armature and the chip. Pulling in fresh ambient air and pushing it over the board seems to be in my experience a very simple and apparently cost effective solution @ $6 to $8 for the fan.
Obviously the Pi is designed to sink a considerable portion if not all of the heat into the board copper the chip is soldered on, so cooling the board is going to cool the chip – that’s the heatsink.
The video was indeed sped up.
However…. the CPU was LIGHTLY loaded.
There is a script called “cpuburn” that will cause maximum stress. A stock 3b+ will throttle to about 600 MHz in tens of seconds. Even using a LARGE (20mm x 20mm x 10mm) self-adhesive heat sink will still cause throttling to around 800 MHz..
This page shows how to install cpuburn. If your PI passes with this running, it can pass anything.
https://core-electronics.com.au/tutorials/stress-testing-your-raspberry-pi.html
The CPU was not “lightly loaded” — if you look at the CPU load graph in the task bar (top right) you see it is at 100 per cent utilisation during the test. Granted, the nature of the load (prime number factoring) is not stressing the GPU on the SoC in addition to the CPU, and so the package as a whole could be more greatly stressed. But to say it is lightly loaded is simply wrong. There are many different ways to do things! :)
I remember this heatsink mod to a RPi 2… I’m sure a laptop fan wouldn’t go amiss on top of this for a RPi 3:
https://sites.google.com/site/picturedumpunferium/_/rsrc/1482308988448/home/Pi%202%20with%20low%20profile%20hs.JPG
B^)
The Canadian version is milled into the outline of a maple leaf.
I remembered a post from Unferium a while back from before some trol took over various (vulnerably obvious?) Aliases and they never returned AFAIK.
I wonder if this is my first picture-link or anything to do with the affected alias’ gets moderated?
It’s a shame that trols and Skiddies exist on the ol’net wrecking random communities :(
Christopher Barnatt – king of boffins still hard at it. – nice video as always. *tips hat
My experience with tiny fans for uses like this is that they crap out in a year or so, and once I’m committed to replacing the fan, it’s not really any worse to just replace the board. And the Raspberry Pi has a good record on availability, so I know that I’ll be able to easily source a replacement board.
The last time that I checked, the RasPi did not have any bearings that could go bad.
But with the fans only being about a dollar (current best seems to be $0.77 USD from eBay), you could buy five at a time and be set for five years.
I am almost tempted to rig up a fan that turns itself on or off based on temperature, but I am just too lazy…
As an aside, I see on eBay (search “Pi fan”) that some people are selling 12V fans for the Pi. Will 5V even be enough to spin the blades on a 12V fan? If so, that would be ideal; you don’t need a ton of air moving just to keep it from throttling.
a 12v fan should work on 5v, it will just spin more slowly
Some of us will need a bit of a bigger push than 5V can provide to get going though.
I’m a big fan of fans!
Not all of them do. Some will spin, but fail to spin up, and some will not spin at all.
Fully agree: that is exactly my solution, and works silently and reliably.
In my experience some work fine, some have a hard time starting at 5V and run once they get going, and somw don’t with at all.
I had the same problem: trying to play FullHD videos on my RP3 didn’t work, because after one minute or so, the temperature was too high and started to hiccup. Putting a heat sink just delayed the problem to two-three minutes, so the final solution was just add a 5cm fan connected to 5 volts, and now all works fine.
Thanks for the warning! I was planning on setting this up. Has anyone found a working passive solution? I’ve seen metal cases that appear to dissipate a lot of heat, but they are expensive.
I paid about $15 for a solid aluminum heatsink case. Looks a bit like a tiny Mac mini, but never throttles for video playback and lightish loads. Best case I’ve ever bought and is now my go to. Also best looking
The Raspberry Pi Group says there is no heat problem.
I know what they say, and I know what happened with my RPi3 ;-)
The Raspberry Pi Group ALSO states that the RPi3 B+ has 1000 bits/sec Ethernet capability.
Even with no heat sink at all, he doesn’t even come close to the max rated temperature of the BCM2837 (85C). The Raspberry Pi PCB itself has excellent thermal contact with the CPU, and with its ground and power planes, it makes for a fine heat sink all by itself. A metal case that makes good mechanical contact with the PCB will also carry away a lot of heat. The Ethernet controller is only rated to 70C, so it might be the part that needs the extra heat sink.
Other SBCs may not be quite as well built so this testing is still useful. I’ve ended up putting a passive heatsink on mine and it still got to 70C while compiling big packages.
That’s because it auto-throttles the chip at 70 C.
It would have been interesting to see the small sink with the arctic paste.
Assuming that adhesive film to be properly chosen, I’d be surprised if replacing it with any alternate “grease” would make more than a few percent difference in final temperature.
It isn’t. The double sided stickers are usually awful, and the companies that make them don’t care a bit because nobody’s gonna take them up for it. In the worst cases they’re just regular double sided plastic tape.
I tried submerging mine in water and it never went over ambient.
You are joking, but actually PURE water is a pretty good insulator. It is only once you start adding ionic impurities that it starts to conduct.
Like the kind that make up solder?
Baby oil works too, but make sure it’s made from 100% babies…
I’ve done thermal calculations a number of times for various products; even if you’ve done it before, it’s often a surprise to learn just how BIG a ‘sink needs to be to make any significant difference.
The effective convective heat transfer area needs to double to halve the chip temperature difference to ambient. The thermal conductivity of the fins is limited, and the density of the fins impede convection, so doubling the size of the heatsink doesn’t actually double its cooling power.
So you got a situation where the heatsink has to be doubled and re-doubled again with diminishing returns to get the temperature to go down.
The other thing to consider with fans is all the crap they suck in. If a device does not need forced air cooling I am a real big fan of not using it. A lot depends on where the thing is going to wind up. Mine are unusually headless, and often times wireless, and used as dedicated controllers for things. Without a fan they run just fine and happy. They might run fine and happy with a fan too, but after a couple of years I would dread to see what the innards looks like with all the dust and crap sucked in and never cleaned out. Out of curiosity, when was the last time you physically cleaned out your cable modem or router? Do you really wanna have to tear down your pie hole once every few months to blow the dust bunnies and cob webs out?