This Computer Is As Quiet As The Mouse

[Tim aka tp69] built a completely silent desktop computer. It can’t be heard – at all. The average desktop will have several fans whirring inside – cooling the CPU, GPU, SMPS, and probably one more for enclosure circulation – all of which end up making quite a racket, decibel wise. Liquid cooling might help make it quieter, but the pump would still be a source of noise. To completely eliminate noise, you have to get rid of all the rotating / moving parts and use passive cooling.

[Tim]’s computer is built from standard, off-the-shelf parts but what’s interesting for us is the detailed build log. Knowing what goes inside such a build, the decisions required while choosing the parts and the various gotchas that you need to be aware of, all make it an engaging read.

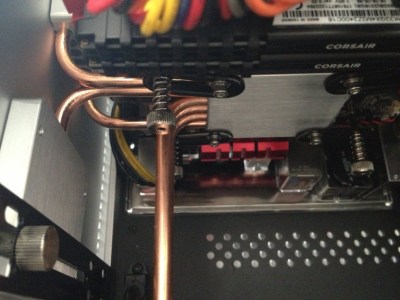
It all starts with a cubic aluminum chassis designed to hold a mini-ITX motherboard. The top and side walls are essentially huge extruded heat sinks designed to efficiently carry heat away from inside the case. The heat is extracted and channeled away to the side panels via heat sinks embedded with sealed copper tubing filled with coolant fluid. Every part, from the motherboard onwards, needs to be selected to fit within the mechanical and thermal constraints of the enclosure. Using an upgrade kit available as an enclosure accessory allows [Tim] to use CPUs rated for a power dissipation of almost 100 W. This not only lets him narrow down his choice of motherboards, but also provides enough overhead for future upgrades. The GPU gets a similar heat extractor kit in exchange for the fan cooling assembly. A fanless power supply, selected for its power capacity as well as high-efficiency even under low loads, keeps the computer humming quietly, figuratively.

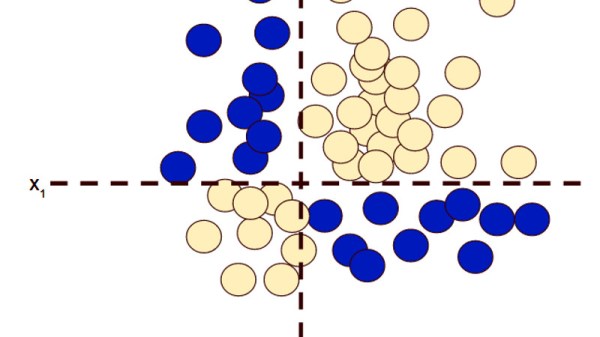
Once the computer was up and running, he spent some time analysing the thermal profile of his system to check if it was really worth all the effort. The numbers and charts look very promising. At 100% load, the AMD Ryzen 5 1600 CPU levelled off at 60 ºC (40 ºC above ambient) without any performance effect. And the outer enclosure temperature was 42 ºC — warm, but not dangerous. Of course, performance hinges around “ambient temperature”, so you have to start getting careful when that goes up.

Getting such silence comes at a price – some may consider it quite steep. [Tim] spent about A$3000 building this whole system, thanks in part due to high GPU prices because of demand from bitcoin mining. But cost is a relative measure. He’s spent less on this system compared to several of his earlier projects and it let’s him enjoy the sounds of nature instead of whiny cooling fans. Some would suggest a pair of ear buds would have been a super cheap solution, but he wanted a quiet computer, not something to cancel out every other sound in his surroundings.

Machine Learning Crash Course From Google

We’ve been talking a lot about machine learning lately. People are using it for speech generation and recognition, computer vision, and even classifying radio signals. If you’ve yet to climb the learning curve, you might be interested in a new free class from Google using TensorFlow.

Of course, we’ve covered tutorials for TensorFlow before, but this is structured as a 15 hour class with 25 lessons and 40 exercises. Of course, it is also from the horse’s mouth, so to speak. Google says the class will answer questions like:

  • How does machine learning differ from traditional programming?
  • What is loss, and how do I measure it?
  • How does gradient descent work?
  • How do I determine whether my model is effective?
  • How do I represent my data so that a program can learn from it?
  • How do I build a deep neural network?

Continue reading “Machine Learning Crash Course From Google”

Spared No Expense: Cloning The Jurassic Park Explorer

While you’d be hard pressed to find any serious figures on such things, we’d wager there’s never been a vehicle from a TV show or movie that has been duplicated by fans more than the Staff Jeeps from Jurassic Park. Which is no great surprise: not only do they look cool, but it’s a relatively easy build. A decent paint job and some stickers will turn a stock Wrangler into a “JP Jeep” that John Hammond himself would be proud of.

While no less iconic, there are far fewer DIY builds of the highly customized Ford Explorer “Tour Vehicles”. As a rather large stretch of the film takes place within them, the interiors were much more detailed and bears little resemblance to the stock Explorer. Building a truly screen accurate Jurassic Park Tour Vehicle was considered so difficult that nobody has pulled it off since the movie came out in 1993. That is until [Brock Afentul] of PropCulture decided to take on the challenge.

In an epic journey spanning five years, [Brock] has created what he believes is the most accurate Jurassic Park Tour Vehicle ever produced; and looking at the side by side shots he’s done comparing his Explorer to the ones from the movie, it’s hard to disagree. A massive amount of work went into the interior, leaving essentially nothing untouched. While previous builds have tried to modify the stock dashboard to look like the one from the movie, he built a completely new dash from MDF and foam and coated it in fiberglass. The center console featuring the large display was also faithfully reproduced from the movie, and runs screen accurate animations, maps, and tour information. The seats also had to be replaced, multiple times in fact, as he had a considerable amount of trouble getting somebody to upholster them to his standards.

But perhaps the most difficult component of all was the clear acrylic roof bubble. These were critical to filming the movie, as they not only let the viewer see down into the Tour Vehicles but also let the characters see out during the iconic tyrannosaurus attack. But because the roof bubble was created only for the movie and never existed as a real aftermarket product, it usually gets ignored in Tour Vehicle builds. It’s simply too difficult to produce for most people. The omission of the bubble was always considered a case of artistic license; in the same way nobody expects a replica DeLorean from Back to the Future to actually fly or travel through time.

But [Brock] wanted to take his Tour Vehicle all the way, so he partnered up with a local glass shop that let him rent time in their oven so he could heat up acrylic sheets. Once heated to the appropriate temperature, they could be removed and wrapped around a mold to make the bubble. The process took weeks to perfect, but in the end he and a few friends got the hang of it and were able to produce a gorgeous roof bubble that they fitted to the already very impressive Explorer.

While previous Jurassic Park Tour Vehicle replicas were unquestionably awesome, this build really does take it to the next level. Short of equipping the garage with a movie-accurate super computer, it’s hard to see how the bar can get any higher.

Restoring A 1930s Oscilloscope – Without Supplying Power

We’ve all done it: after happening across a vintage piece of equipment and bounding to the test bench, eager to see if it works, it gets plugged in, the power switch flipped, but… nothing. [Mr Carlson] explains why this is such a bad idea, and accompanies it with more key knowledge for a successful restoration – this time revitalising a tiny oscilloscope from the 1930s.

Resisting the temptation to immediately power on old equipment is often essential to any hope of seeing it work again. [Mr Carlson] explains why you should ensure any degraded components are fixed or replaced before flipping the switch, knowing that a shorted/leaking capacitor is more than likely to damage other components if power is applied.

The oscilloscope he is restoring is a beautiful find. Originally used by radio operators to monitor the audio they were transmitting, it features a one inch CRT and tube rectification, in a tight form factor.

[Mr Carlson] uses his capacitor leakage tester to determine if the main filter capacitor needs replacing – it does, no surprises there – as well as confirming the presence of capacitors potted into the power transformer itself. These have the potential to not only derail the restoration, but also cause a safety hazard through leakage to the chassis.

After replacing and rewiring everything that’s relevant, the scope is hooked up to an isolation transformer, and it works first time – showing the value of a full investigation before power-up. [Mr Carlson] quips, “It really doesn’t have a choice; when it’s on this bench, it’s going to work again”, a quote which will no doubt resonate with Hackaday readers.

[Mr Carlson] promises to integrate the scope into a new piece of test equipment in the near future, but in the meantime you can read about his soldering station VFD mod, or his walk-in AM radio transmitter.

Continue reading “Restoring A 1930s Oscilloscope – Without Supplying Power”

Smiling Robot Moves Without Wires

What could be cuter than a little robot that scuttles around its playpen and smiles all day? For the 2018 Hackaday prize [bobricius] is sharing his 2D Actuator for Micro Magnetic Robot. The name is not so cute, but it boasts a bill of materials under ten USD, so it should be perfect for educational use, which is why it is being created.

The double-layer circuit board hides six poles. Three poles run vertically, and three of them run horizontally. Each pole is analogous to a winding in a stepper motor. As the poles turn on, the magnetic shuttle moves to the nearest active pole. When the perpendicular windings activate, it becomes possible to lock that shuttle in place. As the windings activate in sequence, it becomes possible to move left/right and forward/back. The second video demonstrates this perfectly.

[bobricius] found inspiration from a scarier source, but wants us to know this is his creation, not a patent infringement. We are not lawyers.

Continue reading “Smiling Robot Moves Without Wires”

Robert Hall And The Solid-State Laser

The debt we all owe must be paid someday, and for inventor Robert N. Hall, that debt came due in 2016 at the ripe age of 96. Robert Hall’s passing went all but unnoticed by everyone but his family and a few close colleagues at General Electric’s Schenectady, New York research lab, where Hall spent his remarkable career.

That someone who lives for 96% of a century would outlive most of the people he had ever known is not surprising, but what’s more surprising is that more notice of his life and legacy wasn’t taken. Without his efforts, so many of the tools of modern life that we take for granted would not have come to pass, or would have been delayed. His main contribution started with a simple but seemingly outrageous idea — making a solid-state laser. But he ended up making so many more contributions that it’s worth a look at what he accomplished over his long career.

Continue reading “Robert Hall And The Solid-State Laser”

Hacking A Cheap Laser Rangefinder

When a new piece of technology comes out, the price is generally so high that it keeps away everyone but the die hard early adopters. But with time the prices inch down enough that more people are willing to buy, which then drives the prices down even more, until eventually the economies of scale really kick in and the thing is so cheap that it’s almost an impulse buy. Linux SBCs, Blu-ray lasers, 3D printers; you name it and the hacker community has probably benefited from the fact that it’s not just the hacker community that’s interested anymore.

Which is exactly what’s started to happen with laser rangefinders. Once almost exclusively a military technology, you can now pick a basic “laser tape measure” for less than $40 USD from the normal overseas suppliers. Unfortunately, as [iliasam] found, they aren’t particularly well suited other tasks. For one there’s no official way of getting the data out of the thing, but the other problem is that the sample rate is less than one per second. Believing the hardware itself was promising enough, he set out to reverse engineer and replace the firmware running on one of these cheap laser rangefinders (Google Translate from Russian).

His blog post is an absolute wealth of information on how these devices operate, and a must read for anyone interested in reverse engineering. But the short version is that he figured out a way to reprogram the STM32F100C8T6 microcontroller used in the device, and develop his own firmware that addresses the usability concerns of this otherwise very promising gadget.

With some minor hoop jumping, the laser tape measure PCB can be hooked up to an ST-Link programmer, and the firmware provided by [iliasam] can be used to enable an easy to use serial interface. Perfect for pairing with an Arduino or Raspberry Pi to get fast and accurate range data without breaking the bank.

It probably won’t surprise you to see this isn’t the first time [iliasam] has gotten down and dirty with a laser rangefinder. This extremely impressive build from last year allowed for incredibly accurate 3D scans of his room, and before that he created his own rangefinder from scratch.

Continue reading “Hacking A Cheap Laser Rangefinder”