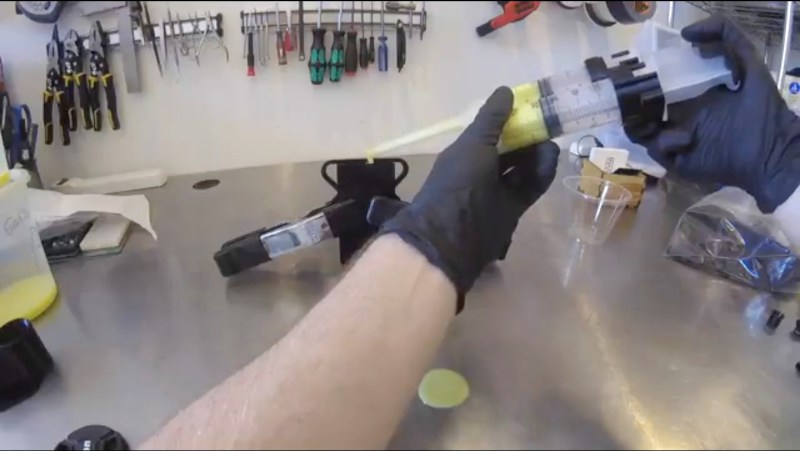
One trick for getting the bubbles out of freshly mixed 2-part epoxy, aka degassing, is to go over it gently with the flame from a propane torch. But both the mixing and degassing take time. [Gianteye] came up with a 3D printed dual-syringe static mixing system which speeds up the process. He used it with silicone to get the difficult steps out of the way quickly for his hands-on soft robotics class, allowing the students to focus more on the matter at hand. But we figure most readers might use it for epoxy.
If you’ve bought those 2-part epoxy syringes available in stores before then you’ll know that they usually come with two syringes, each filled with one of the two parts to be mixed. Depressing the syringes causes each part to come out of its own tube. It’s then your job to mix them together and degas the result.
[Gianteye’s] system consists of 3D printed parts and two syringes. Models for the 3D printing are available on his Thingiverse page and the syringes can be found online. Some of the 3D printed parts help you first fill and degas the syringes. You then attach a 3D printed mixing tube to the ends of the syringes. This tube serves two purposes. When the syringe’s plungers are depressed, both parts of the material are forced through the tube and extruded out. But on their way through, both parts pass through eight helices which form 180° turns and mix the parts together. Out comes the portioned, mixed and degassed material which can go straight into a mold or to wherever you need it.
The mixing tube was designed for one-time use but [Gianteye] discovered during an evaluation that it can be reused if you pull out any cured material and purge it. The evaluation involved silicone though. With hardened epoxy, you’ll probably have to use a new tube each time.
Check out the full details of his system in the video below, including both assembly and usage.
If you’re looking for a metallic look for something without wanting to cast metal than have a look at our own [Gerrit Coetzee’s] article about cold casting wherein he makes some very nice looking parts.


Thick epoxides are mixed and degassed simultaneously by ‘smearing’ the mixture out thinly across a smooth surface. You smear and scrape-up the mixture several times. We use a scale to measure quantities, as syringes are messy and inaccurate. Yes, you can thin a mixture by putting it in a microwave for a short time, and surface bubbles may be popped with a hot air gun. Larger quantities of epoxide resin are mixed in a tub, using a smooth, round dowel in a slow drill – almost no bubbles. The same applies for silicone.
Epoxy resin actually heats up in a microwave?
Try it.
Cute, he’s successfully duplicated the most expensive way to buy 5-minute epoxy, it’s possible to buy that type of container at the hardware store for ~$15 for 10mL, the nozzles are one-shot usage and need to be replaced after use.
I’m pretty sure the most expensive way is to buy it pre-mixed and frozen.
I wonder if the piece can be made in two halves that can be opened to be cleaned and reutilice.
Maybe they can add a paint-can like (or a tupperware like, it’s the same thing) lip that seals the two pieces and doesn’t require a gasket or other sealant.
Just toss the syringes, trying to clean epoxy from the nozzles uses expensive micro brushes, and varsol to stink the place up.
Alcohol is also a solvent for most epoxies.
One time use … Not worth the printing time … But if it were as cheap physical product I’d consider having one around
The wasted epoxy aside it would be nice to squirt it up in to places time to time
They are a cheap physical product as is.
I have some made by Wurth at work.
+1000
I really don’t understand why he’d put this much effort into making something that is readily available, easily sourced, and cheap (You can find them on McMaster for like $1.50).
Not to mention, the commercially available units won’t dissolve if you’re using something with any sort of solvent and they’re clear so you can see the material as it flows through the static mixer.
The epoxies I use come in a two-part tube already, and they give away mixing nozzles for free. (Google mixing nozzles for images) Seems like it would be a lot easier to make a part to utilise what exists already, no 3d printing required.
This was for silicon not epoxy.
Silicone err
He talks about its usefulness for both, so I emphasized the epoxy more since that’s what most readers would use it for. But dangit, now I can’t find anywhere that he mentioned epoxy! My bad I guess. There is a difference since it’s fully reusable if you use silicone and maybe not with epoxy.
https://www.banggood.com/50pcs-F6-16-Green-AB-Glue-Mixing-Tube-Static-Mouth-Section-16-Nozzles-p-1024742.html?rmmds=detail-left-hotproducts__3&cur_warehouse=CN
I don’t really understand why someone designs and prints something that is used in the industry everywere and cam be bought for pennies.
Because he can?
Not everybody has the kind of access you have. It takes between 6 and 12 weeks to get something shipped (at a reasonable cost) to the island I live on. I have designed/downloaded and printed dozens upon dozens of parts that when I lived in the States I would have said “Why on earth would someone print that? They’re totally missing the point of 3D printing!!!”
So, I posted this metal-epoxy mixing 3d print on thingiverse 2846519
It fits the Quik-Weld JB-Weld product, does its mixing, and is meant to be applied to barrels. It was put in the Addivitism e-zine, attributed to by “anonymous”.
Thanks for pointing out that using it with silicone will be able to make it easier for the user. I will share this information with my best friend to help him once he has bought one. It appears that he will be getting one to practice and experiment on. This is because he wants to pursue a career related to this in the future.