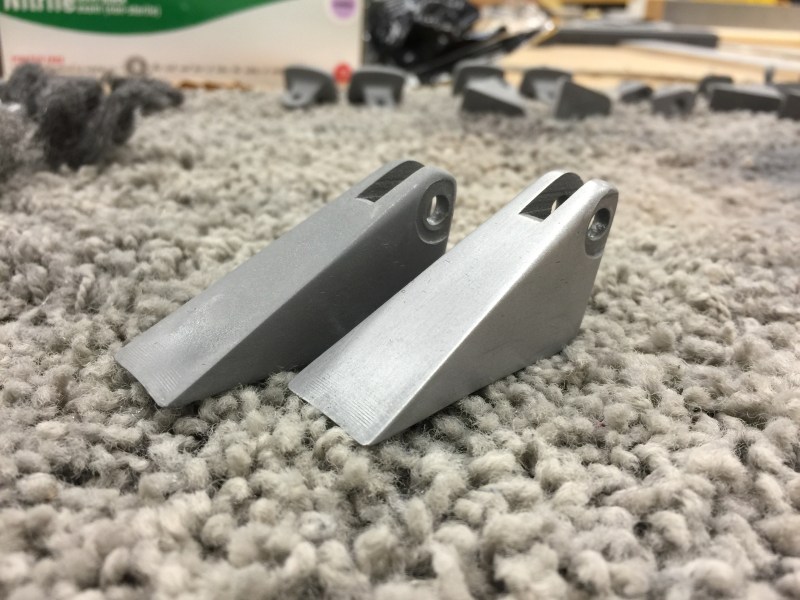
Sometimes we need the look, feel, and weight of a metal part in a project, but not the metal itself. Maybe you’re going for that retro look. Maybe you’re restoring an old radio and you have one brass piece but not another. It’s possible to get a very metal like part without all of the expense and heat required in casting or the long hours in the metal fabrication shop.
Before investing in the materials for cold casting, it’s best to have practical expectations. A cold cast part will not take a high polish very well, but for brushed and satin it can be nearly indistinguishable from a cast part. The cold cast part will have a metal weight to it, but it clinks like ceramic. It will feel cool and transfers heat fairly well, but I don’t have numbers for you. Parts made with brass, copper, and iron dust will patina accordingly. If you want them to hold a bright shine they will need to be treated with shellac or an equivalent coating afterward; luckily the thermoset resins are usually pretty inert so any coating used on metal for the same purpose will do.
It is best to think of the material as behaving more or less like a glass filled nylon such as the kind used for the casing of a power tool. It will be stiff. It will flex a relatively short distance before crazing and then cracking at the stress points. It will be significantly stronger than a 3D printed part, weaker than a pure resin part, and depending on the metal; weaker than the metal it is meant to imitate.
Materials
Cold casting is especially forgiving if the part is mostly cosmetic. The resin used to bind the particles together can be just about anything. While I am using my favorite, Innovated Polymers IE-3075, practically anything will do. It has a fairly long cure time, but the two-part glaze coat from the hardware store works well for this application too.
The metal can be any fine powder. For this example I used 500 mesh (30micron) aluminum powder. I ordered the powder marketed for this purpose by Smooth-On for the fast shipping, but there is nothing special about their powder. If you have the time, the slower but significantly cheaper kind from sites such as eBay will do.
Some Notes On Working With Metal Powders:

- Explosion Hazard: Do not smoke or leave your Jacob’s ladder on while you’re working with metal powders. They can form a fine, barely visible cloud of metal which will explode when hit with an appropriately hot flame (check out [Jenny’s] article about metal powders as fuel). This explosion won’t necessarily just be a scary flash. It could actually be a face melting rapidly expanding ball of heat and force that can and will ruin your chances of being the centerfold in your hackerspace’s sexy hacker fundraising calendar.
- Organ Failure Funtime: Aluminum has been linked to Alzheimer’s. Too much iron can make you clinically depressed and lethargic in a very short time. Silver will turn you permanently blue. These metal powders are extremely fine and your body will have no trouble absorbing toxic levels into your blood through your stomach, lungs, and if you get really fine powder, skin. I highly recommend following good lab practice, even if you have to lie to your buddies about it at the bar later.
With that in mind, let’s talk the bare minimum of safety precautions for working with metal powders:
- Wear a Respirator: A good quality dust mask will be okay, but for this kind of thing it’s best to get a real respirator. I recommend the 3M line with the P100 filters as a minimum. Read a selection guide on how to tell if the mask has sealed or not. If you have a heavy beard be sure to pull the mask tighter than usual.
- Wear Gloves: I highly recommend every hacker have a box of nitrile gloves in their size in their lab at all time. The higher quality kind, like a surgeon might use, fit very well and even have textured fingertips. They don’t tear easily, and I can’t really tell a massive loss in dexterity over no gloves.
- Wear Eye Protection: Aside from risk of blindness, the eyes are also really quite good at absorbing harmful chemicals into the body. Eye protection is a must.
- Cleanliness: Make sure to clean everything with a damp paper towel after the work is done. Keep food containers away from the area until it has been cleaned.
3D Printing & Sanding
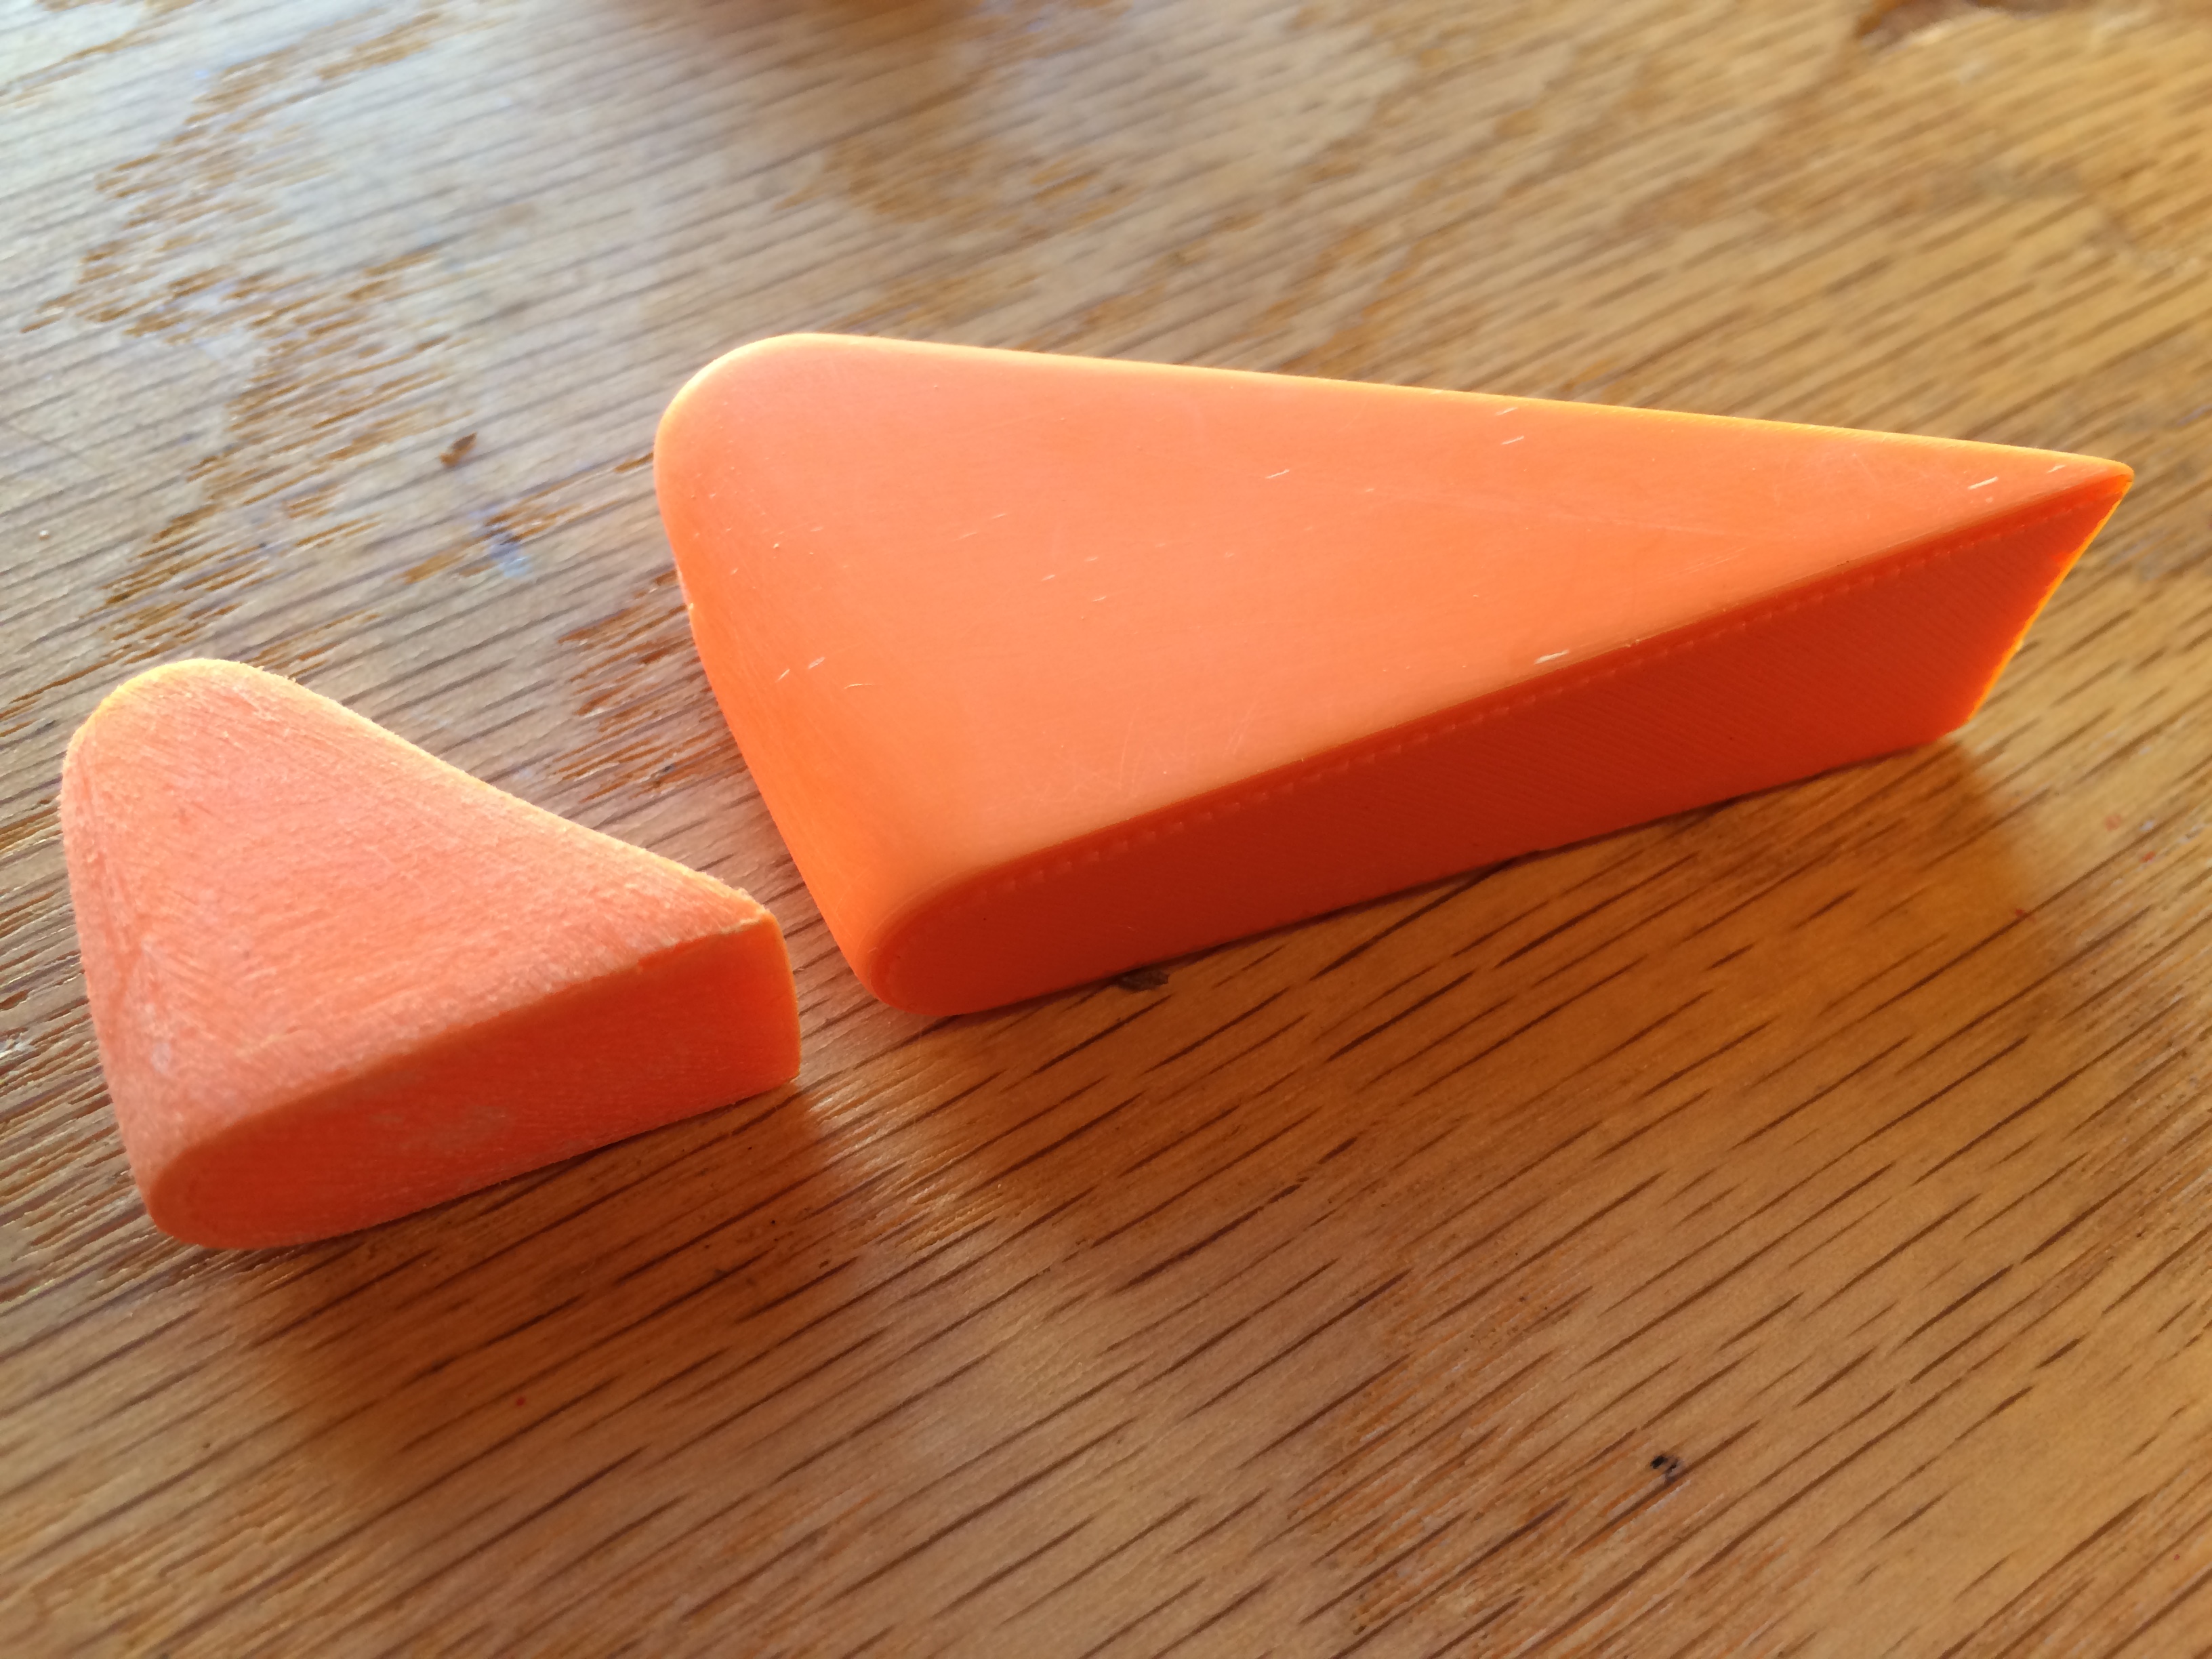
The master parts I used for this casting were 3D printed. I used quite a few outside layers with very little infill. An important thing to note with any resin casting is that the silicone mold will pick up every detail. This is a curse and a blessing. If you invest the time now on finishing the part and getting close to the desired look and feel, you won’t have to do any finishing on the final part.
To get a really nice smooth surface on the PLA parts I started with 220 grit sandpaper to knock off the layers. I then moved straight to 800 grit to get a smooth finish. PLA is fairly easy to sand. The key is to keep it from getting warm. A spray bottle of water can help with this, and will also lengthen the life of the sand paper. Power sanders of any kind are likely to heat the PLA up too much and ruin the part.
A Note on Tolerances:
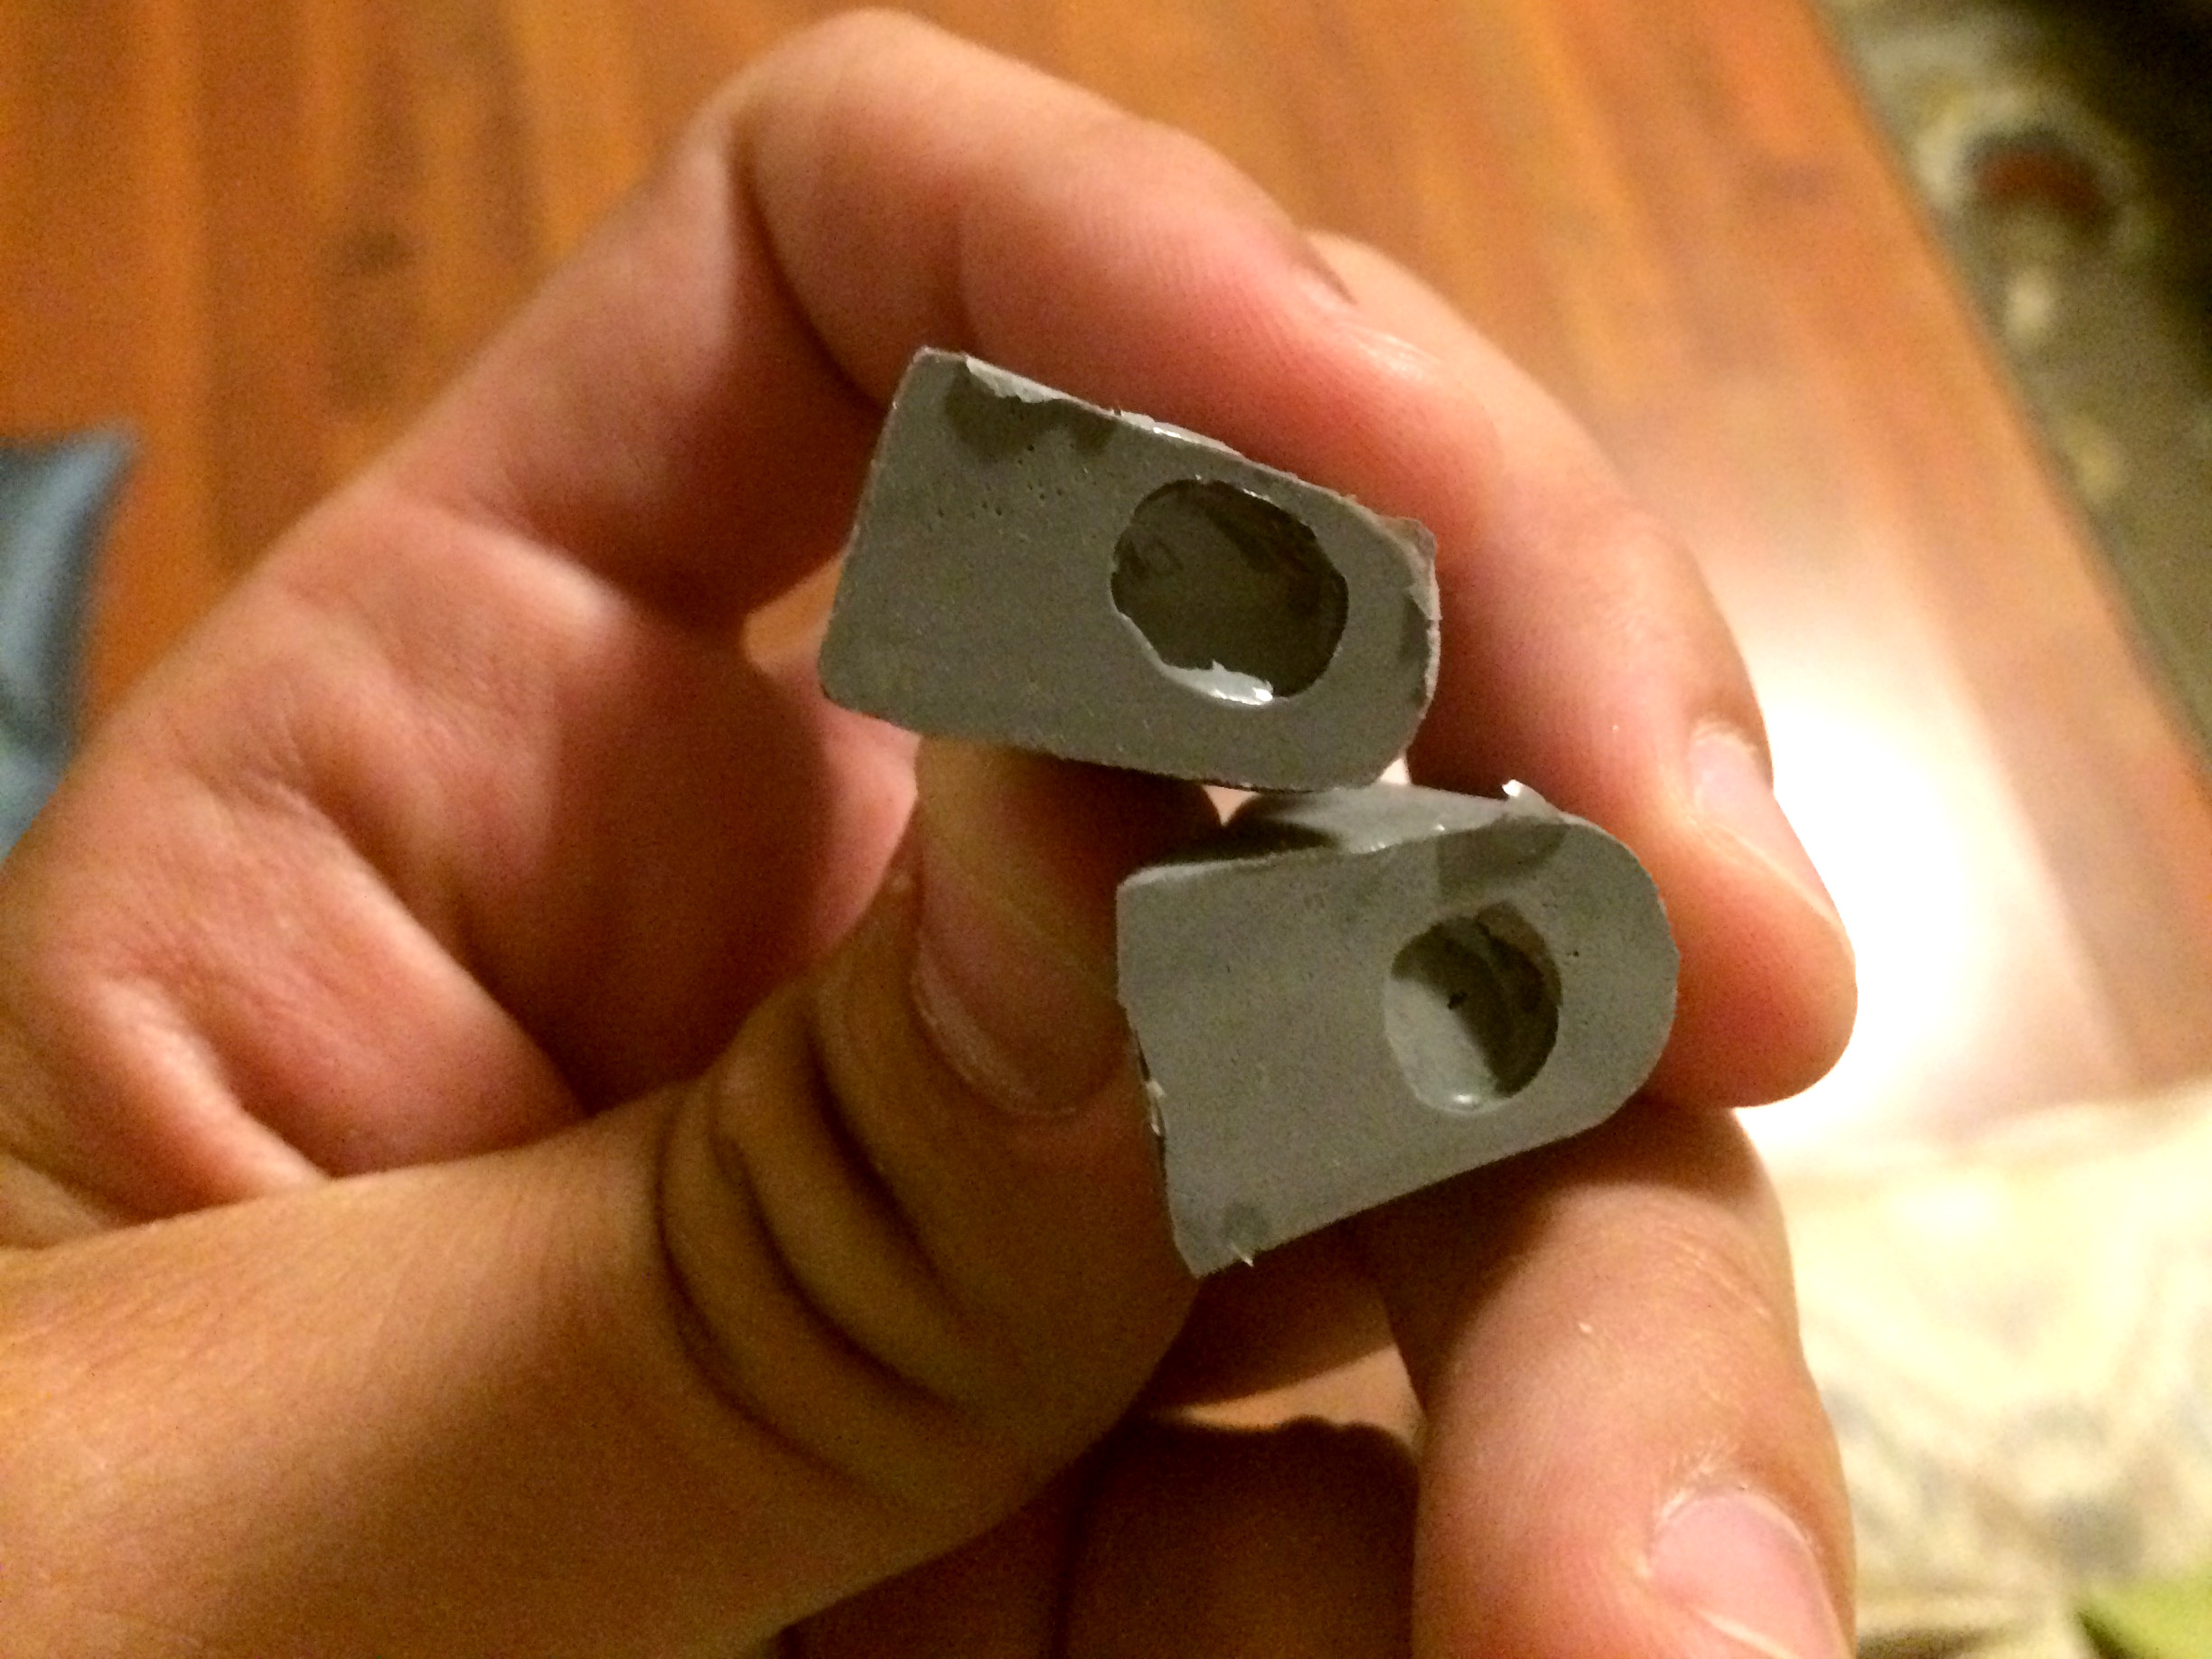
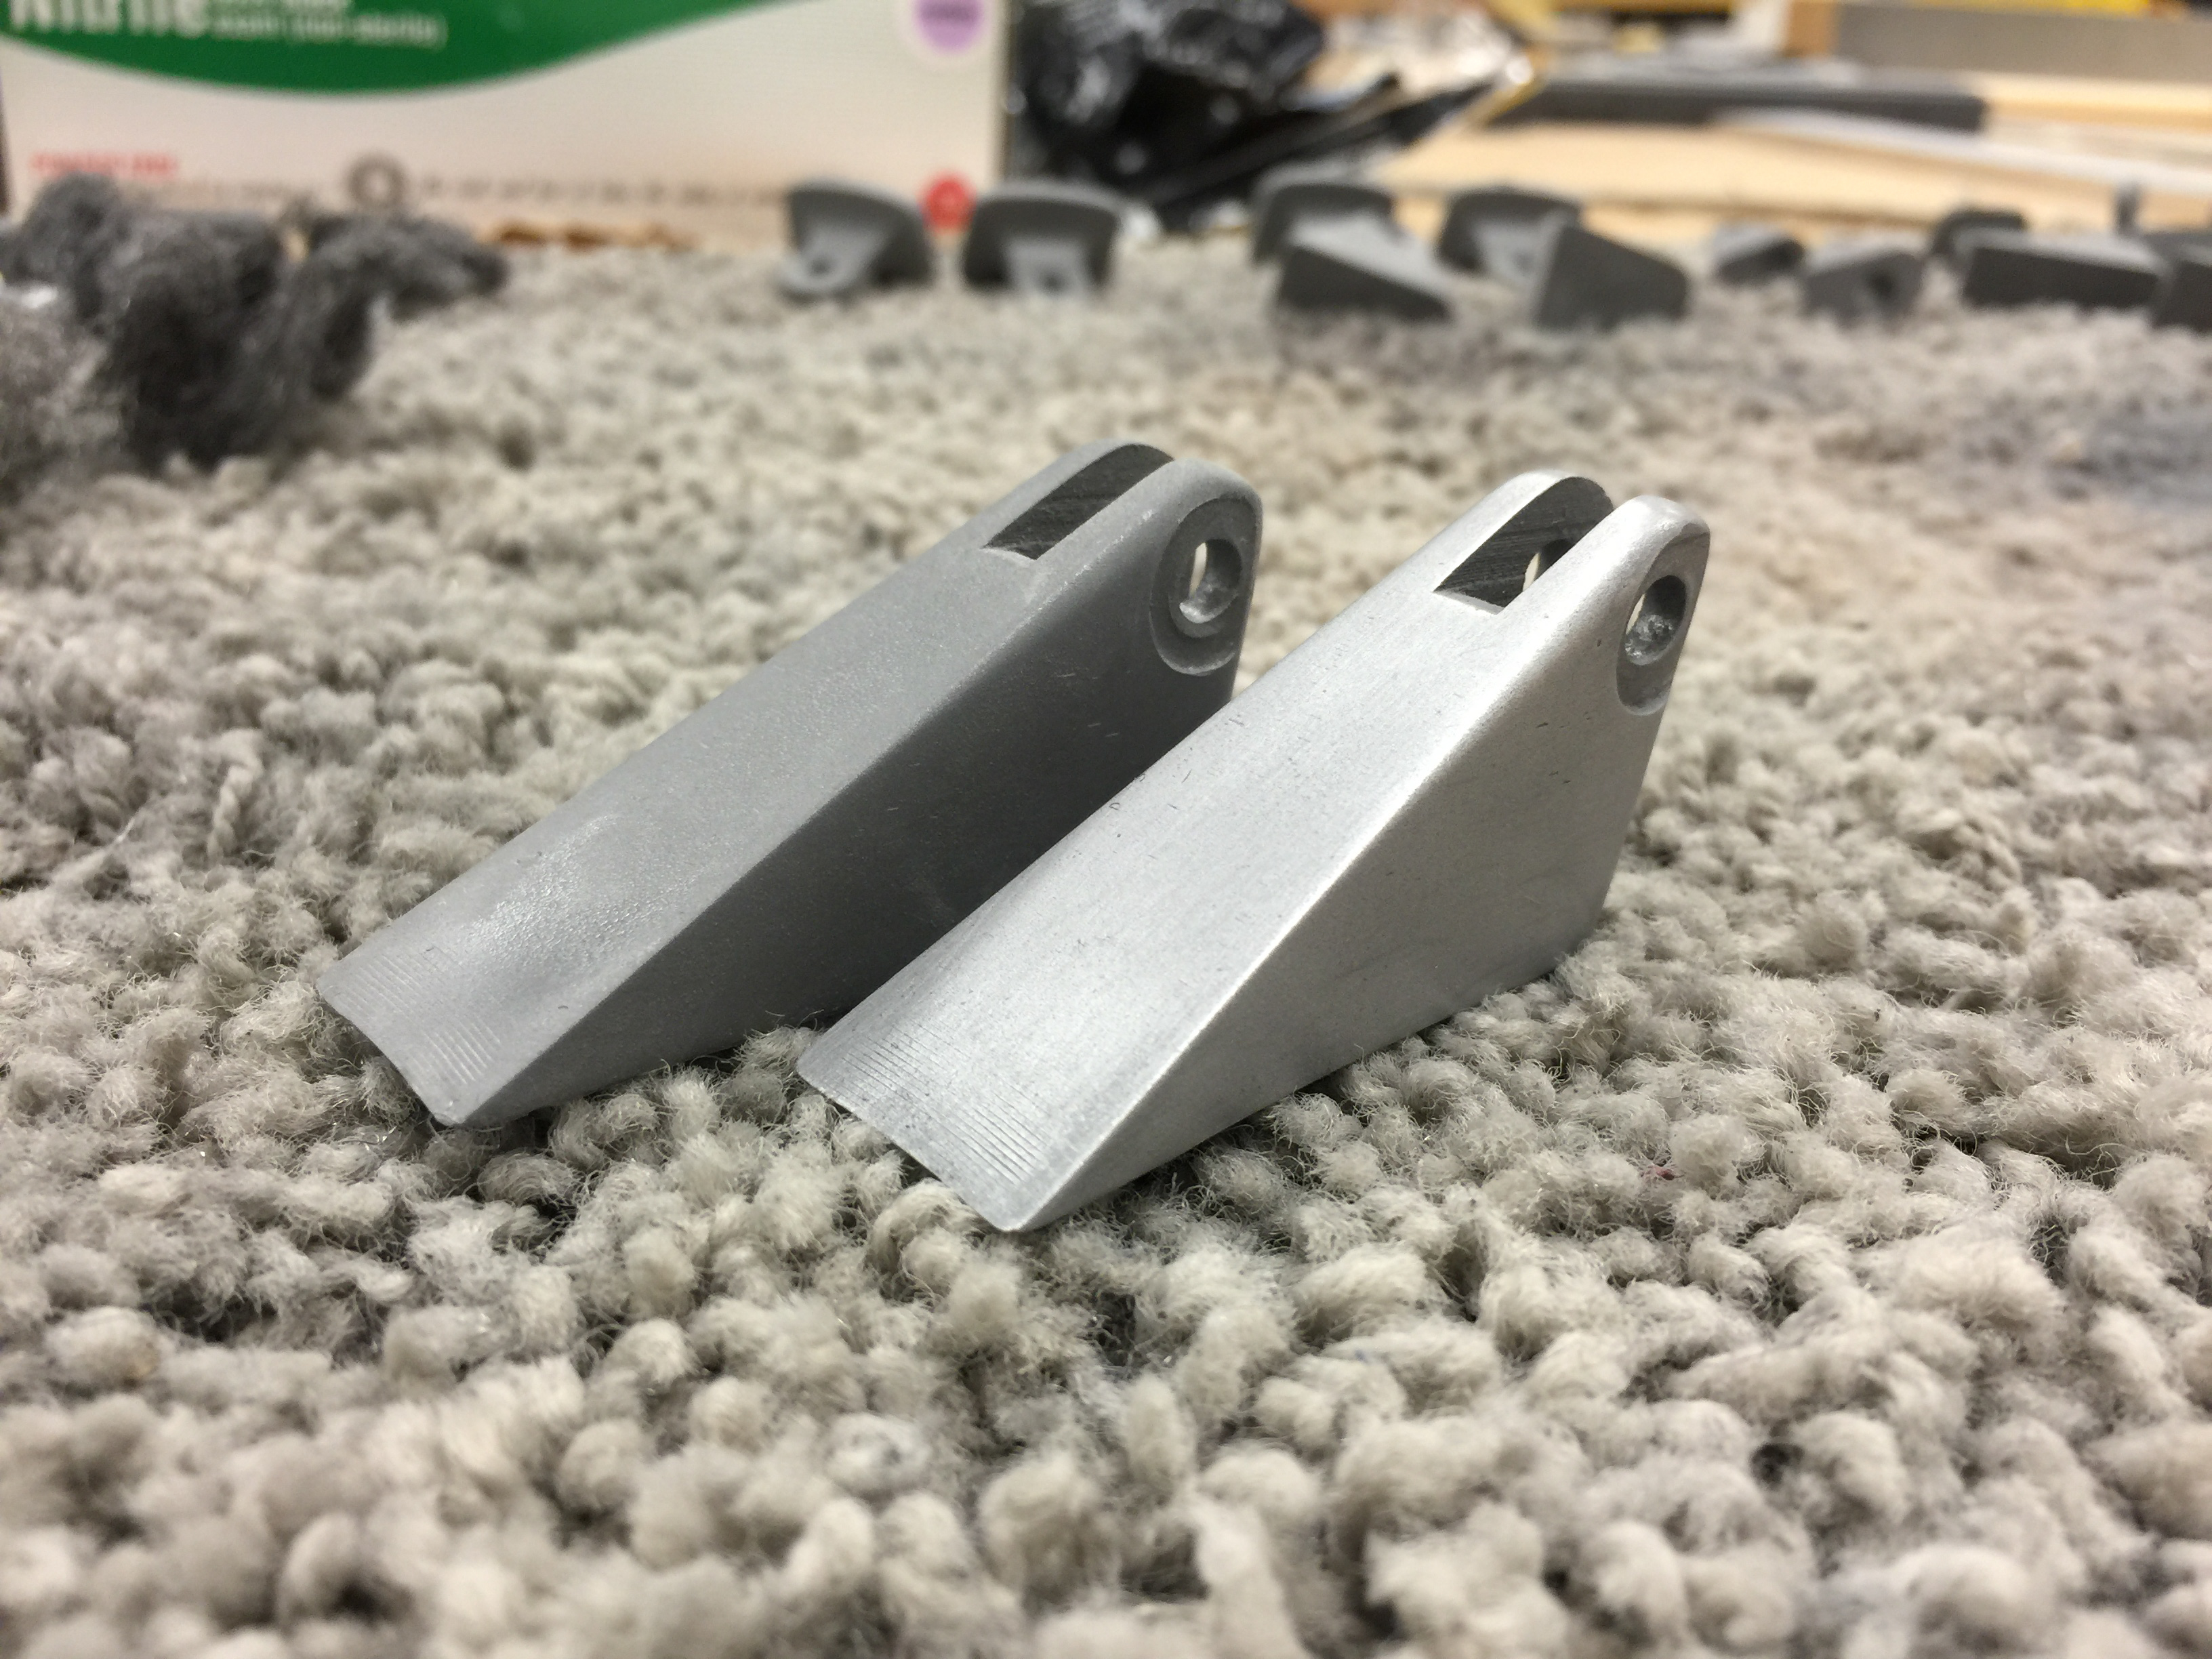
These parts will later have a hole drilled through them when they combine to form a hinge. Most mold making silicones barely shrink. Furthermore, a high quality thermoset resin will not change dimension appreciably either. So whatever tolerance you put into the master parts is the tolerance you’ll get out. This is really helpful and is another advantage over metal parts. For these parts we matched a pair of 3D printed parts and then sanded them to slide perfectly. Every duplicate part made from this mold will behave as if hand matched. Not bad!
Mold
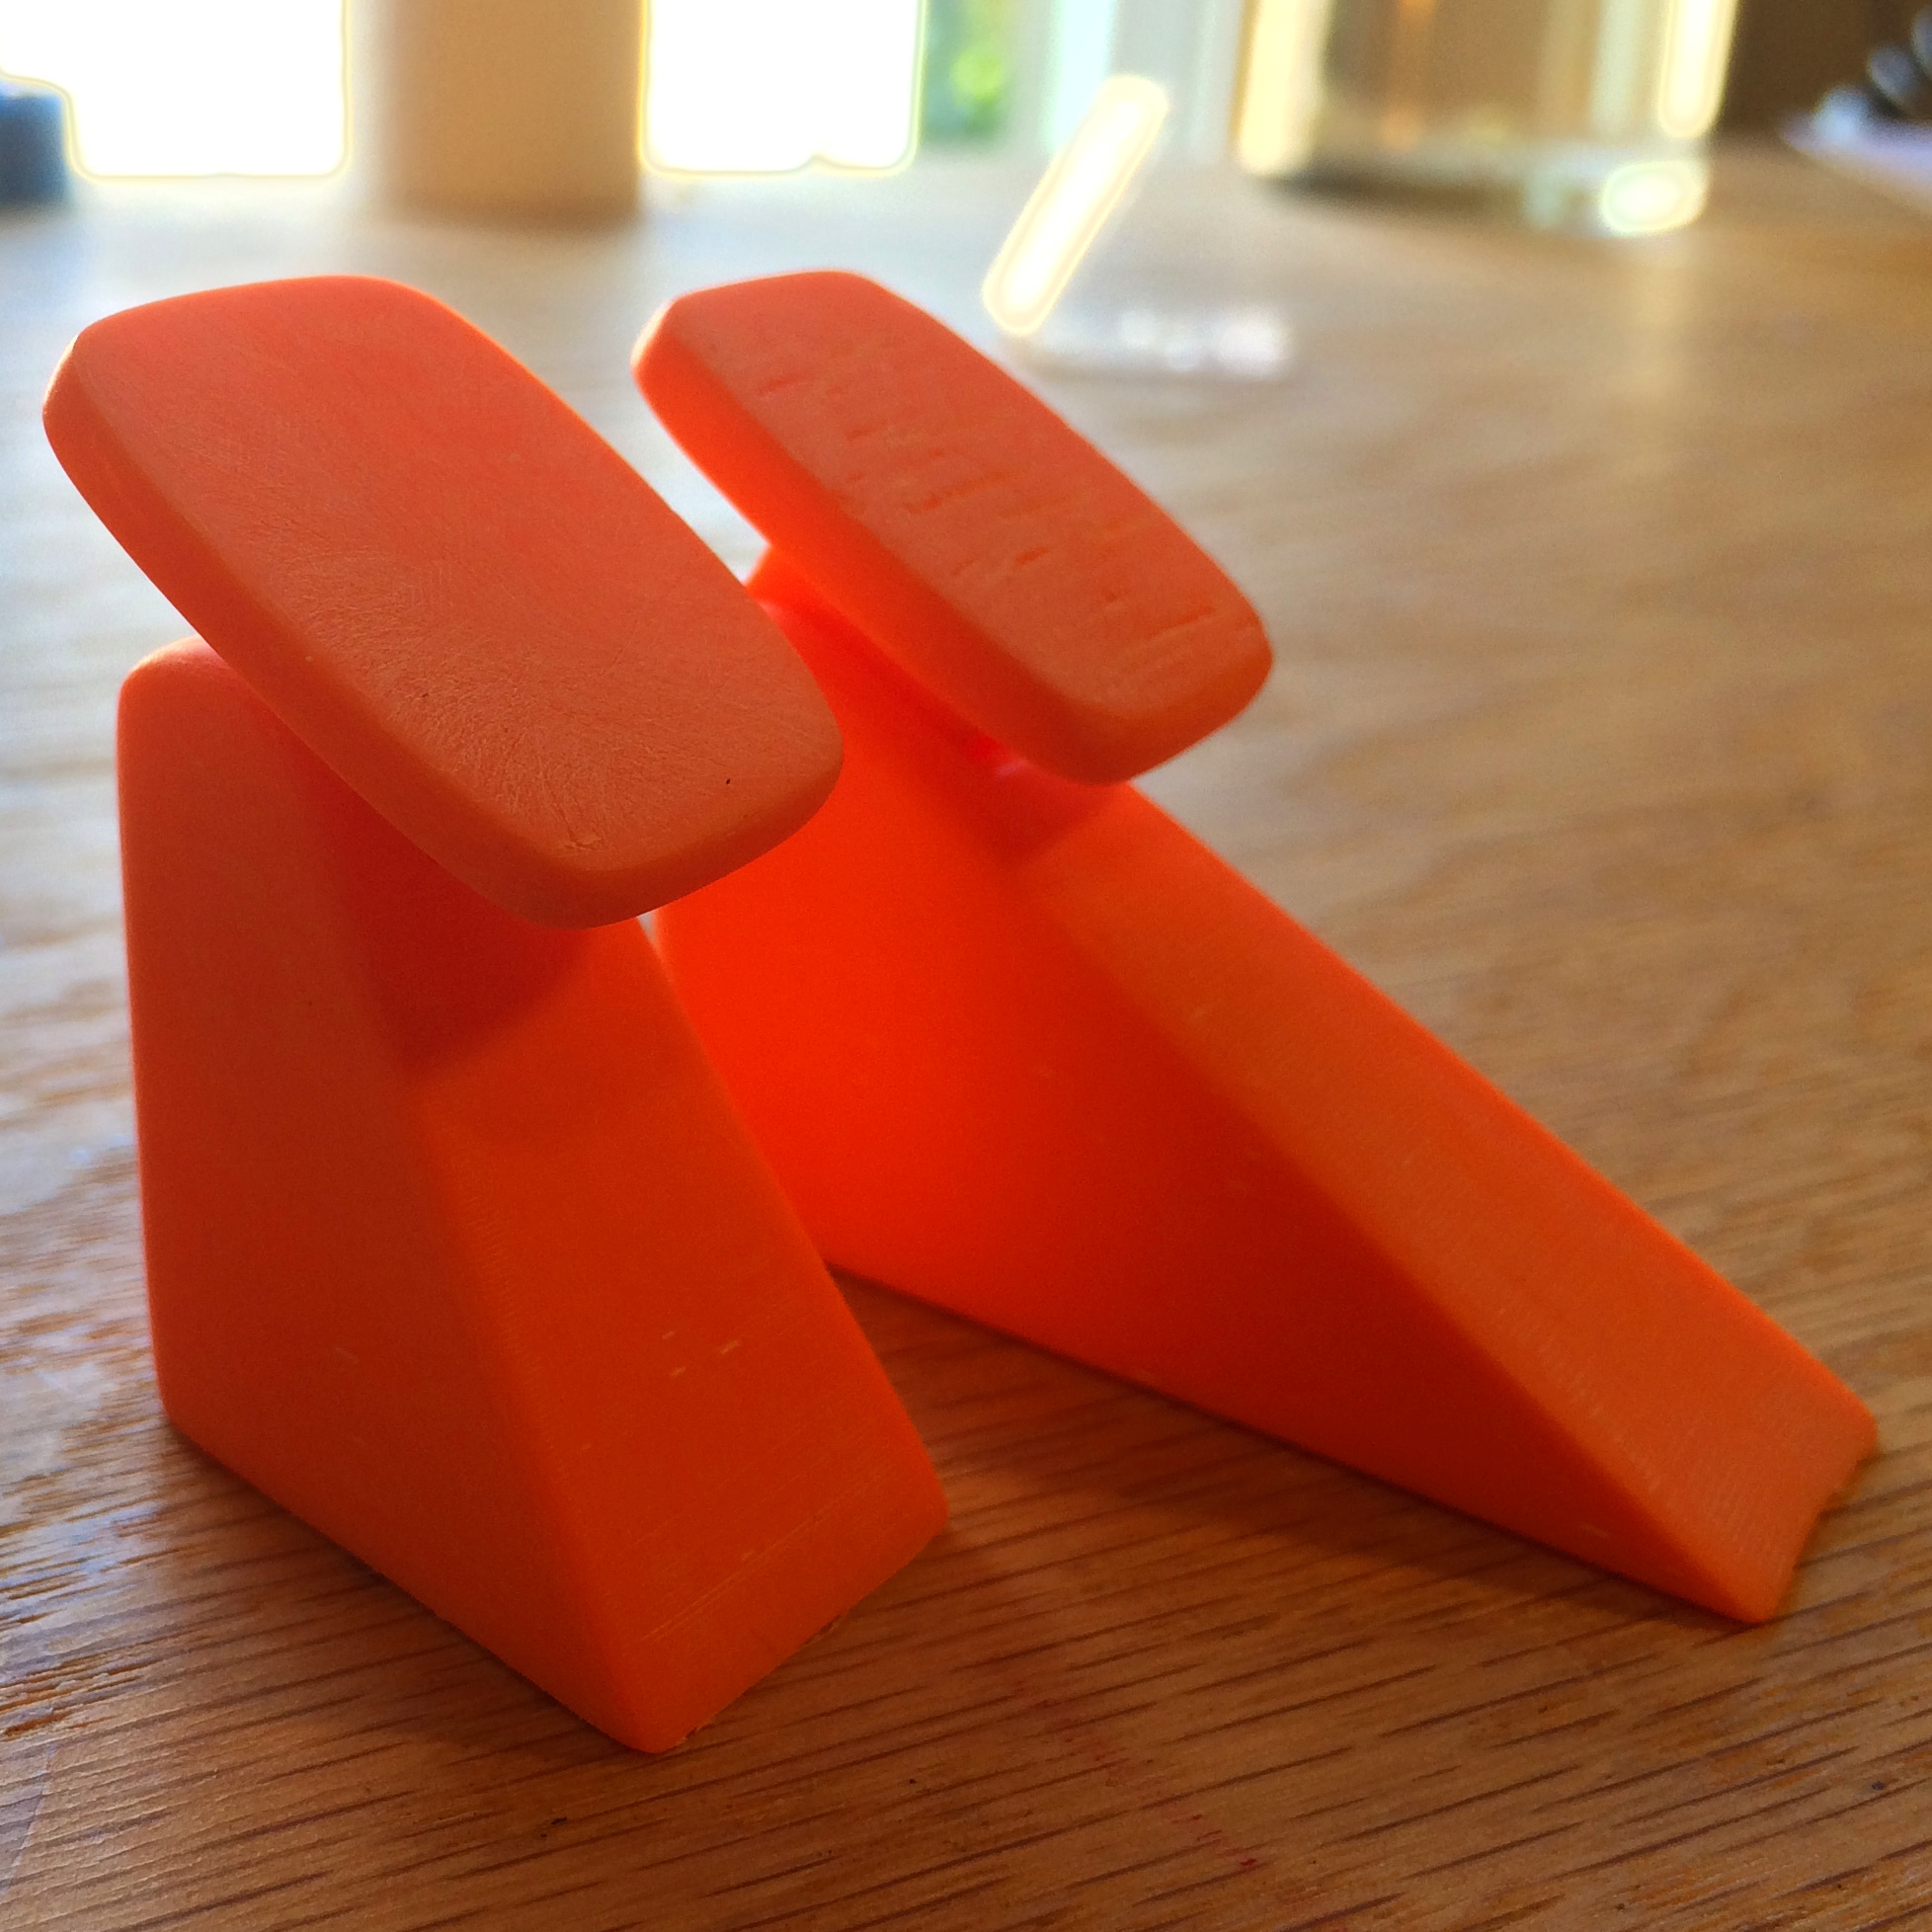
To make the mold I took the prepared 3D printed parts and laid them out in a likely configuration. For these parts the mold only has to be one sided. Even though the parts have an undercut, the silicone flexes easily enough that these have a single parting line. The flat surface that the 3D printer used to hold the parts onto the bed will be made by a sheet of flat UHMW polyethylene which urethane and silicone resins do not stick to.
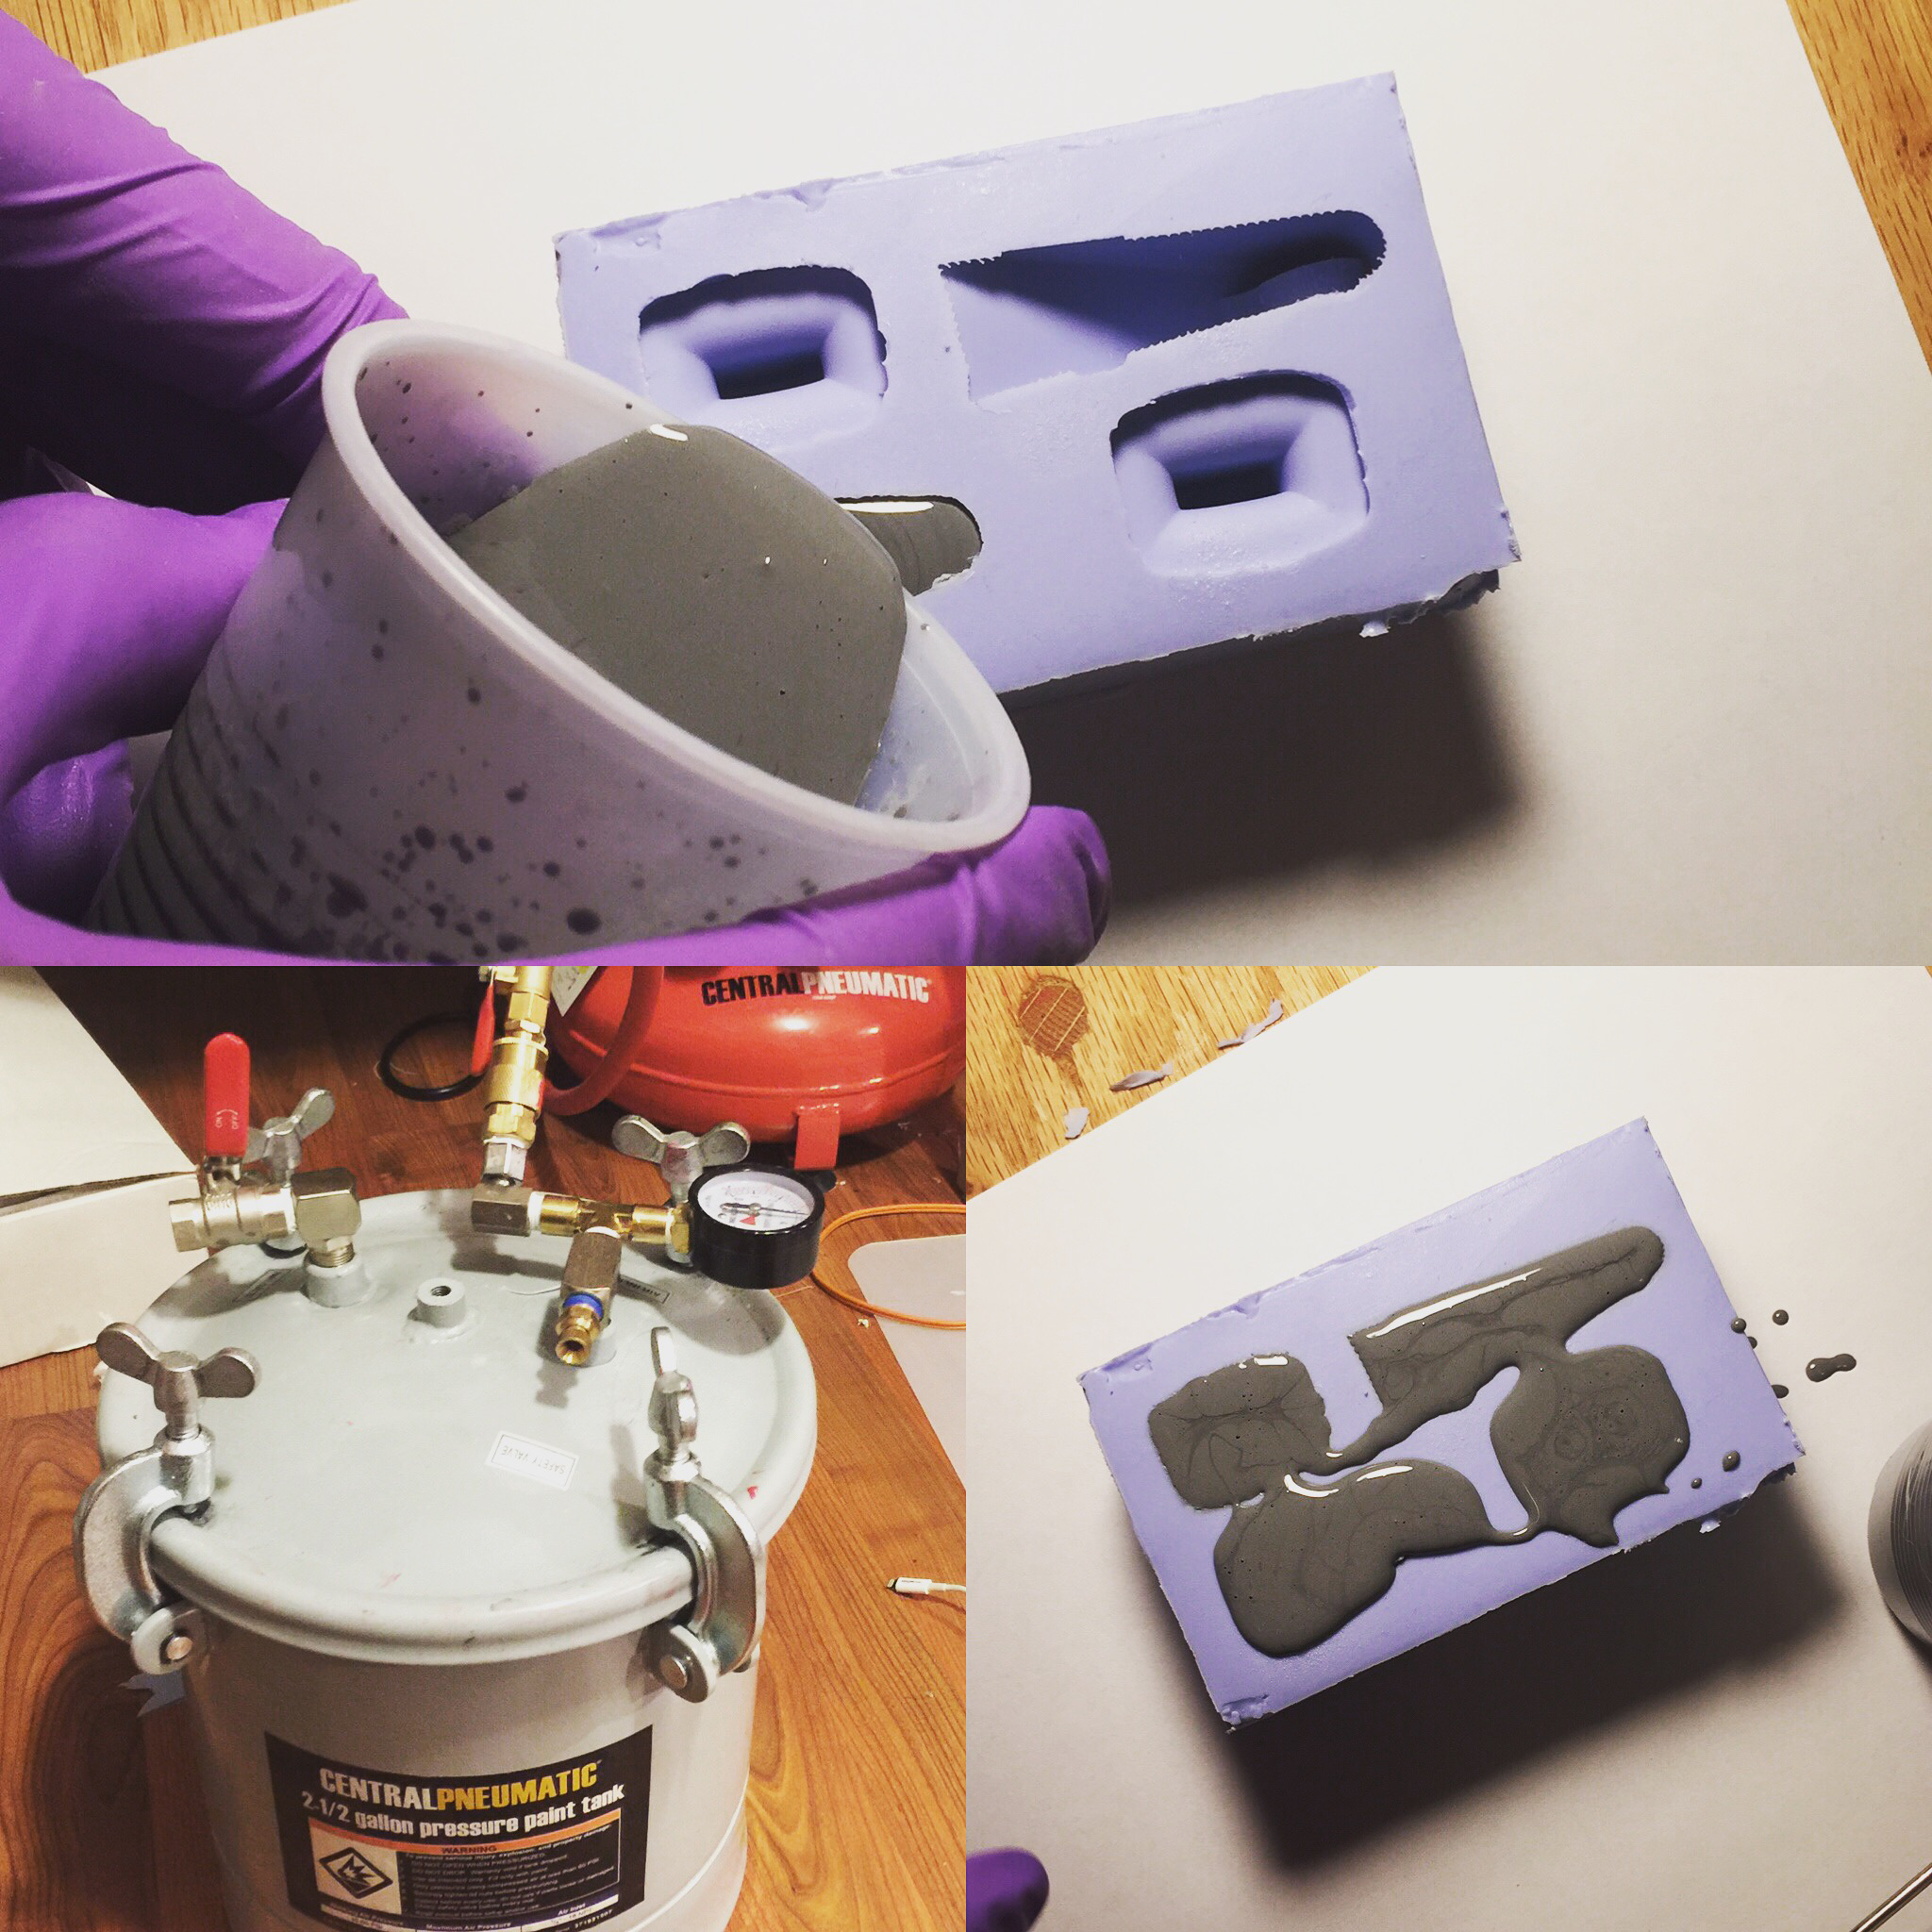
I measured the tallest part and added 8mm to it to define the depth of my mold. I also measured the length and width of the footprint of the configuration. I took these values into inkscape and made a quick layout for a box. I printed these out and glued it to some foamcore as a cutting guide.


The box was easy to assemble. Since there is no water or solvents involved in the pouring of the silicone mold; PVA school glue is enough to hold the parts onto the foam core. If I were more clever I would have laid out my template differently so I could cut halfway through the foam core and get a free sealed edge when I bent the part up. I ended up gluing the rectangles together with hot glue. It’s important to make sure that the edges are all sealed. Silicone starts to set in 30 minutes, but it is capable of oozing out of the mold for at least an hour. It’s very depressing when this happens.


Mixing and Pouring The Mold
Mix and measure the silicone as per the manufacturer’s instruction. Make sure to mix the silicone as thoroughly as possible. Early on I tried mixing gently to avoid bubbles, but this resulted in a silicone that remained sticky forever. If you have a vacuum chamber, degass the silicone before pouring. If you are using a pressure chamber, cure the silicone at 60psi for its cure time before demolding. In my case this was twelve hours.


Mixing and Pouring the Cold Cast
Smooth-On and most sites recommend a 1:1 ratio of resin to powder by volume. Through personal experimentation I’ve found that as long as the resin is mixed exactly, practically the same part can be made with up to 20% error in the powder to resin ratio. Once you go past that, the part either doesn’t luster properly or is too brittle.
This is great because depending on the geometry chosen you can use different thicknesses of slurry. For a small part that will be completely filled with resin, the thinner mixture will work best.
For really large parts you can save a lot of metal powder by making a very thick slurry with more metal than resin. This can be painted on the inside of the mold, left to cure, and then resin without powder can be filled in behind it. This part will not have the same weight and sound as a 100% filled part though.
Mixing the resin and powder mixture is fairly easy. First precisely measure out the A and B parts of the resin. Mix this very thoroughly. Once the resin is mixed the metal powder can be added. It is important to get the mixing order right. If you mix the metal in too early the A and B components may not react with each other properly.
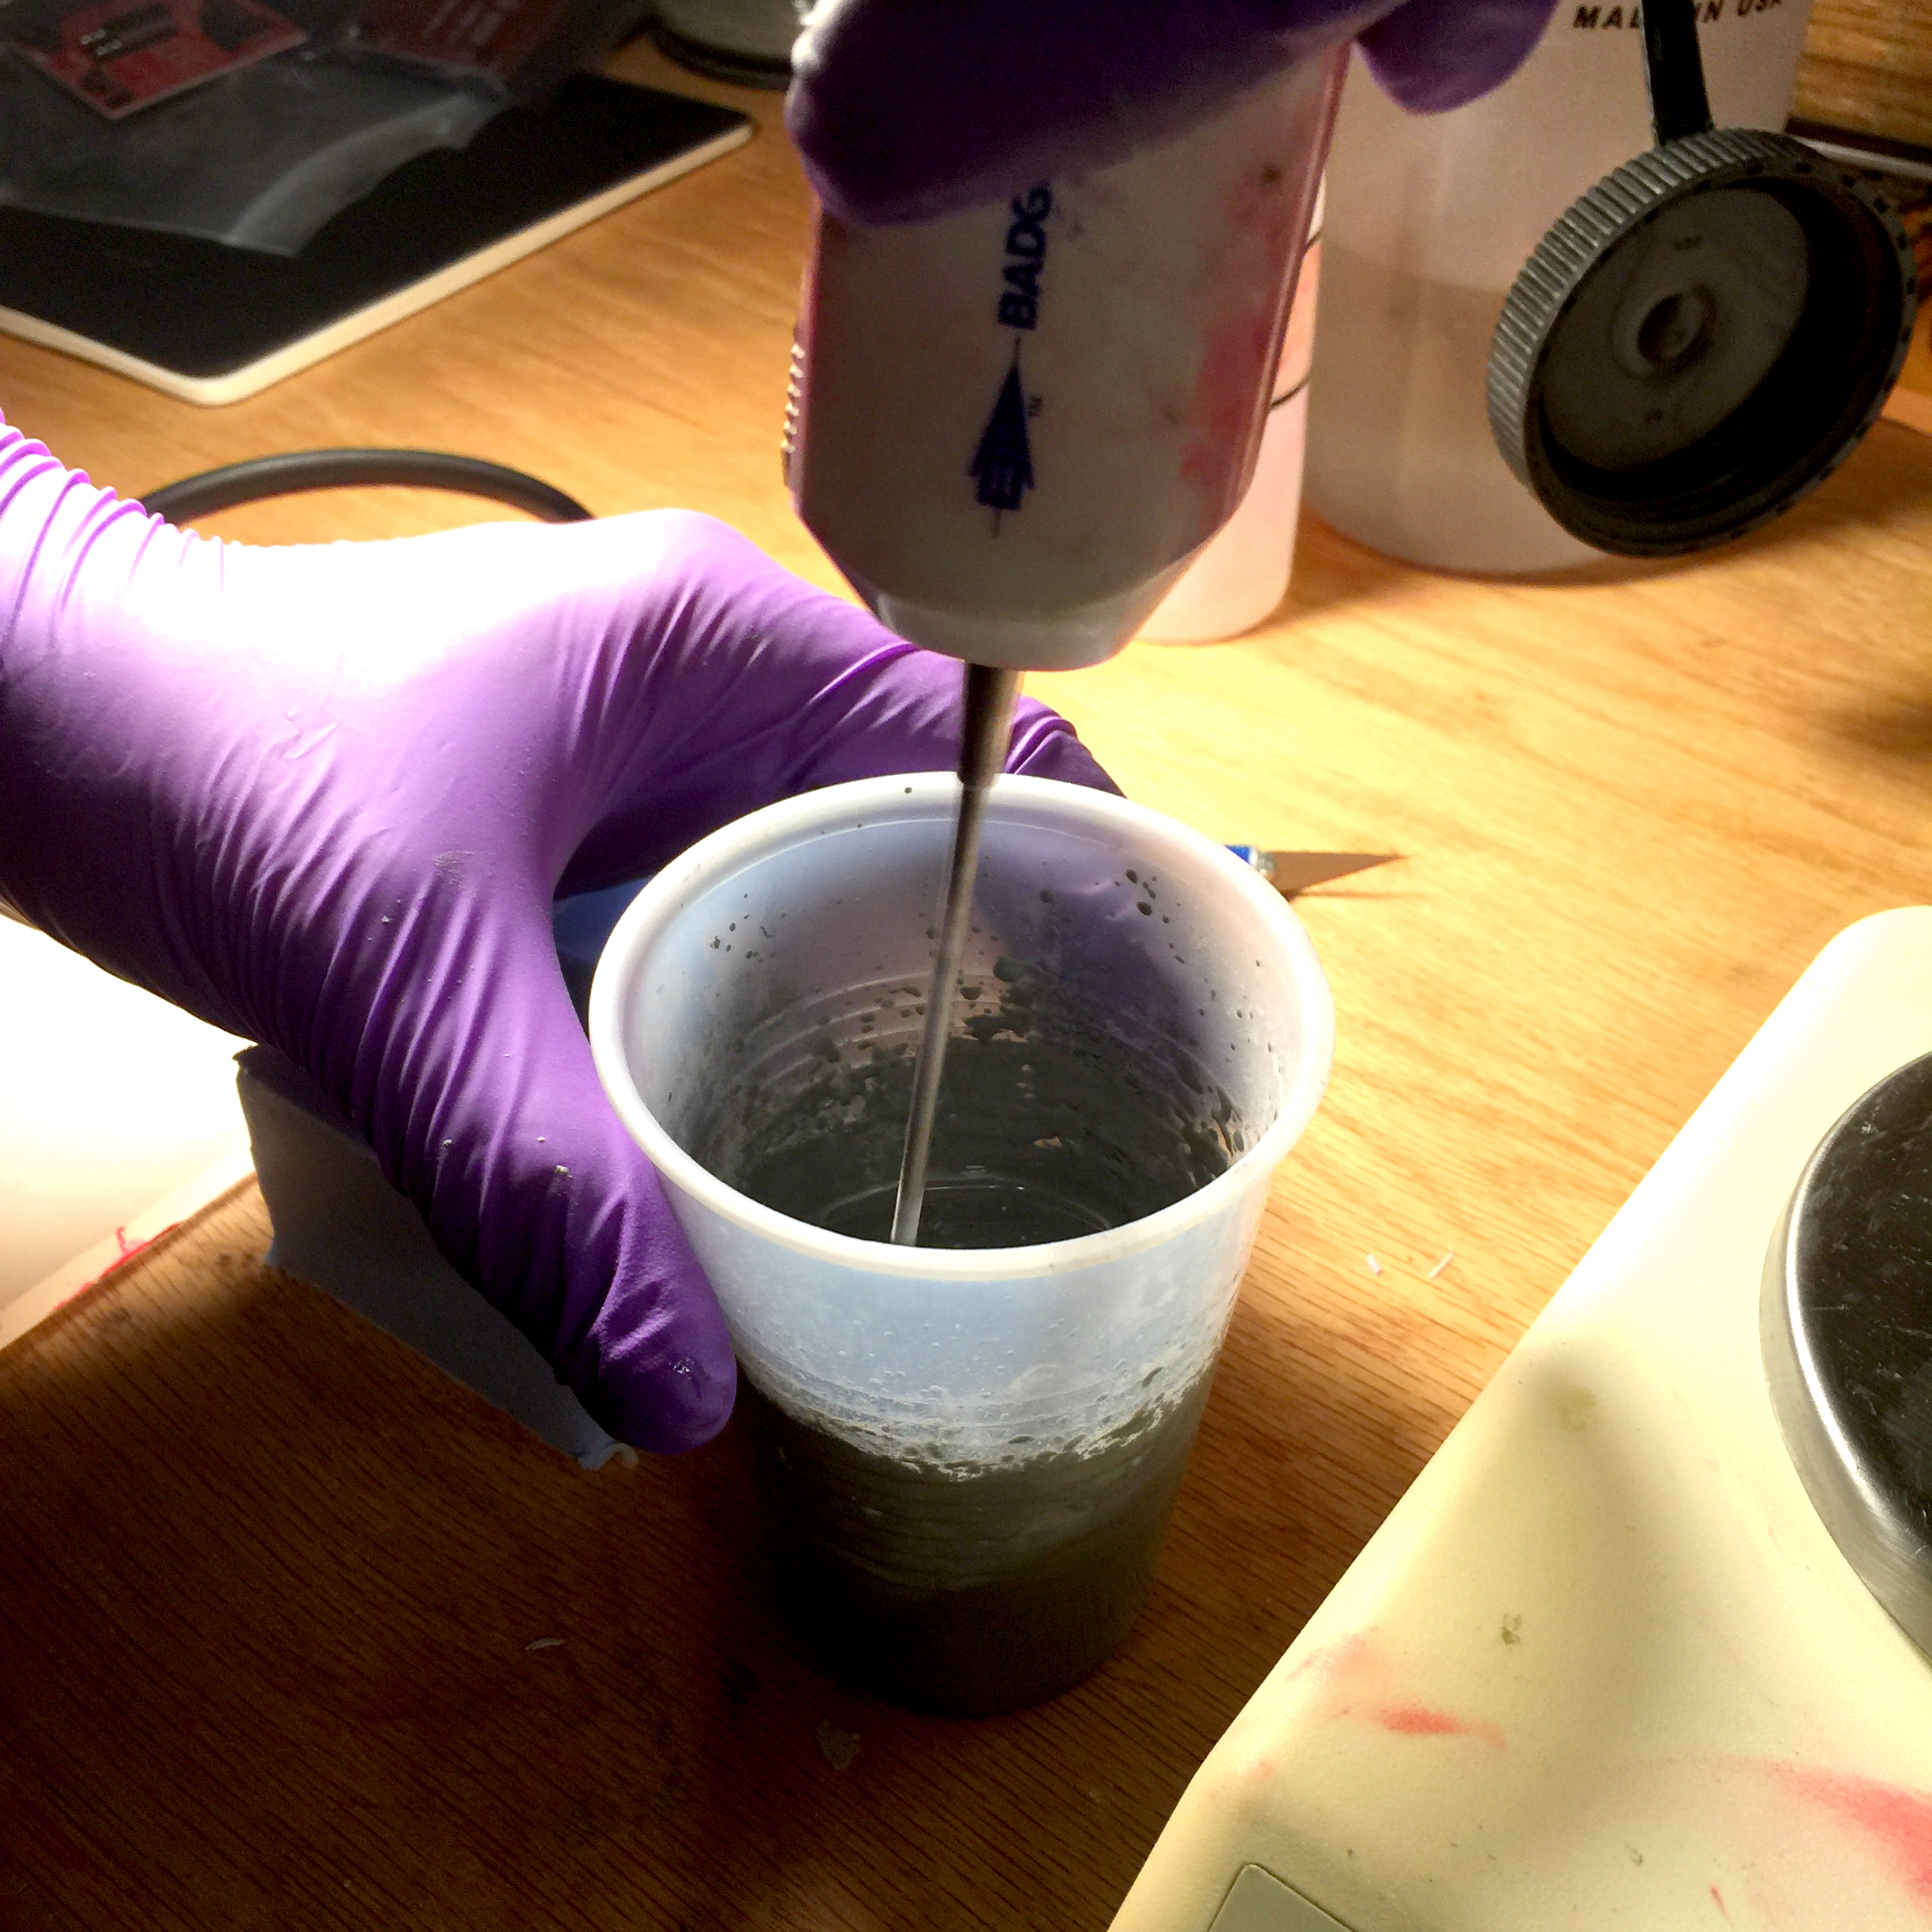
After it is mixed the resin can be optionally vacuum degassed and then poured into the mold as usual. Since this is a single part mold the back of the pour was covered with a sheet of UHMW to make a flat surface. The poured mold was set in a pressure chamber to cure at 60 psi for four hours before demolding. This time will change depending on the resin used.
Polishing and Final Work
After demolding the part is ready for finishing. For this part it was decided that it would be significantly easier to drill the holes after the part was removed from the mold. The other option would be to have a pin in the mold or a two part mold. This would have required significantly more time to finish.
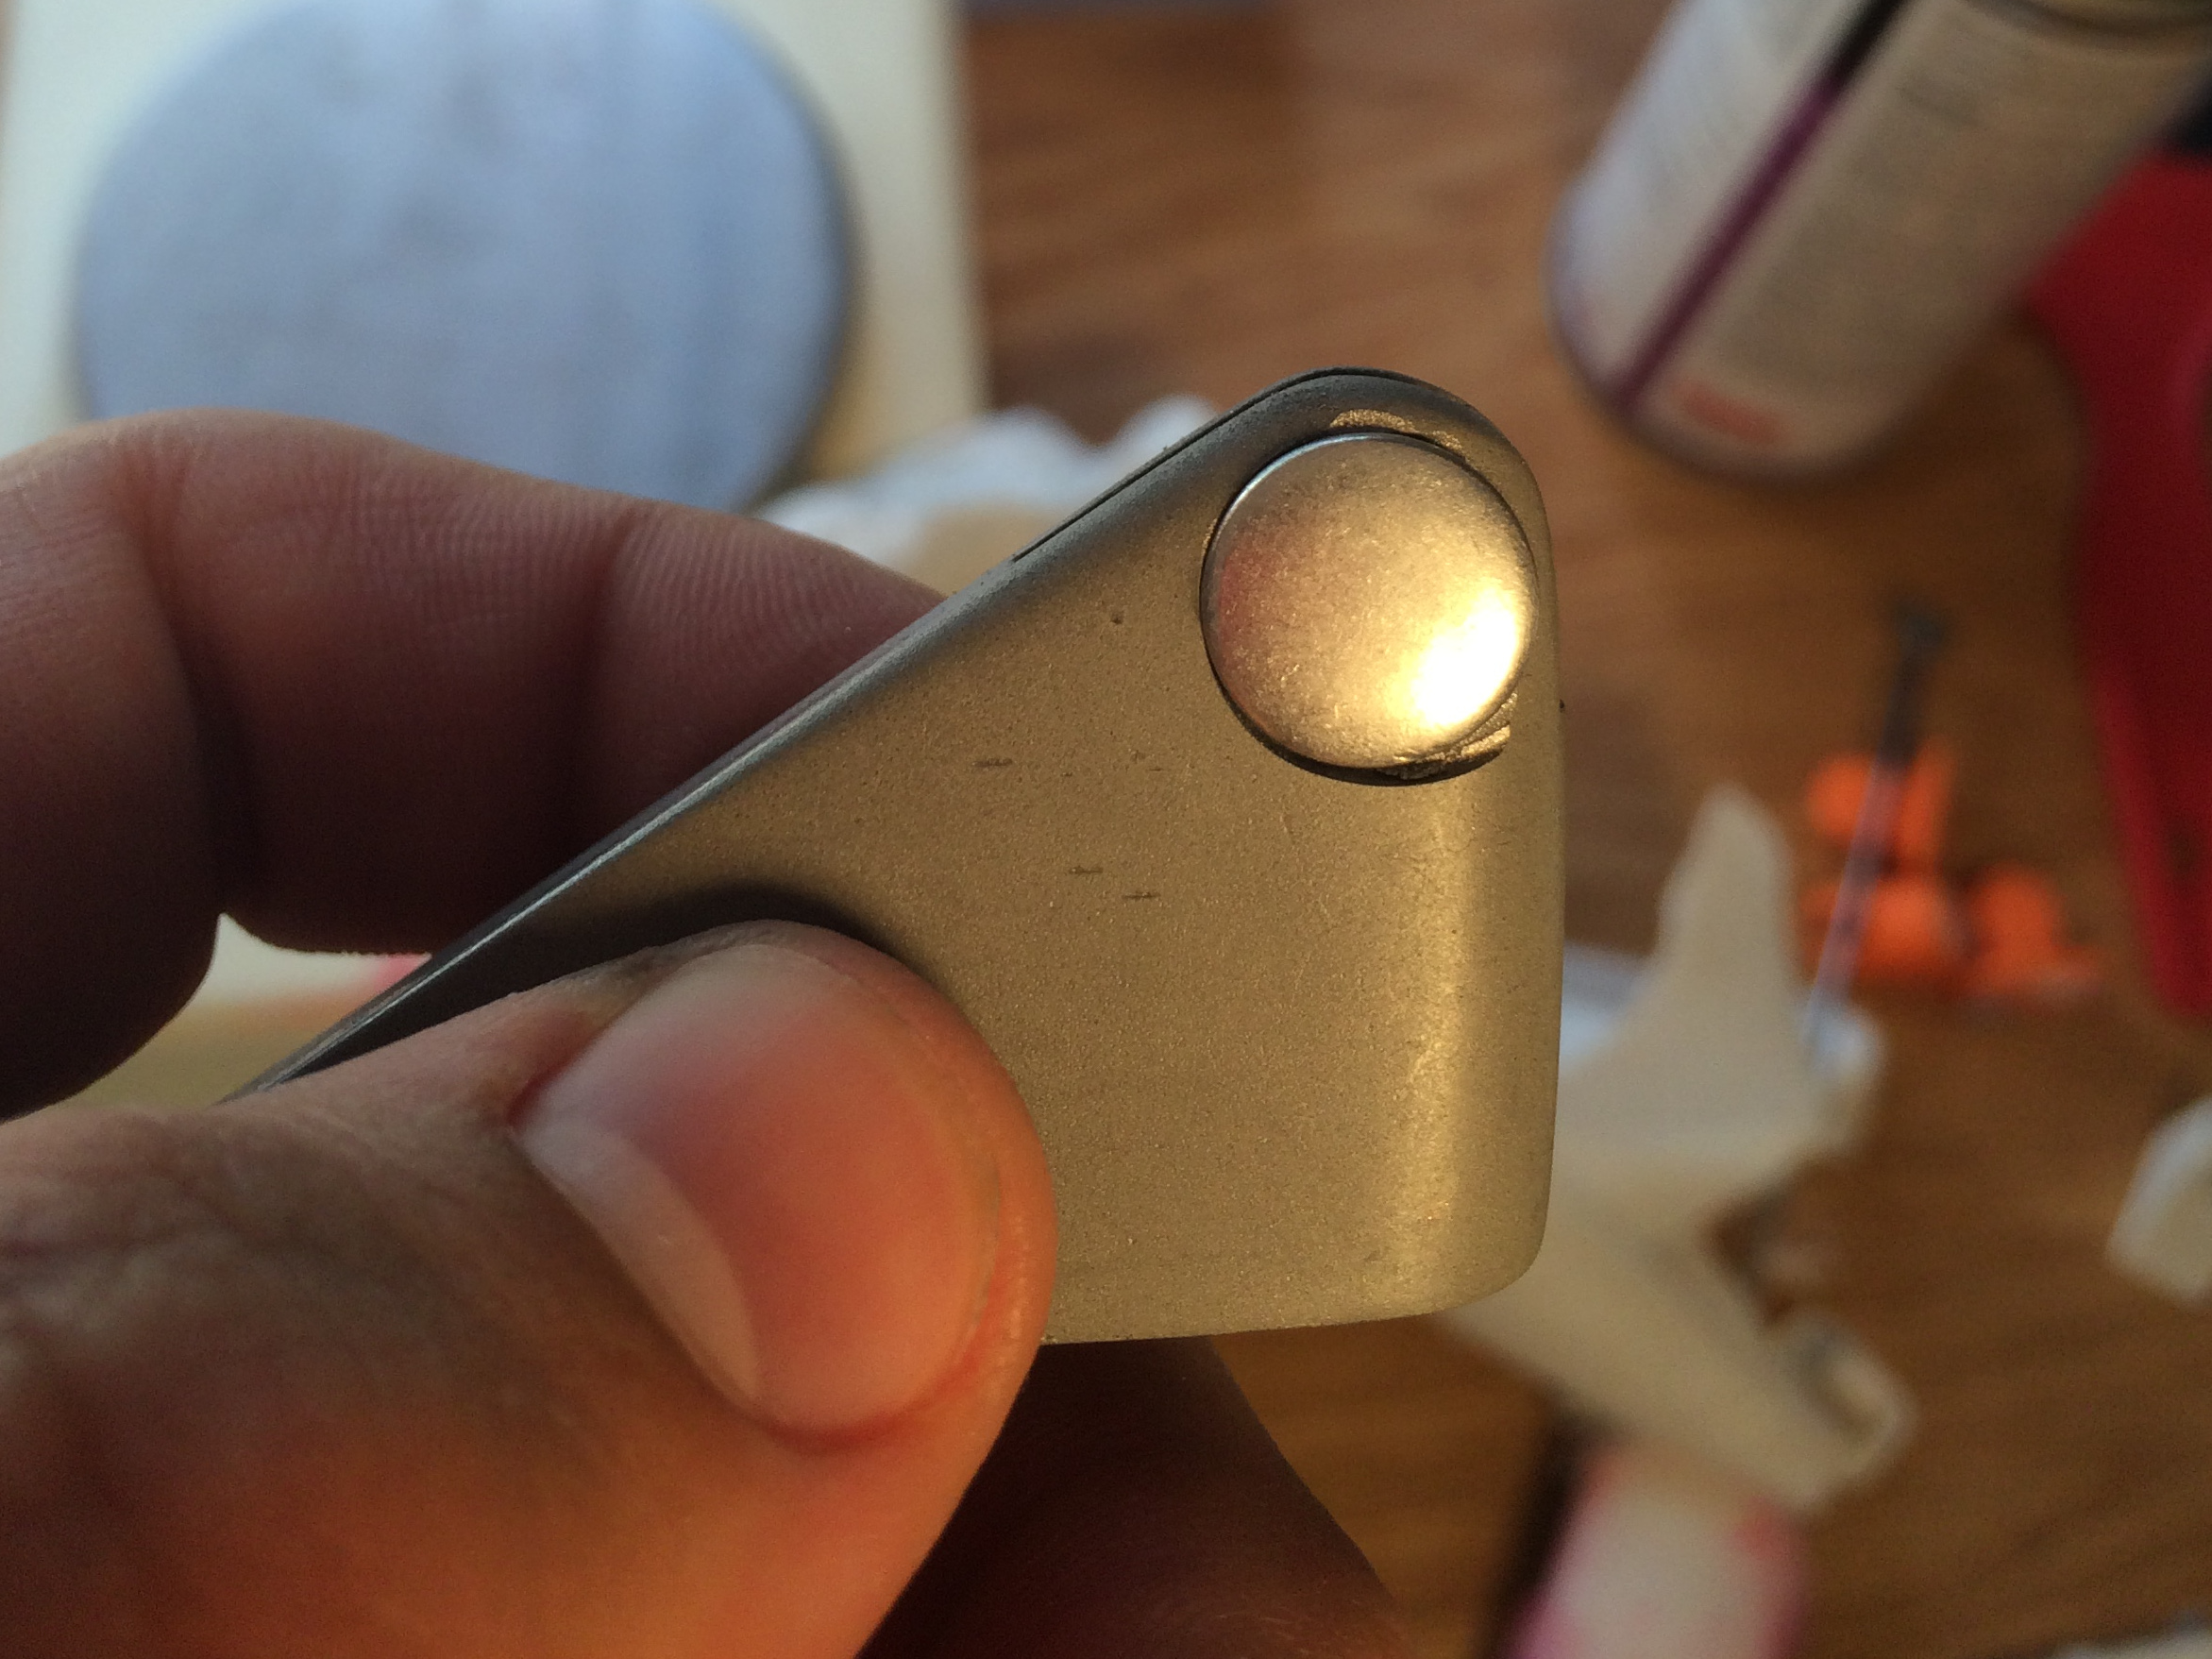
The part will come out of the mold with no shine at all. The resin tends to sit in front of the metal powder. Also the metallic particles are likely to have a small oxide layer over the surface, dulling them. The final step is to polish the part. For a satin finish, simply sand the part down to 400 or 800 grit with circular motions. A buffing wheel will work also. For this stage power tools are acceptable; thermoset plastics have a large working temperature range and can get quite hot before degrading.
To get a brushed look; a scotch-brite pad or steel wool stroked in the same direction over the surface of the part will provide the desired effect.
Of course, there are lots of other possibilities. For example, this video describes artificially aging a part to get a decorative rusting effect. It can also be used to imitate a bronze casting or age a piece of duplicated hardware to match the patina of an existing piece.
This is another useful technique to add to the resin casting skill book. There are lots of uses for this technique, from counterweights requiring precise geometry to fixing an antique radio. Many people use this to stunning effect for prop and jewelry making. Have any of you used this technique?


I wonder how casting something like pewter or other low melting point metal alloy would compare to this. I think it should be doable in a silicone mold. At least it could perhaps give a polishable result, but not sure if resin is still stronger.
Yes, you can cast pewter in a sicilone mold.
Organ Failure Funtime: Aluminum has been linked to Alzheimer’s. Too much iron can make you clinically depressed and lethargic in a very short time. Silver will turn you permanently blue. These metal powders are extremely fine and your body will have no trouble absorbing toxic levels into your blood through your stomach, lungs, and if you get really fine powder, skin. I highly recommend following good lab practice, even if you have to lie to your buddies about it at the bar later.
Uhh, wow. I am safety focused but the amount of misinformation and half truths and stereotypical male bravado here is alarming, even for HaD. Aluminum isn’t really linked with Alzheimer’s. Are you saying that you are going to inhale silver dust and it will turn you blue? If you drank colloidal silver long enough, sure. Skin absorption rates of metallic powders are suspect. Obviously, use PPE but be open and honest about this; not poorly researched, amateurish and sensationalist.
I may have interpreted what I’ve read incorrectly but it looks like inhalation of silver dust can cause argyria. source: http://annhyg.oxfordjournals.org/content/49/7/575.full
But the aluminum thing is bunk.
http://www.ncbi.nlm.nih.gov/pmc/articles/PMC2782734/
“Following oral exposure, aluminium distributes throughout the organism with accumulation in bone, kidneys and brain being of concern to humans with evidence of renal dysfunction, anemia or neurobehavioural alterations reported after excessive doses.”
” However, it should be noted that only at excessive concentrations of aluminium are toxic manifestations seen and, hence aluminium is considered to possess a “low” potential for producing adverse effects.”
“From animal studies and the clear association of aluminium exposure and DAE, it is clear that high levels of aluminium in CNS can lead to neurotoxicity.”
Humans do get Alzheimer-like symptoms from excessive aluminium intake over time, such as with people who eat antacids like they were candy.
From your linked meta-study:
“Some studies have reported that the aluminium concentration in the bulk brain samples, neurofibrillary tangles (NFT) and plaques was higher in AD subjects than controls. Other studies have found no difference. ”
“There are no published reports of physiologically based pharmacokinetic (PBPK) modelling of aluminium.”
“Experimental animal studies have failed to demonstrate carcinogenicity attributed solely to aluminium compounds. Often the response reported is associated with a tissue response to a foreign body rather than a direct effect of aluminium exposure. This appeared to be consistent across various routes of exposure from inhalation to intraperitoneal (i.p.) injection.”
“In agreement with their non-carcinogenic activity, aluminium compounds failed to show positive results in most short-term mutagenic assays and animal experiments to determine genotoxic potential of aluminium compounds lead to contradictory results with suggestions of an anti-genotoxic potential.”
“Several epidemiological studies have reported an increased risk of developing lung cancer or bladder cancer for workers in the aluminium industry, however, in all of these studies the risk has been attributed to the exposure to the PAHs generated during aluminium production rather than from exposure to aluminium compounds. Studies investigating the effects of occupational exposure to aluminium are limited by many methodological issues. Rarely is a worker exposed solely to aluminium containing compounds and exposure information is often not adequate to rule out other toxic substances as the cause of the observed effect. Small sample sizes, misclassification bias, selection of inappropriate comparison groups, and lack of information to control for confounding factors are common weaknesses in these occupational studies.”
“No reliable epidemiological studies exist to reach any conclusion on an association between occupational exposure to aluminium and fertility or developmental effects. No clear results have been obtained on gene-environment interactions.”
“Regular consumers of antacids represent a unique subpopulation with heavy exposure to aluminium. A significantly elevated odds ratio for AD for regular antacid consumers compared to non-regular users was found; however, when only aluminium containing acids were analyzed there was no significant association. Other studies have not found a significant association between antacid use and AD.”
“Evidence surrounding the relationship between aluminium in food and the risk of AD is very minimal. This may be a result of the difficulty in obtaining accurate exposure information in dietary studies.”
As usual, it’s complicated. Aluminum is the most abundant metal in Earth’s crust. Limit inhalation of any metallic dusts but metallic aluminum in general isn’t exactly high on any list of concerns.
The aluminium-causes-alzheimers myth was started by a study that showed a massive increase in aluminium salts in the brain of alzheimers sufferers compared to non-sufferers. The only problem was it turned out that they’d gotten all the alzheimers brains from a completely different source than the healthy brains, and the people who’d collected the alzheimers brains had preserved them in a solution containing aluminium salts. The people collecting the healthy brains didn’t.
So yay.
Do you have a link to this debunk please, that will come in most handy in discussion. Thanks
http://lmgtfy.com/?q=debunk+aluminium+causes+alzheimer%27s&l=1
“Most studies discuss cases of argyria and argyrosis that have resulted primarily from exposure to the soluble forms of silver. Besides argyria and argyrosis, exposure to soluble silver compounds may produce other toxic effects, including liver and kidney damage, irritation of the eyes, skin, respiratory, and intestinal tract, and changes in blood cells. Metallic silver appears to pose minimal risk to health.”
Soluble silver compounds are the item of concern.
Any particulate material that is inhaled will harm you, it will either biodegrade and feed bacteria or it will sit in the lungs causing chronic inflammation which leads to lung disease, or in some cases cancer. So yeah much of what you pointed out as nonsense is nonsense, but the take away message should be reinforced,
DON’T BREATH IN ANYTHING OTHER THAN PURE AIR.
http://www.nejm.org/doi/full/10.1056/NEJM200006153422405
Elemental Mercury Embolism to the Lung
Figure 1 A 21-year-old dental assistant attempted suicide by injecting 10 ml (135 g) of elemental mercury (quicksilver) intravenously. She presented to the emergency room with tachypnea, a dry cough, and bloody sputum. While breathing room air, she had a partial pressure of oxygen of 86 mm Hg. A chest radiograph showed that the mercury was distributed in the lungs in a vascular pattern that was more pronounced at the bases. The patient was discharged after one week, with improvement in her pulmonary symptoms. Oral chelation therapy with dimercaprol was given for nine months, until the patient stopped the treatment; the urinary mercury level did not change during this period. At follow-up at 10 months, she was healthy, with none of the renal, gastrointestinal, or neurologic effects that can result from the oxidation of mercury in the blood and consequent exposure of these organ systems. The abnormalities on the chest radiograph were still apparent. Although these abnormalities are striking, the absence of clinical toxicity in this patient illustrates the differences in the acute and chronic effects of exposure to elemental mercury, inorganic mercury (e.g., mercuric chloride), and organic mercury (e.g., dimethylmercury). Inorganic and organic mercury are much more toxic than elemental mercury; for example, a dose of 400 mg of mercury in the form of dimethylmercury is usually lethal.
Lucky it was a liquid, the body is so much better at dealing with liquids than particles and fibres.
The ban all uses of all forms of mercury and lead idiots are idiots.
Where can I get some of this pure air to “breath”?
Not from your bong, kido.
I wonder how the finished resin cast product compares to the metal infused plastics that are coming out now for 3d printing. After all your printing the master parts.
Ive got some copper, steel and brass infused pla sitting by the printer and they seem to print reasonably well but cant be used for anything except decorative 3d prints. They do have some weight to them but I havnt yet successfully polished them because Im printing very small objects and its very fiddly to polish.
I realise that if you want a lot of parts done casting would be more economical. But for very short runs 3d printing with the metal infused filament might be useful if the result is comparable.
Have you considered using a brass bullet tumbler with an appropriate media to polish?
I’m just wondering where I can get a bucket of high mesh aluminum powder that big that wont cost me an arm and a leg.
kidneys are also fairly valuable…
if you’re careful with it, it shouldn’t blow off any body parts ;)
Buy a ball mill, some alumina balls, a coffee grinder or blender and some rolls of aluminum foil. Do the obvious.
A pair of scissors & a rock tumbler will do a serviceable job for this purpose. Just be careful opening the tumbler jar after days of running. Let it cool 12h and be gentle so you don’t agitate any pyrophoric aluminum you may have generated.Most of it will be coarser, but no sense losing your eyebrows.
If you’re really invested in the project, an attrition mill will work a more efficiently.
Is there suppose to be a section on extracting the PLA from mold?
There probably should have been if the parts were more complex.
In this case the parts are tapered and should slide right out.
“ruin your chances of being the centerfold in your hackerspace’s sexy hacker fundraising calendar.”
Would take a LOT. Not saying I’m a 10, or even a 5, just saying a face melting accident might not hurt my chances all that much.
are the finished parts electrically conductive at all? It would be cool if they were. So many possibilities…
Check out this…
http://hackaday.com/2016/01/07/conductive-silicone-makes-flexible-circuits/
Looks like powders don’t work very well but conductive threads and fibers do.
There’s lots of good suggestions in the comments.
I worked at a lab were we printed circuits in powderbased 3DP-Parts. As the conductive Parts we used silverparticles mixed with epoxy. The problem with Aluminiumparticles is the always present non conductive oxidationlayer on its surface.
What are these hinges for?
Have you used deoderant practically your entire life? …then you are probably aluminium poisoned. Most of them contain Aluminium Chloride to stop you sweating. Do a hair test and ask for heavy metals testing. You will most probably be surprised of what the test shows you.
http://www.snopes.com/movies/films/ozebsen.asp “The aluminum dust used in Ebsen’s makeup had caused an allergic reaction or infection in his lungs that left him scarcely able to breathe, and he ended up spending two weeks in the hospital and another month recuperating”
Please could someone help me when I’ve dusted the mould in aluminium powder and then poured the vacuum resin into the mould and when it’s set I then with fine steel wool burnish to a shine the problem I have is that I lacquer but it then looses it shine any ideas please to a alternative to protect the burnished aluminium it works on bronze with clear Matt lacquer but not with aluminium
Thanks
First, I’m glad to see mention of dusting the mold before cold-casting. There was mention of the thicker concentrated sludge for painting into molds for larger pieces, but metal powder dusting is a great option for smaller, accent and decorative pieces as you can opt out of adding much powder to the resin fill (I add a significantly less portion of metal powder to the resin fill, but include at least a little to clear resin mixes to ensure there is some metallic shine inside in case the top layer gets polished off in places over time). Additionally, you can follow all of the steps in this article’s tutorial AND dust the mold. This will give you the weight and sound you are expecting from the cold cast piece, but provide a very concentrated metal surface for better finish when polishing. The only draw back is that you want to ensure you are using a low viscosity resin if you are working with fine detail, and the metal powder added to the resin will obviously increase viscosity before pouring into the dusted mold, so just keep that in mind. Also, dusting metal powder works better with softer molds as it tends to grip the powder more – but be sure to shake out any excess powder!
For the issue that your aluminum piece is facing – It could be that the lacquer is too thick? Or it could be that the lacquer is softening the resin, especially if applied before the piece has completely cured, as this will dull the finish and potentially prevent full curing from happening?
Also, I personally haven’t come across a satisfactory solution for layering or spray clear-coating on top of highly polished aluminum pieces, but I have had pretty good long term results from working in with polishing compounds (such as turtle wax) as it helps create a shiny compounded finish using the resin present amongst the aluminum. It is basically like burnishing the piece. As you are dusting the mold pre-cast, there will be less resin in the very top layer, but maybe try a compound polish on a test piece and see how it works?
can we cast with PLA, ABS and PETG.
What is the best way to polish brass cold casting small sculpture art relief