Turning A Pair Of Syringes Into A Tiny Water Pump

There is something inherently fascinating about tiny mechanical devices, especially when you’re used to seeing much larger versions. This is the case with [Penguin DIY]’s tiny centrifugal water pump built from 5 ml syringes.

The pump is powered by a small 8 mm diameter brushed DC motor, likely the same type that is used for small toy-grade quadcopters. The tiny impeller is a section of the syringe’s original plunger, with its cross-shaped body acting as the impeller blades. [Penguin DIY] first experimented with the original plunger seal to protect the motor from water, but it quickly melted from friction with the spinning shaft. Silicone sealant was used instead, and the motor shaft was covered with a layer of oil to prevent the sealant from sticking to it. Then the blob of sealant was flattened with a translucent plastic disc to allow clearance for the impeller.

A hole was drilled in the side of the syringe where the impeller sits, and a nozzle cut from the tip of another syringe was glued in place as the outlet. It’s notoriously difficult to get anything to stick to polypropylene syringes, but [Penguin DIY] says in the comments he was able to find an “organic superglue” that worked. With the motor and impeller inserted, the remaining space was also sealed with silicone.

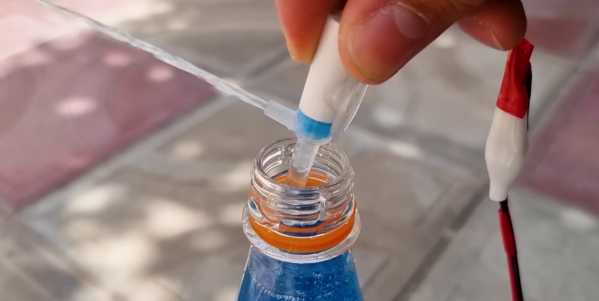
This tiny pump packs a surprising amount of power, and was able to empty a 1.5 l bottle in about one minute with enough pressure to send the jet of water flying. There are still some issues that need to be addressed, though. With the motor completely sealed, it could burn itself quite quickly. A commenter also mentioned that it might suck water into the motor past the shaft after a hot run, as the air inside the motor cools and contracts. Even so, this little pump might be practical for applications that only require short runs, like watering potted plants. If you need more power you could always 3D print a larger pump.

Continue reading “Turning A Pair Of Syringes Into A Tiny Water Pump”

DIY Mechanical Flux Dispenser Syringe Has Fine Control

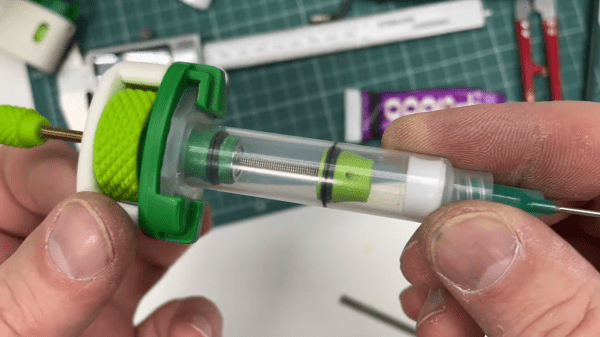
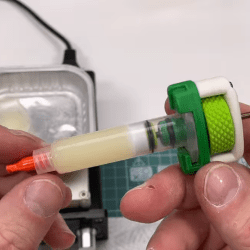
[Perinski]’s design for a mechanical flux dispenser uses some common hardware and a few 3D printed parts to create a syringe with fine control over just how much of the thick stuff gets deposited. The design is slick, and there’s a full parts list to accompany the printed pieces. [Perinski] even has some useful tips on how to most effectively get flux into 5 mL syringes without making a mess, which is a welcome bit of advice.

There is also a separate companion design for a magnetic syringe cap. Not only does it have an O-ring to keep things sealed and clean, but the tip of the cap has a magnet embedded into it, so that it can be stowed somewhere safe while the dispenser is in use, and doesn’t clutter the workspace.

This is all a very interesting departure from the design of most syringe dispensers for goopy materials, which tend to depend on some kind of pneumatic action. Even so, we’ve also seen that it’s possible to have a compact DIY pneumatic dispenser that doesn’t require a bulky compressor.

If you can’t quite figure out how the ergonomics of [Perinski]’s design are intended to work one-handed, you’re not alone. One holds the syringe in their hand, and turns the large dial in small increments with a thumb to control extrusion. [Perinski] demonstrates it close-up around the 4:50 mark, but if you have a few minutes it is worth watching the entire video, embedded below.

Continue reading “DIY Mechanical Flux Dispenser Syringe Has Fine Control”

Surplus Syringes Make Satisfactory Tuner For Amateur Radio Experimentation

Amateur Radio as a hobby has a long history of encouraging experimentation using whatever one might have on hand. When [Tom Essenpreis] wanted to use his 14 MHz antenna outside of its designed frequency range, he knew he’d need an impedance matching circuit. The most common type is an L-Match circuit which uses a variable capacitor and a variable inductor to adjust the usable frequency range (resonance) of an antenna. While inefficient in some specific configurations, they excel at bridging the gap between the 50 ohm impedance of the radio and the unknown impedance of an antenna.

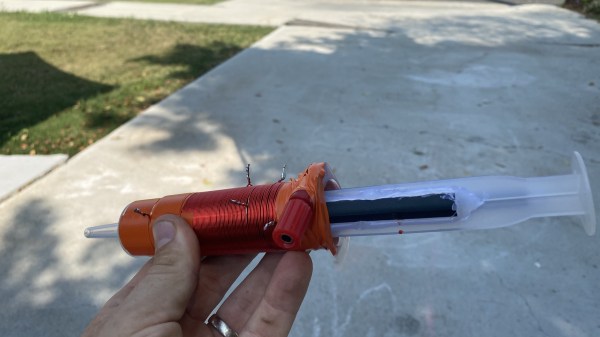
No doubt raiding his junk box for parts, [Tom] hacked together a variable capacitor and inductor using ferrite rods from AM radios, hot glue, magnet wire, copper tape, and some surplus 60ml syringes. You can see that he ground out the center of the plunger to make room for ferrite rods. Winding the outside of the syringe with magnet wire, the alignment of the ferrite can be adjusted via the plunger, changing the characteristics of the element to tune the circuit. [Tom] reports that he was able to make an on-air contact using his newly made tuner, and we’re sure he enjoyed putting his improvised equipment to use.

If Amateur Radio isn’t your thing, then maybe we can entice you with this syringe based rocket, syringe actuated 3D printed drill press, or vacuum syringe powered dragster. Have your own hack to share? By all means, submit it to the Tip Line!

3D Printing Food University Style

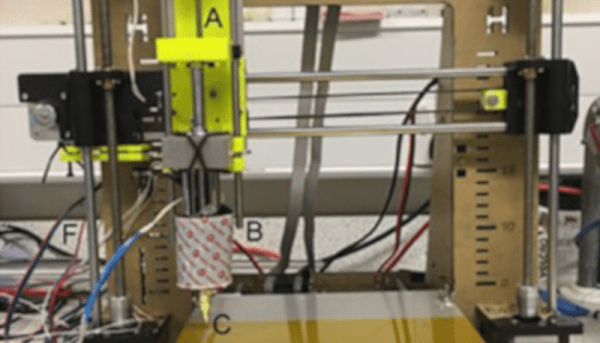
While refitting a 3D printer for food printing isn’t really a new idea, we liked the detailed summary that appeared from a team from the University of Birmingham which converted an i3 clone printer to use a syringe extruder.

The syringe in question was meant for veterinarian use and is made of metal. The paper suggests that the metal is a better thermal conductor, but it was’t clear to us if they included a heating element for the syringe. In the pictures, though, it does appear to have some insulation around it. In any case, we imagine a metal syringe is easier to keep clean, which is important if you are depositing something edible.

Continue reading “3D Printing Food University Style”

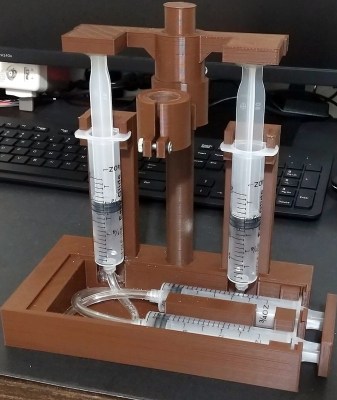
Syringes Put The Squeeze On This Mini Drill Press

If you’re making your own PCBs for through-hole projects at home, getting the board etched is only half the battle; you’ve still got to drill all those little holes. It’s a tedious process, and if you’ve got a lot of them, doing them freehand with a drill just isn’t going to cut it. Which is why [Ruchir Chauhan] built this tiny 3D printed drill press.

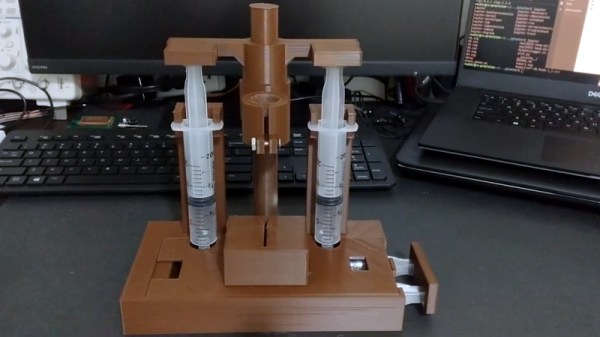
This design is actually interesting for a number of reasons. The fact that it’s primarily 3D printed is a big one, though of course it’s not the first time we’ve seen that. We also like the minimal part count and low-cost, which is sure to appeal to those looking to produce PCBs on a budget. But the most impressive feature has to the hydraulic system [Ruchir] has come up with to actually do the drilling.

Rather than pulling an arm to lower the bit towards the work piece, a system utilizing four syringes, some water, and a bit of tubing is used to pull the tool down. This might seem extravagant, but if you’ve got a lot of holes to drill, this design is really going to save your arms. This method should also give you more consistent and accurate results, as you won’t be putting any torque on the structure as you would with a manually operated press.

[Ruchir] doesn’t offer much in the way of instructions on the project’s Hackaday.io page, but once you print out all of the provided STLs and get your syringes ready to go, the rest should be fairly self explanatory. Personally we might have added a smooth steel rod in there to make sure the movement is nice and straight, but we can see the appeal of doing it with a printed part to keep things cheap.

Looking for more ideas? If you’re after something a bit larger we might suggest this one made from PVC pipes, and this 3D printed desktop press would look good on anyone’s bench. Just don’t blame us if your arms get tired.

Continue reading “Syringes Put The Squeeze On This Mini Drill Press”

Death To All Coca Cola Cans With This Miniature Arduino Powered Cannon

[MJKZZ] sends in this entertaining little tutorial on building a small automated cannon out of a syringe.

He starts the build off by modifying an arc lighter, the fancy kind one might use to light a fire on a windy day, so that it can be controlled by a micro-controller. The arc is moved to the needle end of the syringe with a careful application of wires and hot glue. When the syringe is filled with a bit of alcohol and the original plunger is pressed back in a small spark will send it flying back out in a very satisfying fashion.

Of course it wouldn’t be a proper hack without an Arduino added on for no reason other than the joy of doing so. [MKJZZ] adds an ultrasonic sensor into the mix which, when triggered appropriately by an invading object fires the arc lighter using a reed relay.

He demonstrates the build by eliminating an intruding coke can on his work bench. You can see it in the video after the break. All in all a very fun hack.

Continue reading “Death To All Coca Cola Cans With This Miniature Arduino Powered Cannon”

Syringes Become Rockets In This Flying Build

Syringes have all kinds of useful applications in the workshop, from injecting fluids to helping pick up tiny components. There’s always room for a bit of levity however, and [Tom Stanton] decided to have a play with some syringe rocket builds.

The basic idea involves blocking the end of a syringe, and then pull the plunger to create a vacuum in the tube. When released, the plunger will rush forward from the atmospheric pressure counteracting the vacuum, hitting the end of the tube and launching the syringe forward.

[Tom]’s initial attempts with small syringes were fun, but larger builds struggled with breakages, sealing issues, and excessive weight. Some more luck was had with a vacuum cannon build, which was able to launch a projectile to a decent height, albeit without a lot of stability. [Tom] wrapped things up by designing a small 3D printed launcher that fits 10mm syringes and lets you shoot them around the workshop with abandon.

It’s fun to see the concept explored in detail, with [Tom] doing a great job of explaining the basic physics behind the phenomenon. If you’re hungry for more, consider using syringes as basic hydraulic actuators for model builds. Video after the break.

Continue reading “Syringes Become Rockets In This Flying Build”