The personal computers in science fiction books, movies, and games are way cooler than the dinky pieces of hardware we’re stuck with in the real world. Granted the modern laptop has a bit more style than the beige boxes of yesteryear, but they still aren’t half as l33t as the custom PowerBooks in Hackers. Luckily for those who dream of jacking into the Matrix, the average hacker now has access to the technology required to make a custom computer to whatever fanciful specifications they wish.
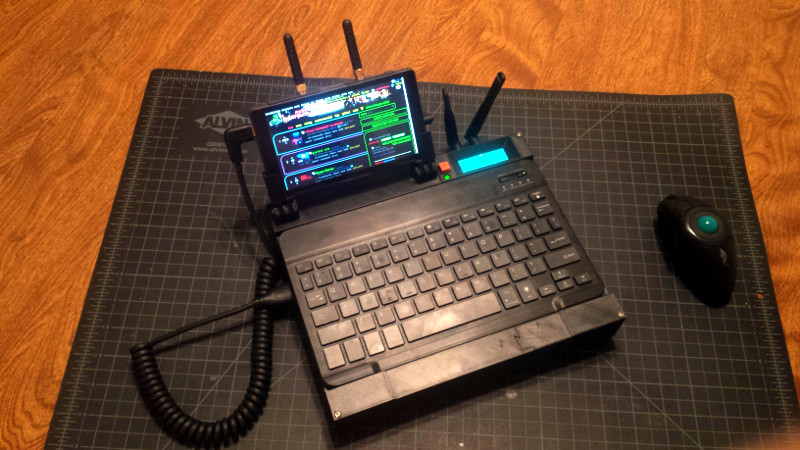
 A perfect example is this “cyberdeck” created by [Tinfoil_Haberdashery]. Inspired by William Gibson’s Neuromancer, this wild-looking machine is more than just a cosplay prop or conversation piece. It packs in enough power to be a daily-driver computer, as well as some special features which make it well suited for field work.
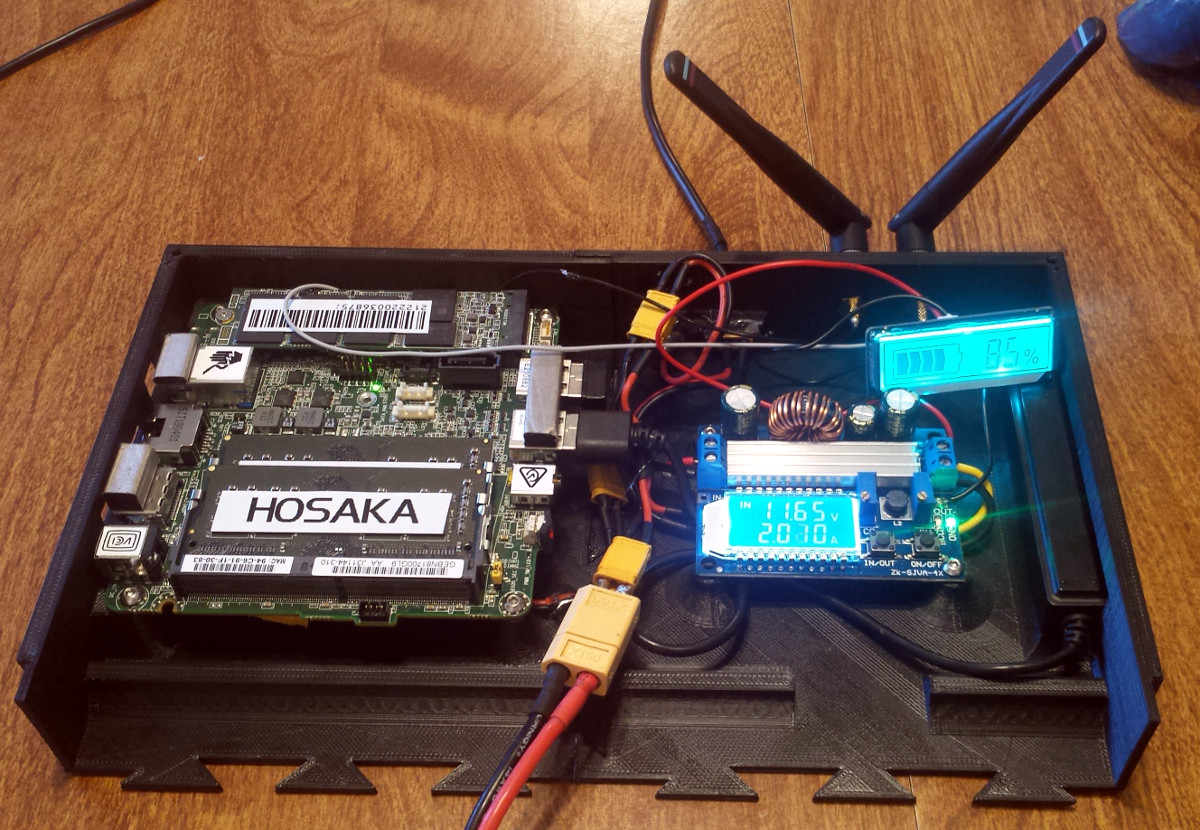
The body of the cyberdeck is 3D printed, but as [Tinfoil_Haberdashery] doesn’t have a 3D printer big enough to do the whole thing in one piece he had to break it up into subsections. He added a dovetail pattern to the edges of each piece, which makes for much stronger joint than simply gluing it together. A worthwhile tip if you ever find yourself in need of printing something really big.
Raspberry Pi aficionados might be disappointed to see the Intel NUC motherboard inside; which features a 3.4 Ghz dual-core CPU, 8 GB of RAM, and a roomy 500 GB SSD in an incredibly small package. To keep everything running the machine can take up to twelve 18650 cells, giving it a maximum run-time of sixteen hours or so. There’s even a 12 V power jack so he can power a soldering iron and other low voltage gadgets off of the deck’s batteries in a pinch. The integrated charger can take anywhere from 6 to 30 V, which gives [Tinfoil_Haberdashery] the ability to charge up from a wide array of sources.
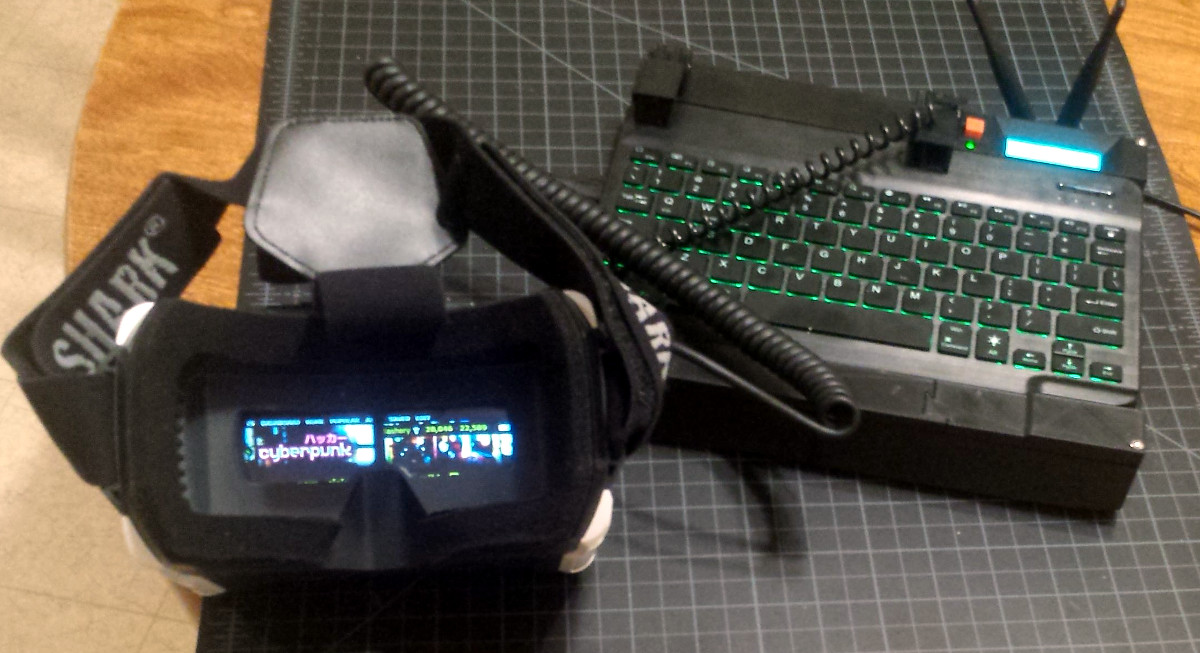 But perhaps the best feature of the cyberdeck is the display. It uses a Fat Shark Transformer, a five inch 720p display designed for FPV drone use, which can not only fold flat against the deck for storage, but can be removed and slipped into a pair of goggles. This gives the cyberdeck a head mounted display that looks like something straight out of the movies. It even supports 3D, if you’re willing to cut the resolution in half.
Things have come a long way in the world of DIY head mounted computer displays. Really makes you wonder what the dedicated hacker is going to be able to pull off in another 10 years or so.
[via /r/cyberpunk]


Ooh, this is cool. Similar form factor to my DIY laptop builds… but better. Kudos for including a battery — I have not, in mine — it’s easier to work out how to live without, than to figure out how to wire up one properly, IMO…
The battery is surprisingly easy. You just need a constant-current, constant-voltage buck/boost controller and a BMS to balance the cells. If you had a less variable input you might not need the CC/CV controller.
Which specific charge controller / converter are you using? Are the cells balanced? Or are you physically taking them out and swapping them with fresh ones from an 18650 charger?
I also like the little neon blue charge indicator that’s visible from the exterior next to the screen. Nice build, i think you’ve convinced me to get myself a NUC!
Rather than a dovetail setup, a lap joint would be easier to design and glue, and there would be more surface area for the glue to set. If you’re printing in ABS or other suitable plastic, it can be solvent-melted together to form a seamless joint.
An alternative is to weld the parts together. Print the edges of the pieces with a half-V and butt them together on a flat heatproof surface – then take a strand of your filament and stick it in a cheap dremel clone and push the spinning filament into the groove between the parts. The friction melts the plastic and mixes the polymer strands across the joint to form a permanent weld.
https://www.youtube.com/watch?v=Cj9TMmUldhc
Designing the part with a V gap for the weld allows for complete penetration through the sheet, unlike in the video where the melted material reaches only half-way through.
Would an ultrasonic welder work in this scenario?
The question is, do you have one?
I do.
I agree about the v-gap, but I prefer hot air plastic welding with an SMD hot air pencil and 3D printer filament (see the many online videos about hot air plastic welding.) It works great and creates nicer joins than friction welding. If the part wasn’t printed with a v-gap, you can make one with a Dremel.
The question is, do you have a hot air station?
Friction welding is a nice solution because people have rotary tools, while hot air stations of ultrasonic welders are much more rare.
The solvent melting method is a good second because you can easily get solvents at a hardware store. The reason why it isn’t the best is because the solvent changes the composition of the plastic and makes it harder and more brittle, and it fills gaps poorly, and leaves bubbles and voids. The solvent has to be applied thinly to avoid that, but then you don’t get thorough mixing and the polymer strands only mix over a microscopic distance, so the joint isn’t very strong.
But then again, if you’ve made a lap joint, you can have as much surface area as you wish, and you can twist and pull the joint as much as you want and the plastic itself will give before the solute joint.
I do. I don’t however have a (working) rotary tool unless you count lathes.
My Chinese clone Hot-Air station cost less than my Chinese clone Rotary tool.
spinning filament! my mind is blown
The issue is that the underside of the overhanging half of the lap joint would be pretty rough, even with supports. The dimensional accuracy would be reduced and it would be harder to get a good bond. I used lap joints on all the sidewalls, but decided not to for the bottom.
Frankly, it’s nice to see a project that has something other than a Raspberry Pi in it. I have a similar Intel NUC mainboard setup in one of those aluminum cases you can buy of AliExpress for dirt cheap and it’s handy as hell.
Hasn’t the Intel NUC been discontinued?
Nope, it keeps being updated with newer CPUs. Maybe you were thinking of the Edison?
I suspect what makes the cybercomputers cool isn’t so much the hardware, as it’s the software.
Nope. It’s the gloves.
https://youtu.be/fQGbXmkSArs
Nice work. I would buy this.