There’s nothing like a true hack, where something useful is concocted from bits of scrap and bargain store finds. Builds like these are much more than the sum of their parts, especially when they result in a useful tool, like this DIY vacuum chamber that’s good for all sorts of jobs.
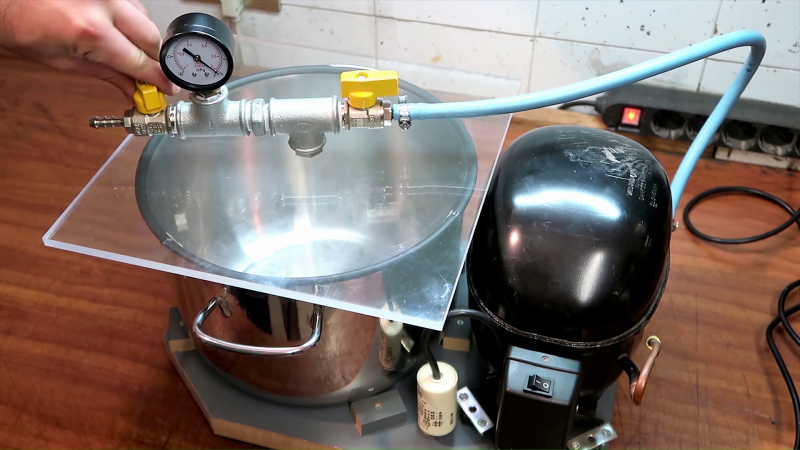
Everything [Black Beard Projects] used to accomplish this build is readily available almost everywhere in the world, although we have to note that appliance recycling efforts and refrigerant recovery programs have made it somewhat harder to lay hands on things like the old fridge compressor used here. The big steel cooking pot is an easy thrift store find, though, and while [Black Beard] used high-quality stainless fittings and valves to plumb the chamber, pretty much any cheap fittings will do.
The one sketchy area of the build is the plexiglass sheet used for the chamber top, which seems a little on the thin side to us. You can see it flexing in the video below as vacuum is pulled; it survived, but we can see it failing catastrophically at some point. We stand ready to be reassured in the comments. Still, it’s a tidy build with a few nice details, like wiring a switch into the old start capacitor box and using car door edge protector as a gasket on the chamber.
Fridge compressor hacks are standard fare, of course, being used to make everything from air compressors to two-stroke engines. Sometimes they’re even used to keep things cool too.


A popular low cost option is to convert a cheap pressure cooker.
https://www.youtube.com/watch?v=-pYZrIgnLS0
No reassurances here. It looks too thin given the surface area.
I’m not familiar with the strength of the material, but the way it bends would make me do a step backwards. But it seems to work. Wonder how it would perform on a really could day, when the material is slightly more brittle.
Anyway, fun project. My initial thoughts where, when he the copper tube was cut, where did the debris/sawdust go. I’m sure some of it went into the inlet, but then I though, ahhh… how do they do this in the factory and then I realized that there must be some sort of filter already present in the compressor, which would make sense…
Ac tech here, nope-no filter inside of that hermetic compressor. The suction line (which is what he is using) goes into the case of the compressor where the motor windings are. In practice this is to allow the windings to be cooled by the returning refrigerant and to prevent and liquid from entering the compression chamber by heating to a gas.
In an air conditioning system the filter (liquid line filter dryer) is placed at the outlet of the compressor. This is because the most sensitive piece of equipment in the system is the metering device, either a txv or a very small hole or tube that the high pressure liquid refrigerant is forced thru to change its state to a low pressure fog.
I should mention that there are suction line filter driers, but they are usually only installed when a compressor has burned out (winding insulation disintegrated due to acid/temp).
I would recommend a filter for this, they’re pretty cheap.
https://www.amazon.com/dp/B007EXFC2W
Just put it in the middle of the hose. A recycled one would also work as you’re not after the dessicant, just the filter aspect.
thanks for the info
Much appreciated, Mbc.
If it’s lexan (polycarbonate) it’s fine, acrylic would be a disaster IMHO, but polycarbonate is bendy but strong as hell and well up to the task I would say.
Acrylic has that annoying fracture-and-break feature.
Now in the video comment he states: “Specific high strenght polycarbonate 10mm (better use thicker like 20mm for regular polycarbonate or plexiglass)”
So he went with lexan, and the plexiglas is an alternative and should be thicker when used.
Note that lexan/polycarbonate is pretty expensive compared to acrylic and will make this project at least twice as expensive in my area, but I don’t know how that is globally.
He said polycarbonate, so, as stated by others, failure is likely to involve less shrapnel than acrylic. I am, unfortunately, handicapped by actual experience with pressure and vacuum vessel design and requirements. I would not want to be in the same room as this under vacuum, but the thickness of the poly is only a part of it. The penetration with the stress risers (threads) and no reinforcement is a much bigger issue. Thickness-wise, it probably is OK as long as there are no flaws and it doesn’t undergo any shock.
I’ll leave it here for all of the internet experts to jump all over this like the last few times I have voiced concern. Remember, EVERY rule in the code (ASME, or equivalent in the EU or other regions) is there because someone died. I’ll just note that rather than put in calculations and code references, as the first time I put all that in, it just pissed people off.
(I should add that a big part of the concern is due to the unconstrained edges and asymmetry of the sheet. If the sheet was round and the boundary was clamped/sandwitched with gaskets, this would be a MUCH less disturbing setup, though the threads through the material with no reinforcement around the hole, and the out-of-balance due to the gauge, hose, and valves are still a big concern)
More flex than I’d be comfortable with, but it also depends on the material – Which I do not see specified anywhere. Acrylic would be far more concerning than Polycarbonate.
Videos have an expandable description (on PC’s at least) and it says he uses high-strength polycarbonate.
Please… just get a pressure cooker!
uh oh… better be careful there… might wind up on a homeland security terrorist ‘watch list’ ……
I think the issue here is that a clear lid is wanted. If you are degassing PDMS or epoxy or whatever, it’s nice to see what is going on.
If there’s any reassurance to be offered about the plastic, it’s that it’s probably polycarbonate and will fail relatively gently. If it were acrylic, which fails very violently in situations like this, it almost certainly would have broken already.
Also, that compressor is probably not in great shape after the bit with the water. Once the water starts boiling under low pressure, it quickly washes out the remaining air, meaning the pump is pulling nearly 100% water vapor. During compression, some of that vapor condenses back to a liquid, and mixes right into the pump’s lubricating oil.
Systems that pump out volatile liquids normally have a gas ballast valve right upstream of the pump, which is basically a controlled leak used to admit enough air to the pump inlet to keep things from condensing into the pump oil.
I have a hunch the water was just degassing and not boiling. I’m no vacuumologist though.
Huh? I don’t think it’s carbonated water.
https://www.engineeringtoolbox.com/water-evacuation-pressure-temperature-d_1686.html
According to this, above around 700 mm Hg gets the boiling point into the territory you might see in a garage in summer. That’s 27.5 king-thumbs Hg like the gauge he’s using. So you’d probably see the beginnings of a boil.
it doesnt have to be carbonated, there’s dissolved air in the water and chlorine in tap water. its how fish breathe dontchaknow.
Personally I’m convinced he made this whole thing just to have a youtube with views and the thing is already at the curb ready to be picked up by waste disposal by now.
I wonder if he retrieved that switch and cable before he tossed it though.
He put a hole in his workbench. Why not just drill with the plastic in the vise?
He didn’t need a hole in the vise..
thats what workbenches are for but… yeah. mines chock full of holes but its not that pretty either.
Gotta have some backing so the bit doesn’t blow out the other side. That’s what scrapwood is for, though. Like that hunk of junk he made the base of the vacuum pump out of.
Like others have mentioned the lid is two think. Should be probably about 3/4” thick. Also putting fitting in it just weakens it even more. Cut a hole in the side of the pot and weld or epoxy in a bulkhead fitting. At this level of vacuum you could even use cheap PVC bulkhead fittings that can be screwed in place.
Scientific American ameteur scientist had an article once about putting two fridge compressors in series to get better vacuum. But you would probably be ahead of the game by just going to harbor freight and picking up a vacuum pump there. It will perform better and last longer than a fridge pump. Fridge compressors are expecting oil to be circulating through the system or they die an early death.
First let me say “I’m not recommending to do this in any way, just saying it does work and quite well even!”
I’ve worked in the refrigeration industry 34 years now and I have 2 old and I mean 1970’s very small freezer compressors (about 5lbs each) that I’ve used as evacuation unit’s with about 2 oz’s of the oil that was in each unit when they were removed from service. These units work as good now as they did when I started using each in the late 1980’s. These work much better than standard evacuation pump’s and you can use them with just a little oil in them and as a open system without them blowing the oil all out. Just do not put to much oil in the intake line and fill the compressor when it is NOT RUNNING! Also I’ve never had to add any oil to these units since the late 1980’s and mine have the compressor oil they were running on as a closed system back then. The compressor will spit any excess oil out if it has to much in the unit just leave for about and hour if it has a little to much oil in the compressor still. I’d suggest putting a small rubber hose on the output side and run the opposite end into like a 2L plastic bottle etc. until it stops if any oil is coming out. I was taught about this by a old timer that had been in the business since refrigeration systems started in the business sector in the early 1950’s in the USA.
The best unit’s to use are out of a small 3cu.ft.refrigerator liked you would find in a collage dorm room. Mainly because these are small compressors and light weight. I mounted mine to a small aluminum plate and put some rubber feet on the plate, they work like a champ. One big note though they will draw down a neg. vacuum in a system very quickly and if left on a long period of time can create to much of a negative vacuum for just testing or evacuation a system. I also installed relief adj. valves and a negative pressure gauge on each of my units. The other benefit is you can hardly hear them running. Also note I’ve also used one years ago with a small inline water filter on the output side of the compressor and hooked up a airbrush for painting. These units I’ve run for up to 5 hours non-stop and I’ve never had them heat up where you could not touch them. The smaller units to me work best though. I just thought I’d through in some hands on experience, for what ever it’s worth now days. Everyone Loves to read about things but never have hands on experience much any more with things. Take Care…
I would use vacuum diaphragm pump for that app. No worries about vapors eating piston and quick evacuation time for fast setting resins. For silicones it should be fine, with dry season.
The high altitude test chamber at the place I used to work at had a clear plastic door about an inch thick. The chamber was about twice the size of the one pictured though. When you are not selling things you have a different sense of liability I guess.
No pro, here, w only 1 refridge syatem under my belt, from design to coil-fab and build/fill… But I have worked w NASA evel chambers. As I understand it, a high altitude chamber is… relative. With 14.7 psi (old school, here,) and maybe 5 (psi).at commercial.jet 20,000 feet, high altirude is veey relative. But with 10 psi difference, one might envision stacking 1″ square steel rods atop the lid, long enough to each be 10 lbs. You mention a 1″ thick door. Big as a piece of electronics gear? Big enough to crawl through? 32×80″? Bring extra diapers, cuz it’s all relative, (because it cannot be absolute ????,) and cuz it all Depenz. A metal lid could be drilled and tapped and a mere 3×4″ window installed, atop. I would not mind an inner ring under the lid to keep the pot round. Could be vid monitored from “afar.” Smaller tapped hole helps a wee bit. But, just kibbitzing. Carry on! And by golly, post numbers and formulae if so inclined. There’s a naysayer and crab for every pot. Some if us will eat it up… some won’t stomach it. Meh…
Ahh, oops, you did specify size. My bad.
And if the volume was double, each dimension might be 30-50% larger, so twice the thickness seems about right. Black Beard may have it spot-on… He may have actually phoned someone or looked up others to get into the ballpark…!!! Kibbitzing is one thing. Judging, over my pay grade. There is i sufficient data, for me anyway… a non-pro.
The plastic cover is marginal, but probably OK if polycarbonate. The bowl is totally too thin, and will collapse if used too many times. As others have mentioned a pressure cooker is a much better option. For the vac pump Harbor Freight’s cheapest power vac pump is USD$90, so easy to see why the fridge compressor is an attractive alternative. It won’t hold up to everyday use but for a few times a year it will probably last several years.
Paint pots are cheap at HF…
I have seen people use pressure cookers, they seem to work well but you can’t see what is gong on. If you don’t wanna invest in a pressure cooker I would try sheet HDPE, but I am not sure if it comes in clear. HDPE will not shatter if it is shocked. I had the lift charge in a 3″ “salami” style salute fireworks shell fail to go, and with that type of shell, the burst charge is not dependent on the lift. It was in a HDPE mortar tube and the tube ballooned and blew off the 3/4″ plywood and deck screws going over the top and bottom of the tubes in the rack, but the tube itself only ballooned and ripped. No shards came off of it. The other thing is if you are only going to do this once in a rare while, assuming you live away from other people, you can set it up outside with a long extension cord and turn int on and off from a safe distance. For some people this is pretty common practice with ball mills, depending on what they are milling.
The bigger the chamber, the more strength you need in all the materials
For degassing resins, an alternative is to use as small volume as you can. Myself I’ve been planning to use teflon-coated baking pots, which have just a few deciliters of volume. They should stand up to the pressure better and the lid doesn’t need to be very thick either. So instead of putting a small plastic cup into a big pot, just use a sturdier cup in the first place and put a removable lid on it.
safer if the playcarbonate sheet is left undrilled and the pot is tapped instead…
I was thinking the same thing.
Personally I’ve done one with a 30 bucks glass pot from walmart (with a hole already drilled on the side for a tap, so I can put my hose there) and a ceramic floor tile as a cover. Holds up vacuum fine so far.
Interesting…this looks exactly like the setup described in “Experimental Composite Propellant” 18 years ago, except that the author used a top 1″ thick, and a stainless-steel mixing bowl was used as the vacuum chamber.
http://www.compositepropellantbook.com/