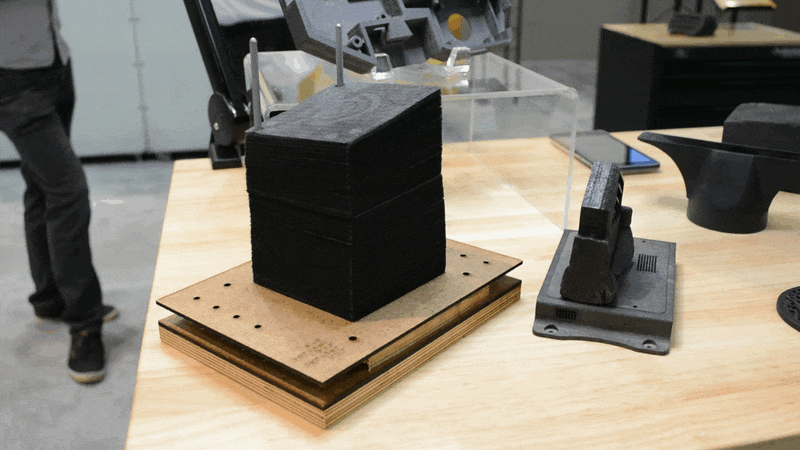
We’ve seen FDM printers lay down layers by extruding plastic in a line. We’ve seen printers use sintering and lithography to melt or cure one layer at a time before more print medium moves into place for the next layer. What we’ve never seen before is a printer like this that builds parts from distinct layers of substrate.
At the International Manufacturing Technology Show last week I spoke with Eric of Impossible Objects. The company is using a “sheet lamination process” that first prints each layer on carbon fiber or fiberglass, then uses a hydraulic press and an oven to bake the part into existence before bead-blasting the excess substrate away. Check out my interview with Eric and join me below for more pictures and details.
It’s incredible to see a process that prints the layers individually, using holes to align all of the layers on rods before fusing them together. I’m told the accuracy and resolution is quite good but don’t have a metric to back that up. The accuracy is best running parallel to the layers, so wide flat parts will yield consistent results. Very tall parts that require many layers will eventually see variations in accuracy.
Update: We made an inquiry with Impossible Objects about the accuracy and layer height limits of this process and received the following explanation:
The process does not recommend a layer limit. The Z height is currently limited to the size of the heated press we can find. We could theoretically have a much higher Z, but it would A) need to be large enough to fit the loose stack of sheets, and B) provide enough energy to still melt the thermoplastic powder at the center of the part.
When the Z height of the geometry is entered into the press, the press will stop at the desired height. We factor in any expansion / shrink, and it adjusts accordingly. But the long answer to the short question is that the accuracy still falls within the 50-200 micron range.


The substrate used in this process is quite thin and wispy. The printer itself moves the substrate through a process that uses inkjet printing to deposit a binder. Powdered thermoplastic is then applied where it sticks to the binder and the excess is reclaimed. The layers are automatically stacked in order at the end of the machine.


The second half of the process compresses the layers in a press, and bakes them to melt the thermoplastic into a solid. Bead blasting is then used to remove the excess substrate. Depending on your application, the part is now ready to used, or can be further processed through machining, adding threaded inserts, or other processes common to working with composites.


There’s a range of materials available for use with this technique. They depend on what substrate and thermoplastic is chosen. One of the more interesting examples they had on hand is made of carbon fiber reinforced polyether ether ketone (PEEK). This material has excellent heat resistance, and feels like metal when held in your hand. This particular demo is a jig for holding PCBs during wave soldering.


What you end up with are composite parts that have very different properties from those printed in powder or resin processes. These parts are reinforced by the fibers of the substrate and will certainly find eager customers in the manufacturing industry for applications that aren’t being met by other additive technologies.
If you loved this, make sure you also check out the direct metal printing equipment we saw at IMTS.


” What we’ve never seen before is a printer like this that builds parts from distinct layers of substrate.”
http://www.mcortechnologies.com/
Or even more meta – https://hackaday.com/2008/11/06/3d-printer-uses-office-paper/
Their printers are pretty pricey, but quite fun to watch in person.
VolksWagen has been using layer “printing” from sheet metal to build engine prototypes for years. Unfortunately, despite this they haven’t been able to build an approvable AND reliable engine without cheating for years, as well.
This sounds like LOM: https://en.wikipedia.org/wiki/Laminated_object_manufacturing
There was also a (semi) commercial process called “POM” which used sticker paper and a plotter, aimed at schools, I think, and called POM. (Possibly distributed by Denford).
In fact, back in 2004 I made my first 3D printed parts by modifying a Roland plotter to use a drag-knife to print out layers in A4 sticker paper. I probably still have the Matlab code that turned STL into Roland plotter code somewhere.
Assembly was manual and exceptionally tedious, but here is the final part after super-glue consolidation.
https://photos.app.goo.gl/uJGNjr9wgDk7BPKh9
I then used it to have functional parts cast in brass and the pannier hangers have been holding my luggage to my motorcycle ever since.
Looks like it would have been easier to whittle the mould… but kudos for the lateral thinking re. the plotter.
I used a Cameo Silhouette craft cutter – a Roland is pretty spendy for me. In each layer, always in the same place(s), I also cut a round hole or two. Then assembly is made ten times easier by building the thing up on a pair of pegs sticking through the alignment holes. Soda straws cut to length work since you can just slide a razor blade over the top layer when you’re done and shave them off smoothly.
I got the Roland from eBay (back when it was an auction site…). And yes, I used a pair of pegs and had the plotter cut alignment holes.
How do they remove CF from closed spaces, with powder, it need 1-2 small holes.How to fit sandblast nozzle inside?
A lot CF goes away, it will impact part cost.
Hot pressing will make love to any registration, that’s way they state accuracy in international BS units: “very good”
Just because it’s a printed part doesn’t mean it can print arbitrary parts. FDM and sintering printers have their own classes of parts they’re incapable of printing well.
Besides, I doubt you’d *want* hollow parts for most of the things this would be used for.
As for material wastage, it’s no different than any other machining process.
I doubt they can do enclosed spaces in this process. Even steep overhangs would be problematic I’d guess. Which then raises the question what the added value of this process is. Seems it’s probably cheaper and just as fast or faster to do it using traditional machining processes.
You make a good point that I should have gotten that information and included it in the article. I followed up with Impossible Objects on this question and have added an update to the article to include this information.
This is only worth as much as its novelty. I’m sure it’s nice to have long fibers in your printed part, but they are only available in one direction. I can’t imagine immense increases in strength and stiffness over a short fiber printed Nylon part, Even if they are there it’s tough to justify considering the construction is on the order of twice as long and has intensive post processing.
It probably has fibres in both horizontal directions, but even if it’s just one, that makes it equal to wood, which has proved a very good material for thousands of years.
In any case, this is optimised for printing wide flat parts where horizontal fibres are all you need.
The carbon sheets are not the woven type we’re used to seeing in cars and sports gear. The sheets consist of strands in random directions, held together with a (polymer) binder.
What are the possibilities of sandwiching passive parts along with traces at the hobby level here?
In other words, could this be used to create multi-layer custom circuit boards at a level on par with hacking ink printers and etching circuit boards?
I was right across from IO! Very cool tech.
Ours is multi material FDM, support, build solid, build flexible (TPU), for example.
http://www.pluralam.com
Laminated 3D objects are really old. Hackaday featured several beyond the ones already linked in the comments. Who is this ‘we’ that has never seen this?
At the Paleontology department at my uni they had students cut stiff paper into layers resolved from CT-scans (and before that spitballed from X-rays) of dinosaur skulls for decades before someone realized this could be done far more reliably and faster by a cutting plotter (and that realization was 20+ years ago…)
Having fibres in an object will not do much for strengthening holes if the holes are simply punched out of fibreboard instead of having the fibres go round the hole, and one dimension has no fibres along it at all.
I’ve not yet seen procedure where what is printed is selected by binder, not cutted. It’s more like fusion of LOM and SLS.
I suppose it’s a combination of additive and subtractive manufacturing. It seems like there will be a lot of waste using this process.
Yeah, it would be nice to know if the part that gets sandblasted away can be recycled at all. Seems to be pretty messy and difficult to seperate the blasting medium and the printing medium.