When the Magic Smoke is released, chances are pretty good that you’ve got some component-level diagnosis to do. It’s usually not that hard to find the faulty part, charred and crusty as it likely appears. In that case, some snips, a new non-crusty part, and a little solder are usually enough to get you back in business.
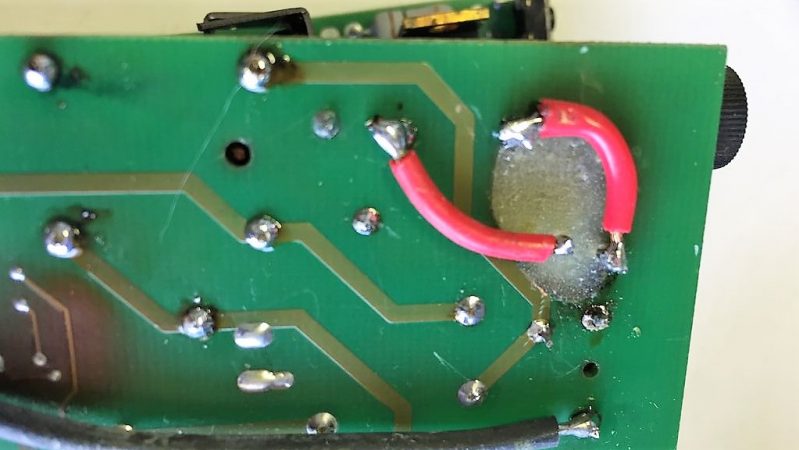
But what if the smoke came not from a component but from the PCB itself? [Happymacer] chanced upon this sorry situation in a power supply for an electric gate opener. Basking in the Australian sunshine for a few years, the opener started acting fussy at first, then not acting at all. Inspection of its innards revealed that some unlucky ants had shorted across line and neutral on the power supply board, which burned not only the traces but the FR4 of the board as well. Rather than replace the entire board, [Happymacer] carefully removed the carbonized (and therefore conductive) fiberglass and resin, leaving a gaping hole in the board. He fastened a patch for the hole from some epoxy glue; Araldite is the brand he used, but any two-part epoxy, like JB Weld, should work. One side of the hole was covered with tape and the epoxy was smeared into the hole, and after a week of curing and a little cleanup, it was ready for duty. The components were placed into freshly drilled holes, missing traces were replaced with wire, and it seems to be working fine.
This seems like a great tip to keep in mind for when catastrophe strikes your boards. There are more extreme ways to do it, of course, but perhaps none so flexible. After all, epoxy is versatile stuff.


I heard that JB Weld is made with powdered steel if I’m not mistaken which could account for its color and strength. It is therefore possible it could be conductive, at least a little bit compared to a regular FR4 board. Has anyone tested this glue to verify how conductive it is?
From their website:
Will J-B Weld conduct electricity?
No. J-B Weld is not considered to be a conductor. It is an insulator.
This is only a question of voltage. I would not use metal filled epoxy for such a repair. You can use glass fiber filled stuff which is for car body repairs.
The last time I had such a damage, I got away with scrapping off the charred epoxy and soldering the wires of the resistors to the remaining traces. This was an A/C board with no replacement available at the beginning of summer.
I tried jb weld on a distributor cap as it was described as non conductive and had high temperature tolerance. At those voltages it was conductive! I wouldn’t want to use it routinely for anything other than LV.
Above comments have confirmed my suspicion that JB Weld is at least slightly conductive. However, I think they make a clear version that has no powdered metal in it. That should be OK for HV applications, though maybe not quite as strong.
So the metal powder is slightly insulated by oxide layers or thin layers of epoxy resin. This remebers me of powdered metal inductor cores. Perhaps you could make custom inductor cores from that stuff.The voltage of eddy currents is usually quite low.
Reminds me of playing with car coils as a kid.
I found that black rubber used on engine/exhaust mounts are conductive/porous enough to pass HV, even around 20-30mm.
I’m guessing there some carbon content for the ‘black’.
There is a metal powder filled version, but I don’t believe the standard JB Weld is that way.
Regular JB Weld is attracted to magnets. Try it!
I’ve been waiting to see the dog pile on the JB weld suggestion. Indeed, I would definitely choose a different two part epoxy without metal particles for any kind of electrical repair. Plenty of good options.
While not normally done for damage that bad, epoxy based fab repair is a standard practice:
http://www.circuitrework.com/guides/3-5-1.html
Depends on the PCB and application for it. I worked for the Danish Railways, where we did repair stuff like that. Old PCB’s that wasn’t replaceable, did get full on repair with epoxy, and components swaps, also new traces.
It’s fun to repair 4 layer boards like that, wheb you have a gaping hole in the middle ;)
Well stone me, what are the chances of that. I had exactly the same thing happen on a door opener about ten years ago in Greece, mended it the same way. The only difference being it was a lizard that suffered a rather unpleasant demise and over a long time foot to tail had been a conducting path live to neutral that got worse. When I took it out the front of the lizard was just desiccated but the back end was part of what was left of the PCB and just carbon.
“Conductive Lizard” is now your punk rock singer name. ;)
Like all cancer surgery just cut it out, but I just go with stiff bridge wires and done.
No, it’s not cancer. :-) But also in burn injuries you have to cut away the dead or charred tissue (Debridement).
Such a repair is childs play on that scale. Louis Rossman does the same thing under microscope on multilayer mother boards, however the fault rate is high, and he usually goes with magnet wire replacement traces. The only reason to do Epoxy PCB repair is if trace placement is important, like maybe in a switching power supply like here.
Thanks for this information! I have a Data Precision 3500 multimeter with a similar problem. Smoke rising directly from a charred area of the PCB. It’s a nice old Panaplex meter, so I’d like to fix it! The charred area is on the high-voltage traces for the Panaplex supply:
https://www.flickr.com/photos/anachrocomputer/35359282033
First thin is to acquire schematics, so you can find out what failed and burned the trace and secondly was might else by affected. It appears that the C52 capacitor is the culprit. Desolder it and test if it is shorted. With a PCB this age, it is only top and bottom traces and the power supply is linear, so some repair wires to bypass any burnt traces is the way to go.
Perhaps the capacitor leaked some electrolyte. It has to be replaced. But of course, at this voltage level (~100V) it is important to remove all burnt and charred epoxy very thoroughly. I don’t think, that a schematic is necessary, but of course helpful.
Some folks replace actual tracks with multiple modwires side by side, this is fine if its done properly.
Interesting randomness: I have heard of people taking a similar shaped track from a donor board and tack Epoxying it in place to maintain the board in original form.
I did not know this was a hack…
Just a standard motor controller repair for me. ;)
http://wolftronix.com/amc230_1135/images/IMG_7670.jpg
http://wolftronix.com/amc230_1135/images/IMG_7771.jpg
http://wolftronix.com/amc230_1135/images/IMG_7773.jpg
The question is why the manufacturers of outdoor devices don’t take the extra bit of time and place a laquer or plastic layer over the traces after the part completes QA? Insects and small lizards are going to enter into an enclosure for shelter at some point, and will investigate the whole thing over time. The coating wouldn’t stop the short, as I’m sure it will break down or be damaged by the critters over time, but the mean time between failures would be much longer.
I have done burnt board repairs in the past. I would caution you to remove the charred material as completely as possible. Carbon is conductive. I would worry more about that than the epoxy. On my first repairs I had arcing even at low voltage.
Yeah. I was also thinking: removing the carbon would be quite enough. No need to fill the hole again with epoxy, unless you want to repair a mounting point. Just keep the hole open and repair dead-bug style.
ahem… On a similar issue, this fix is mine, from about two months ago:
https://hackaday.io/project/158890-resurrecting-a-zombie-mum-5-mum56z40-food-mixer
i have been repairing chard PCBs by drilling them out and jumping them for awhile now, i never really found the need to epoxy them after but i do recommend fully drilling them out or at least drilling until you are fairly past any charing as chard PCB is basically a carbon resistor
now I know why PCB are often green, it must be the chard:
https://en.wikipedia.org/wiki/Chard
s/He fastened a patch/He fashionned a patch/